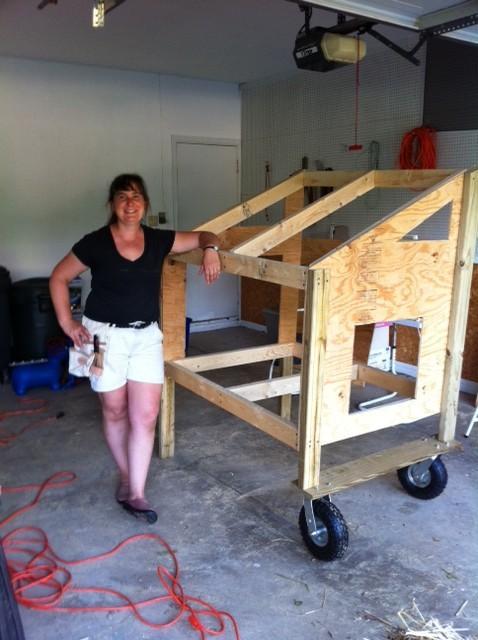
Dh and I had a babysitter this afternoon, so it was a good day of coop building. This is the first he's helped me, and we didn't even come close to killing each other.
After a lot of progress, we ran into a glitch connecting the wheels. There wasn't enough room to secure them directly under the coop's legs. Of course, we didn't discover that until after we drilled the first few holes for the bolts. I am hating the compromise dh talked me into. I don't think they will hold up at all.
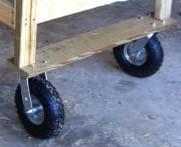
The wheels are the castor-type wheels from Harbor Freight that swivel. Right now, they are secured with bolts into a 1x6 board.
So, I'm thinking I could
1. Replace the 1x6 board with a slightly longer one. This allows the wheels to be placed exactly under the legs, but it prevents the coop from connecting flush-ly to my run. I have already built a 4x8 run, and I'm planning to connect it to the tall side of the coop.
2. Double-up the 2x4 legs to make them 4x4 at the bottom where the wheels connect. Screw the wheels directly into the 4x4s. I might actually have to triple this up to 6x4. The metal plates on the wheels are pretty big.
3. Replace the 1x6 board that connects the legs with a stronger 2x6 board. This will distribute the weight better across the board without snapping.
4. Do nothing. Dh is right. It's strong enough for chickens.
This is my first big project like this, and I could use whatever advice you can muster. Thanks!
After a lot of progress, we ran into a glitch connecting the wheels. There wasn't enough room to secure them directly under the coop's legs. Of course, we didn't discover that until after we drilled the first few holes for the bolts. I am hating the compromise dh talked me into. I don't think they will hold up at all.
The wheels are the castor-type wheels from Harbor Freight that swivel. Right now, they are secured with bolts into a 1x6 board.
So, I'm thinking I could
1. Replace the 1x6 board with a slightly longer one. This allows the wheels to be placed exactly under the legs, but it prevents the coop from connecting flush-ly to my run. I have already built a 4x8 run, and I'm planning to connect it to the tall side of the coop.
2. Double-up the 2x4 legs to make them 4x4 at the bottom where the wheels connect. Screw the wheels directly into the 4x4s. I might actually have to triple this up to 6x4. The metal plates on the wheels are pretty big.
3. Replace the 1x6 board that connects the legs with a stronger 2x6 board. This will distribute the weight better across the board without snapping.
4. Do nothing. Dh is right. It's strong enough for chickens.
This is my first big project like this, and I could use whatever advice you can muster. Thanks!


