First, a disclaimer  I'm a first-time coop builder and have very little experience building anything like a coop.
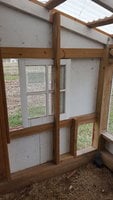
I'm building a 6x10 coop based on plans I purchased. I'm learning a lot from this build, including that novice-friendly doesn't always mean what you hope it means. I'm following along the plans and I'm at the install the windows part. And it basically says just that - install the windows. Now, I didn't know there were so many options with windows. I needed 24"x24" windows and picked up 3 vinyl utility windows at Lowes. From my extensive googling, I can tell you that they have a nailing fin and an integrated J-channel (it says that on the online description, but now I actually know what that means ).
).
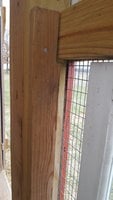
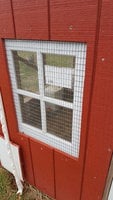
I'm trying to figure out the best way to install them since the nailing fin and J-channel causes the window to stick out from the side of the coop wall further than I expected. The J-channel is wider than a 1x4, but narrower than a 2x4. I found "brick molding" that might work if I file it down a little where it meets the corner of the window due to a seam that sticks out a bit there.
Does anyone have experience installing these type of windows on a coop where the siding is already up? What's the best way to be sure I don't have any water leakage? I do already have window flashing tape to use for the install and watched a couple of videos on how to use it. Does the fact that the window sticks out away from the coop wall change anything when installing it?
I hope that's clear. I plan to install windows this weekend, and I'm trying to plan it out.
Thanks!
 I'm a first-time coop builder and have very little experience building anything like a coop.
 I'm building a 6x10 coop based on plans I purchased. I'm learning a lot from this build, including that novice-friendly doesn't always mean what you hope it means. I'm following along the plans and I'm at the install the windows part. And it basically says just that - install the windows. Now, I didn't know there were so many options with windows. I needed 24"x24" windows and picked up 3 vinyl utility windows at Lowes. From my extensive googling, I can tell you that they have a nailing fin and an integrated J-channel (it says that on the online description, but now I actually know what that means
 ).
).I'm trying to figure out the best way to install them since the nailing fin and J-channel causes the window to stick out from the side of the coop wall further than I expected. The J-channel is wider than a 1x4, but narrower than a 2x4. I found "brick molding" that might work if I file it down a little where it meets the corner of the window due to a seam that sticks out a bit there.
Does anyone have experience installing these type of windows on a coop where the siding is already up? What's the best way to be sure I don't have any water leakage? I do already have window flashing tape to use for the install and watched a couple of videos on how to use it. Does the fact that the window sticks out away from the coop wall change anything when installing it?
I hope that's clear. I plan to install windows this weekend, and I'm trying to plan it out.
Thanks!


