- Apr 2, 2012
- 46
- 40
- 24
We decided to create a new post or each stage since the original thread would get too long with all the pictures and stuff
PLEASE NOTE!
 THIS IS STAGE TWO OF FOUR that we will have for the coop. We WILL put the drawings with FULL dimensions up within a couple of days.. Thanks for your posts and comments!
First, a picture of Hawk @ 3 weeks old.. most wing deather in and wanting to fly the friendly skies!

Hawk at 3 weeks old, wanting to get out to his new place (not yet hawk!)
Stages
First stage will be basic structure with floor. ** COMPLETED ** Direct link to first stage
Second stage will be walls/Laying compartment - This page
Third stage will be roof and venting.
Forth stage will be any remaining stuff for the coop
Fifth stage our protective run, since in Connecticut we have many predators (Hawks, Skunks, Raccoons, Opossums, Fisher Cats, Owls..)
After we complete the build I will edit this thread to put all materials and prices in one collection. Prices here are a reflection on NEW materials from one of the large chain stores.
Well here we go!
Time required: 2 Hours
Tools needed:
Circular Saw, Drill, Square, Pencil, Chalk Line, Safety Glasses
Materials for Stage Two
4 - sheets of T-111 exterior grade textured board ($25.00ea. Total: $100.00)
4 - 2x4x8 ($2.80ea. Total 11.20)
1 box of 1.5" weather-grade screws. ($9.00)
1 Gallon of Olympic Latex Exterior Grade Paint ($26.00)
1 tube of Elmer's exterior wood glue ($6.00)
various brushes and rollers (we have these items)
Total cost for Stage Two: $152.20 + tax
We chose pre-primed T-111 and painted directly to do i good job and not needing to prime it ourselves first.
OK, let's get some work done, the chickens are waiting!
Step 1 : Add 2x4's to support walls and roof line pitch
We measured and cut two 2x4x8 to 72".. We screwed them to the top and back supports. We decided to have a 15" overhang on the front, this will help with our plans for a better venting system.

Picture of roof supports, to help keep everything plumb when hanging walls
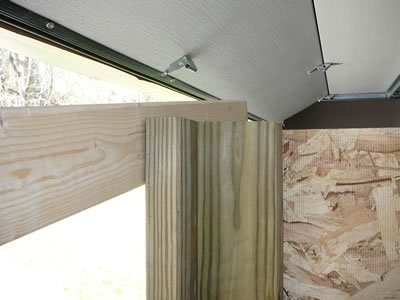
Front roof brace, set 1" above top

Please note.. Make sure ALL support legs are plumb prior to screwing these down. These are more to help with holding everything square so make sure they are!
Step 2 : Add 2x4 sections into base of flooring.. - Last week after finishing up , we noticed that we were going to need additional 2x4's to fill in the holes created by the original Purina design.. this will stop critters like mice from entering..
Now we used the wood last week we had left over for the most part, but if you use new board, just cut the following and screw like this picture below to align with flooring
2 pcs of 2x4 cut to 42" - for the two sides
2 pcs of 2x4 cut to 67" - for the front and back
Screw in well using screws from last week (3") do this for all four sides your flooring should now match up to outer legs so that we now can add the outside walls.
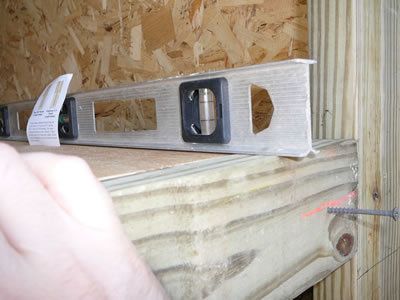
Use a level to make sure 2x4's stay even with plywood flooring.

Another picture of what these 2x4's will do
THE WALLS
We did make all the cuts first, since I wanted the girls to paint the first two coats prior to hanging.. here they are doing their part! ( we are only painting the exterior surfaces)

Everybody is busy for the chickens!
Step 3: Make cuts for front T-111 wall - measure and cut the front wall to 47" high by 75" wide.. (again check your measurements on your coop to verify) mark, snap a chalk line and cut. Then install making sure the bottom edge aligns with the boards at the bottom 2x4's you just installed. Use the 1.5" screws to secure.. we went every 1 foot between starting about 4 inches in from any edge to minimize chances of splitting any boards.

Mark and chalk then cut
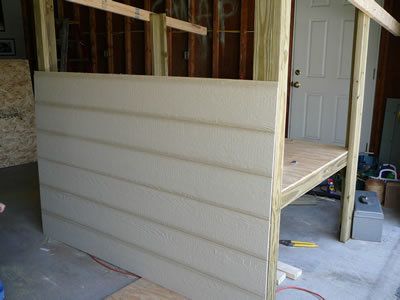
Front wall prior to mounting
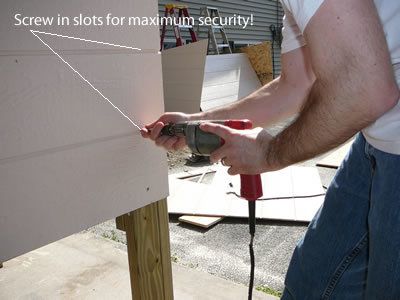
Add screws to the slots for maximum security
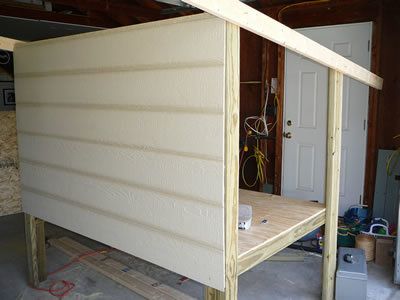
Front wall after mounting
Step 4: Make cuts for the two sides T-111 walls - measure and cut the front wall to 47" high in the front corner, 39" high in the back corner by 51.5" wide.. (again check your measurements on your coop to verify) mark, snap a chalk line, to get the angled cut, just mark and snap the chalk line to get the proper angle (please see picture below for measurement guide). Then install making sure the bottom edge aligns with the boards at the bottom 2x4's you just installed. Use the 1.5" screws to secure.. we went every 1 foot between starting about 4 inches in from any edge to minimize chances of splitting any boards.
If you want to make one verify and then duplicate, just make sure to flip board over so that you have a mirror of the first or you will have two walls that will be of one side.. ( external face needs to be the opposite)
make sure the right and left walls extend to meet the face of the front wall as seen below

Left side cut seen here prior to hanging

Right side after hanging with dimensions
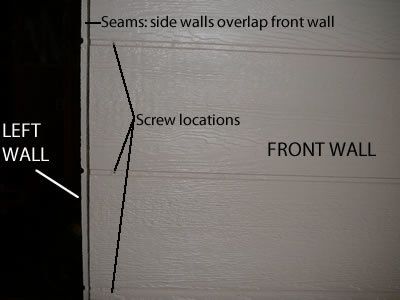
Screw area and seam location (looking from front wall)
Step 5: Cutting back T-111 wall
Now, we have cut our back wall, here are the dimensions: but we are holding off on mounting until next week. Why? well we are changing up the plans again.. we have decided to cut the back wall in half and we will be mounting so they swing open to the left and right instead of opening to the ground as in the original plans. We figured the weight would be too great on the hinges and for the kids to lift it back into place by themselves. This will also allow us the convenience of only needing to open half of the back if needed.
So we will post our supplies next week to put the back on..
Step 6: Cutting in front door
We placed our door 3" off the floor of the coop, so to do this the easy way, we just measured the inside of the coop center and then up 3" and put a screw in to mark it on the outside.
Then measure 6" to each side and 12" up with a square to cut out our opening,

Measure each side of the screw 6" for 12" opening

I used a circular saw to make the cutout
Bam! the cutout door for the chickens!
Step 7: Chicken Nesting Boxes
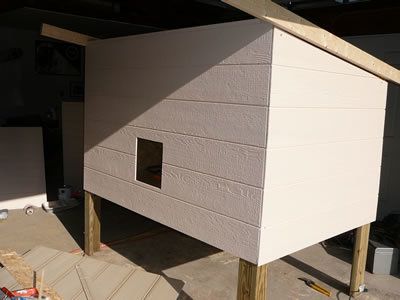
OK, we considered a few things for our needs and location of this unit. we are placing the chicken nesting boxes on the right hand wall.. this will allow us to access it from outside the enclosed run that we are building, but the same concept on which wall to place is the same. We also plan on adding two plexiglass windows to the front for light and a removable venting system so that in the winter we can close it up if it gets too cold. (but those are down the road in week 4 projects.
Since we have 6 hens, we are planning on 3 nesting boxes... the dimensions and build process I will put up here tomorrow night, but here is the picture of the location!

Preview of where we will be placing our chicken nesting boxes
** UPDATE ** PDF Drawing are hosted on mediafire, get them here: www.mediafire.com/?cn9fc8h5pa1lggi
Unfortunately I have to work
 and we are consistently making adjustments to fitting our needs in stage 3 and 4 and don't want anyone wasting wood due to our changes.. So I'd rather hold off on putting more information up when we may change it.. We don't want anybody wasting $$ on this project.
PLEASE NOTE!
First, a picture of Hawk @ 3 weeks old.. most wing deather in and wanting to fly the friendly skies!
Hawk at 3 weeks old, wanting to get out to his new place (not yet hawk!)
Stages
First stage will be basic structure with floor. ** COMPLETED ** Direct link to first stage
Second stage will be walls/Laying compartment - This page
Third stage will be roof and venting.
Forth stage will be any remaining stuff for the coop
Fifth stage our protective run, since in Connecticut we have many predators (Hawks, Skunks, Raccoons, Opossums, Fisher Cats, Owls..)
After we complete the build I will edit this thread to put all materials and prices in one collection. Prices here are a reflection on NEW materials from one of the large chain stores.
Well here we go!
Time required: 2 Hours
Tools needed:
Circular Saw, Drill, Square, Pencil, Chalk Line, Safety Glasses
Materials for Stage Two
4 - sheets of T-111 exterior grade textured board ($25.00ea. Total: $100.00)
4 - 2x4x8 ($2.80ea. Total 11.20)
1 box of 1.5" weather-grade screws. ($9.00)
1 Gallon of Olympic Latex Exterior Grade Paint ($26.00)
1 tube of Elmer's exterior wood glue ($6.00)
various brushes and rollers (we have these items)
Total cost for Stage Two: $152.20 + tax
We chose pre-primed T-111 and painted directly to do i good job and not needing to prime it ourselves first.
OK, let's get some work done, the chickens are waiting!
Step 1 : Add 2x4's to support walls and roof line pitch
We measured and cut two 2x4x8 to 72".. We screwed them to the top and back supports. We decided to have a 15" overhang on the front, this will help with our plans for a better venting system.
Picture of roof supports, to help keep everything plumb when hanging walls
Front roof brace, set 1" above top
Please note.. Make sure ALL support legs are plumb prior to screwing these down. These are more to help with holding everything square so make sure they are!
Step 2 : Add 2x4 sections into base of flooring.. - Last week after finishing up , we noticed that we were going to need additional 2x4's to fill in the holes created by the original Purina design.. this will stop critters like mice from entering..
Now we used the wood last week we had left over for the most part, but if you use new board, just cut the following and screw like this picture below to align with flooring
2 pcs of 2x4 cut to 42" - for the two sides
2 pcs of 2x4 cut to 67" - for the front and back
Screw in well using screws from last week (3") do this for all four sides your flooring should now match up to outer legs so that we now can add the outside walls.
Use a level to make sure 2x4's stay even with plywood flooring.
Another picture of what these 2x4's will do
THE WALLS
We did make all the cuts first, since I wanted the girls to paint the first two coats prior to hanging.. here they are doing their part! ( we are only painting the exterior surfaces)
Everybody is busy for the chickens!
Step 3: Make cuts for front T-111 wall - measure and cut the front wall to 47" high by 75" wide.. (again check your measurements on your coop to verify) mark, snap a chalk line and cut. Then install making sure the bottom edge aligns with the boards at the bottom 2x4's you just installed. Use the 1.5" screws to secure.. we went every 1 foot between starting about 4 inches in from any edge to minimize chances of splitting any boards.
Mark and chalk then cut
Front wall prior to mounting
Add screws to the slots for maximum security
Front wall after mounting
Step 4: Make cuts for the two sides T-111 walls - measure and cut the front wall to 47" high in the front corner, 39" high in the back corner by 51.5" wide.. (again check your measurements on your coop to verify) mark, snap a chalk line, to get the angled cut, just mark and snap the chalk line to get the proper angle (please see picture below for measurement guide). Then install making sure the bottom edge aligns with the boards at the bottom 2x4's you just installed. Use the 1.5" screws to secure.. we went every 1 foot between starting about 4 inches in from any edge to minimize chances of splitting any boards.
If you want to make one verify and then duplicate, just make sure to flip board over so that you have a mirror of the first or you will have two walls that will be of one side.. ( external face needs to be the opposite)
make sure the right and left walls extend to meet the face of the front wall as seen below
Left side cut seen here prior to hanging
Right side after hanging with dimensions
Screw area and seam location (looking from front wall)
Step 5: Cutting back T-111 wall
Now, we have cut our back wall, here are the dimensions: but we are holding off on mounting until next week. Why? well we are changing up the plans again.. we have decided to cut the back wall in half and we will be mounting so they swing open to the left and right instead of opening to the ground as in the original plans. We figured the weight would be too great on the hinges and for the kids to lift it back into place by themselves. This will also allow us the convenience of only needing to open half of the back if needed.
So we will post our supplies next week to put the back on..
Step 6: Cutting in front door
We placed our door 3" off the floor of the coop, so to do this the easy way, we just measured the inside of the coop center and then up 3" and put a screw in to mark it on the outside.
Then measure 6" to each side and 12" up with a square to cut out our opening,
Measure each side of the screw 6" for 12" opening
I used a circular saw to make the cutout
Bam! the cutout door for the chickens!
Step 7: Chicken Nesting Boxes
OK, we considered a few things for our needs and location of this unit. we are placing the chicken nesting boxes on the right hand wall.. this will allow us to access it from outside the enclosed run that we are building, but the same concept on which wall to place is the same. We also plan on adding two plexiglass windows to the front for light and a removable venting system so that in the winter we can close it up if it gets too cold. (but those are down the road in week 4 projects.
Since we have 6 hens, we are planning on 3 nesting boxes... the dimensions and build process I will put up here tomorrow night, but here is the picture of the location!
Preview of where we will be placing our chicken nesting boxes
** UPDATE ** PDF Drawing are hosted on mediafire, get them here: www.mediafire.com/?cn9fc8h5pa1lggi
Unfortunately I have to work
Last edited:


