My Lil Tiny Coop Build...

fieroboom

In the Brooder
7 Years
Oct 2, 2012
17
1
24
Hey guys & gals, my wife & I decided that we wanted to get some chickens (well, I decided, and had to promise her the kitten she & our lil girl have wanted for a while to get her on board...). We're planning to go get 4 Red Stars in the next day or two...

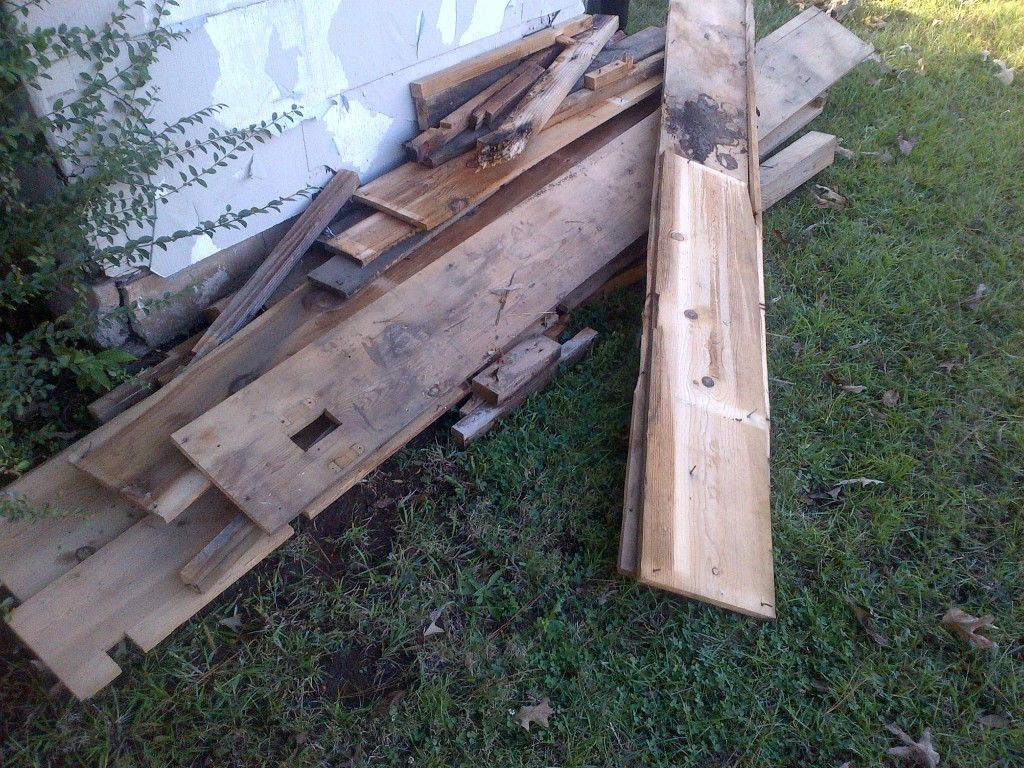
So, we started building our coop. It's pretty small, but having had chickens before, I'm fairly sure it'll be sufficient. So far, the total cost of this build has been $4 for a box of screws, $2.37 for some hinges, and $3.50 for a couple of 8' 2x2s; everything else was found on the side of the road. :D

Here is our pile-o-loot before construction:


And here's my super-specific-absolutely-to-scale blueprint of what I had in mind... ;)


We have a picket fence around our little backyard area, so I wanted the nesting boxes to overhang into the fenced area for easy collection. Also, the two main front-to-rear supports are notched and resting on top of the top fence runner. This allows us to pick up the entire assembly and move it to another fence panel when the grass underneath thins out or gets too messy, etc.
This is a rental house, so this coop was designed with portability & cleanliness in mind regarding the landlord's property...
 
Looks great!!! Good luck
big_smile.png
 
So, after drawing it out, we got to work. We pulled, straightened, and re-used most of the nails from the pile-o-loot, except where I felt the need to use screws. I prefer screws in structural joints, because they don't tend to loosen as quickly as nails.
After our first day's work, we had the basic frame up:


And my wonderful lil helper :)


I get off work at 4pm every day, so with fall approaching, I have about 2 hours every day to work on it before it gets dark.
The 2nd day of building got us to this stage:


The lattice is just positioned there for ideas... That's not the final run size...
My lil helper, super 'cited to nail her own board! :D


Whew, day #3 got us to this stage:


My lil helper, again... Soooo faithful (cuz she's a daddy's girl... ;) )


And this is her begging for the new kitten... How could anyone possibly resist that??!? :)


Back to the build pics:


I had planned on a hinged roof piece for the laying boxes back here, but the sizes of wood I had didn't really allow it, so I made a fold-down rear wall:


And that's how it's sitting right now. We recently moved, so the only tools I could find were my Skil Saw with a rough-cut blade, and a tape measure... I bought a couple of yard sticks to use as straight edges too. I'm really surprised actually, because without a square or level, I'm within 1/8th inch of being square! Woohoo!! :D

We're planning to go get our birds this afternoon, and will probably just keep them in the garage a few hours while I finish up enclosing the coop.

Questions & comments are always welcome! :)
 
OMG, how could I forget my wife's feeder? I came home yesterday, and this is what she had made from a plastic olive jar:


The jar's capacity is around 1/2 gallon or so, and I believe that should be plenty for now. We're gonna have 4 birds, but they have a LOT of acreage to free range, so I don't think we'll even have to fill it every day.
big_smile.png


EDIT:
She sent me some more pics of her feeder:


Last edited:
looks great!!!!!! what we did for our feeder is used a plastic container that you can get at Home Depot / Lowe's and attached a metal oil pan to the bottom. my hubby pole sawed holes around the bottom so it self feeds. holds 35 lbs for 25 feathered friends we have
 
So my wife just sent me a text, and she's been gathering "hay" from the field next to our property... They cut this field maybe once a month with a bush hog type mower, and leave the clippings where they lay. It's already been drying in the field for about a week, so she and the lil helper gathered a bunch up and spread it out on our deck to dry.

Mommy & lil helper:


Lil helper loading the wheelbarrow:


Our "Hay" drying on the deck:


She also went down to the tree line and got some pine straw... My father owns a tree business that I used to run with him, so if we run out of hay & pine straw, I have plenty of access to nice wood shavings, and can even make them fresh if I need to. I also have plenty of cedar wood laying around, so I can make cedar shavings too, and we'll just try them all & see what our chickadees like best!
smile.png
 
Wow, I didn't realize it had been this long since I last posted!! I wasn't quite finished with enclosing the coop when we got our hens, so that night I just threw some boards on it, slapped a piece on for a roof, generally made it safe for them, and called it a night. The next day (day #4 of building) I got it mostly completed, minus the "little touches," and here are some pics of the building fun:

Day #4 - Roof, Ramp, and End Walls:


Day #5 - Rear Vent Cover, Front Door, and Roost:


The plexiglass in the front door was also something I found in that pile-o-loot on the side of the road. I used the oak 1x2 rough-cut pieces for the surround, using my skil saw to cut a notch lengthwise in the 1" side. I then fitted the plexiglass in the pieces, and screwed them together on the corners. I had some small hinges in the toolbox, so I put those on it, and voila! :eek:)
The roost is just a small maple tree I found in a wooded area out back. I cut it down and mounted it with plumbing strapping to the side 2x2 supports.

The front roof is just a piece of Luan paneling cut to size, and the rear roof is a mix of 1-by boards because I didn't have anything the full right size. I still need to seal the Luan and waterproof the rear. Luckily, I found a stack of shingles in an old shed that my landlord said I could go through, so those will be going on the rear, and I'll probably just paint the Luan. :eek:)
 

New posts New threads Active threads

Back
Top Bottom