We took our kiddos to TS one day and they flipped out over the baby chicks. Long story short, we now have baby chicks. I didn't want to sink a lot of money into the coop. Looking around, I located some 14' 2x6s left over from some other projects.

Like any well meaning dad, I started googling and youtubing. I came across SSLFamilyDAD and his coop
. The best I can tell, it was based off the Wichita Coop. I wanted to incorporate the nesting boxes and a storage/water locker onto the coop platform for a couple of reasons.
1. 4x6 will provide more shade in the summer
2. keep water tank from freezing in the winter
3. storage locker to keep feed and bedding.
I took the typical 4x4 table top and made it a 4x6.
Pulling the old rusty nails out of the lumber and cutting the lumber down to size.

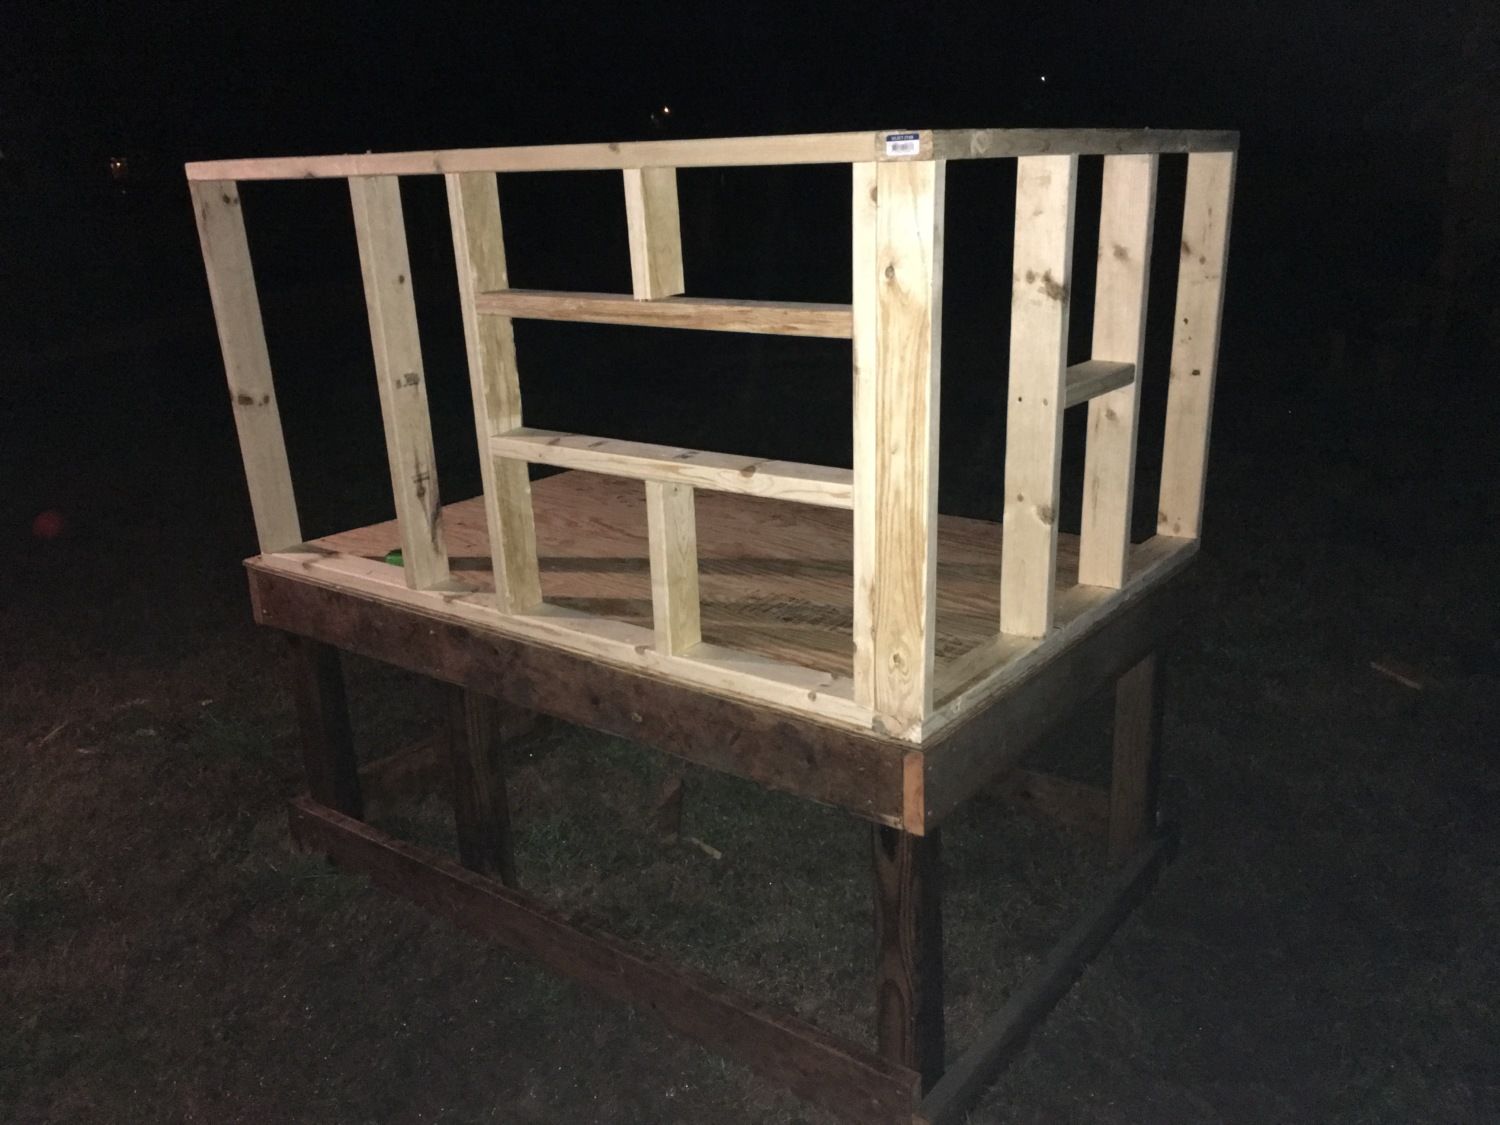
A lot of my work was done after dark, after the kids were down...and the weather has been exceptional, 30-40s and rain rain rain...I used 4x4 posts for the legs and 2x6's on the runners. The side of the front door is a 2x4. I was afraid the 2x6 would be too big for the chicks to climb over to get under the shade.
2x4 on the bottom front side of the coop, pictured below. Everything else is a 2x6


Nesting boxes. I tried to use all the left over lumber I had before buying 2x4s from the big box stores. (right) This is the back side of the nesting box. On the front side, there is a 2x6 running vertical across the front, to keep eggs in and pine chips out. I then placed some scrap 2x4s on their side and attached plywood on top. This elevated the nesting boxes just a little.

This is the base for my clean out door. I took some spare 4x4s and cut them down. My large coop door will sit right on top of this.


Big E helping out on a lumber run.

I bought roofing joist hangers ($.84 a piece) to attach my rafters. They were cheap and I didn't have to cut into the 2x4s, thus weakening the roof. The tall side was designed to be 4' high and the low side 3'. This would make using a 4x8 sheet of plywood easy to cut and fit into place. I based the design on using 2x4s on the bottom and not the 2x6s. So I have a little bit of a lip on the bottom. I'm looking at attaching hardware cloth to the bottom and then use a trim board to even it all out.

Clamps are a man (or woman's) best friend when working alone. Here you can see the 8" overhang on the roof line. The rafters are about 5'6" or so long. I wanted just enough to keep the rain off the coop and windows/doors.

(left pic) Here you can see the door opening and the clean out.
(right pic) Nesting boxes on the left. Water tank locker on the right. You can't see it here, but I installed a roof across the top of the nesting boxes. So there is a large storage slot there. (detailed pic later)


When I was measuring, I got a little ahead of myself. I cut the plywood down and then cut the window out. I then measured and cut out the rafter openings...this made my window cut off. I'm going to remove the horizontal beam you see in the window and move it up, out of the way.


Lower roof line. I wanted to seal it up almost all the way and just leave a small gap for airflow.

I added plywood and was going to shingle the roof but later took it off and added a metal roof. The rafters did not extend all the way to the end so I have a small gap on each end. I'll probably cover it with hardware cloth and leave it open, again for the air flow. It doesn't get super cold down here (South east) and I've been able to hold a good temperature in there while testing it out before we added chicks.

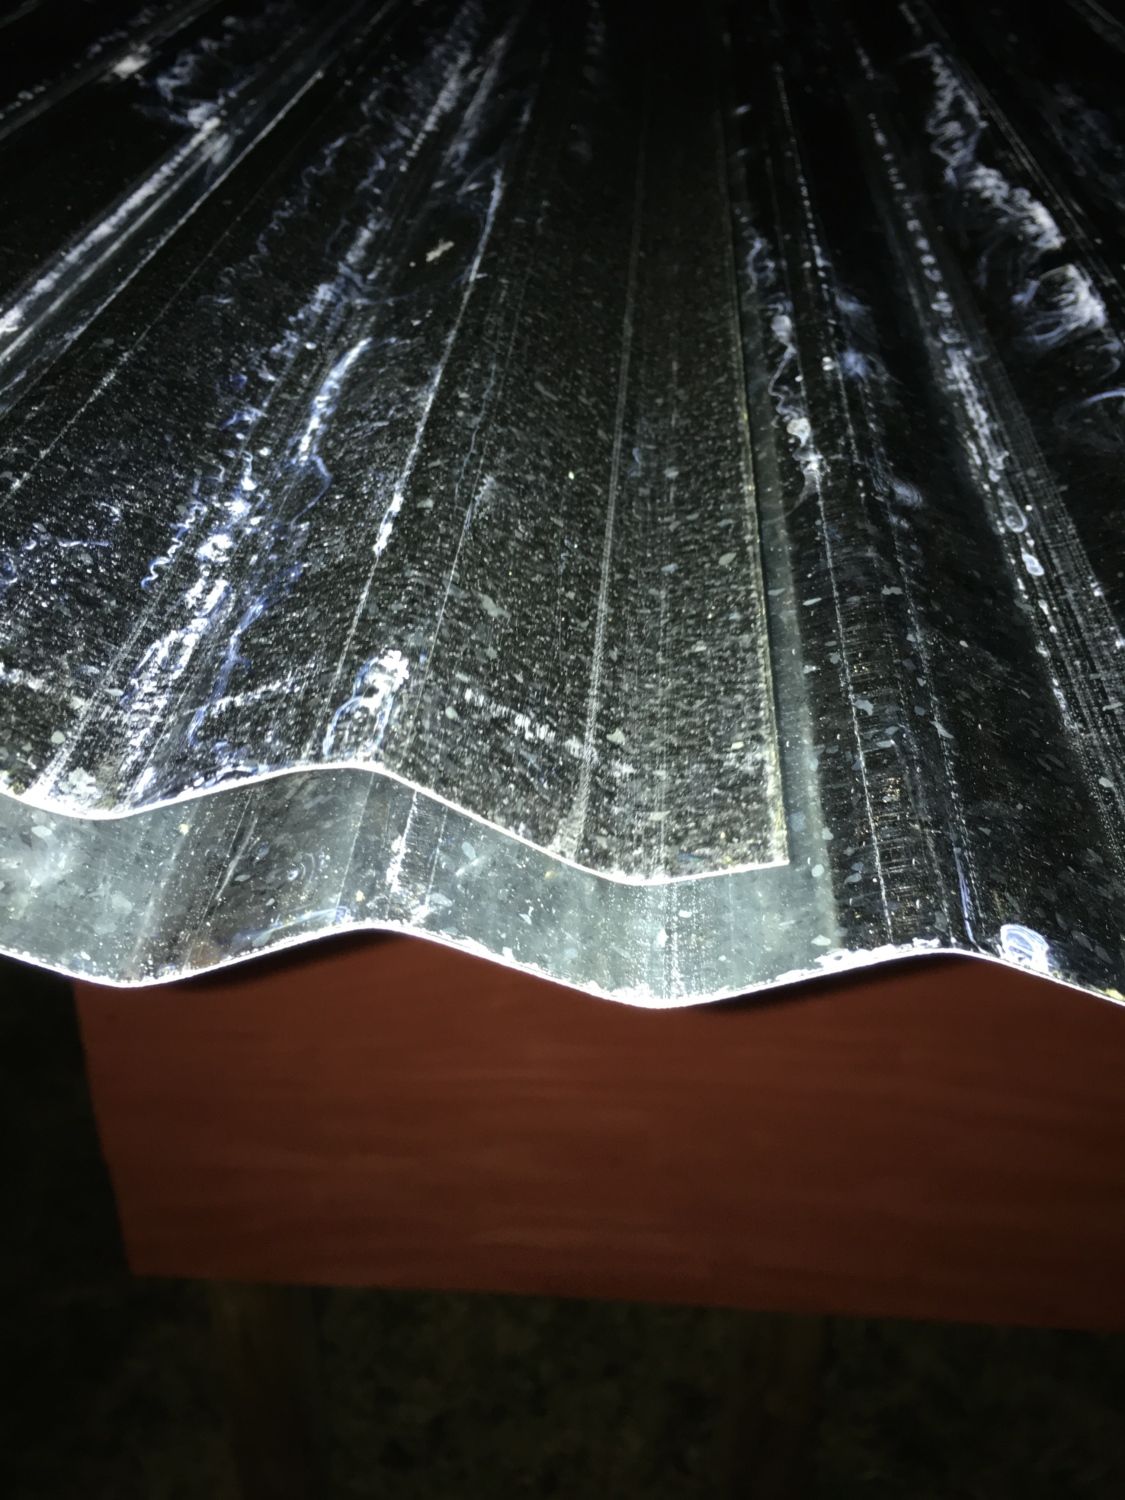
Left: Correct way to lay metal roof. Keeps falling rain from creeping up under the panels...
Right: Incorrect way

I decided to install the 4 roof panels before cutting to avoid any miscalculations. The coop was built on a 4x6 but it's a little off here and there. I ran a support joist to have something to attach the roof to. Same thing done on the other side.


Semi finished. 1 coat of paint on, still 1 more to go. We are going to trim it out with white around the coop and doors / windows to give it a nice finished look. The weather has not been cooperating thus far.


We decided to keep the brooder in the coop.
1. Less mess inside
2. We don't have a garage or a lot of extra room w/ 2 little ones running all over the house.
3. I've read and believe it will help them acclimate better to the weather quicker.
If and when we do some more baby chicks. I'd like to do something with more of an outside view so they can start from day 1 looking at their surroundings. I've heard it helps them assimilate better as they get older. They are still pretty skittish but we are only on day 2.
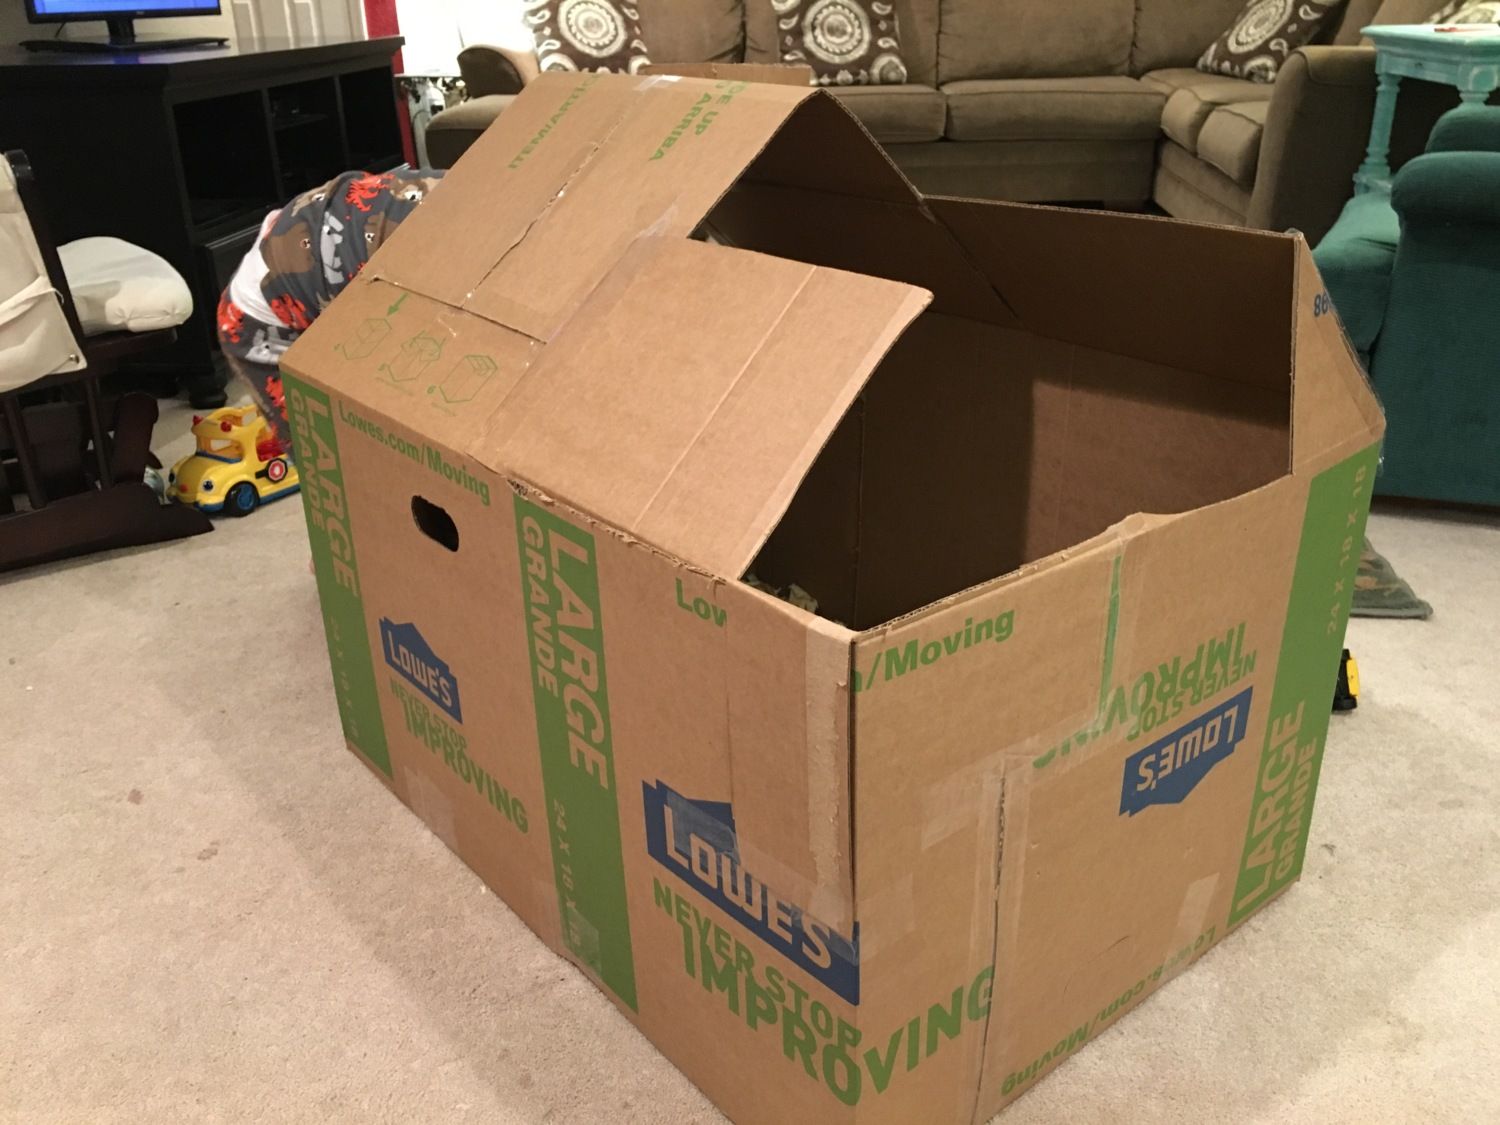
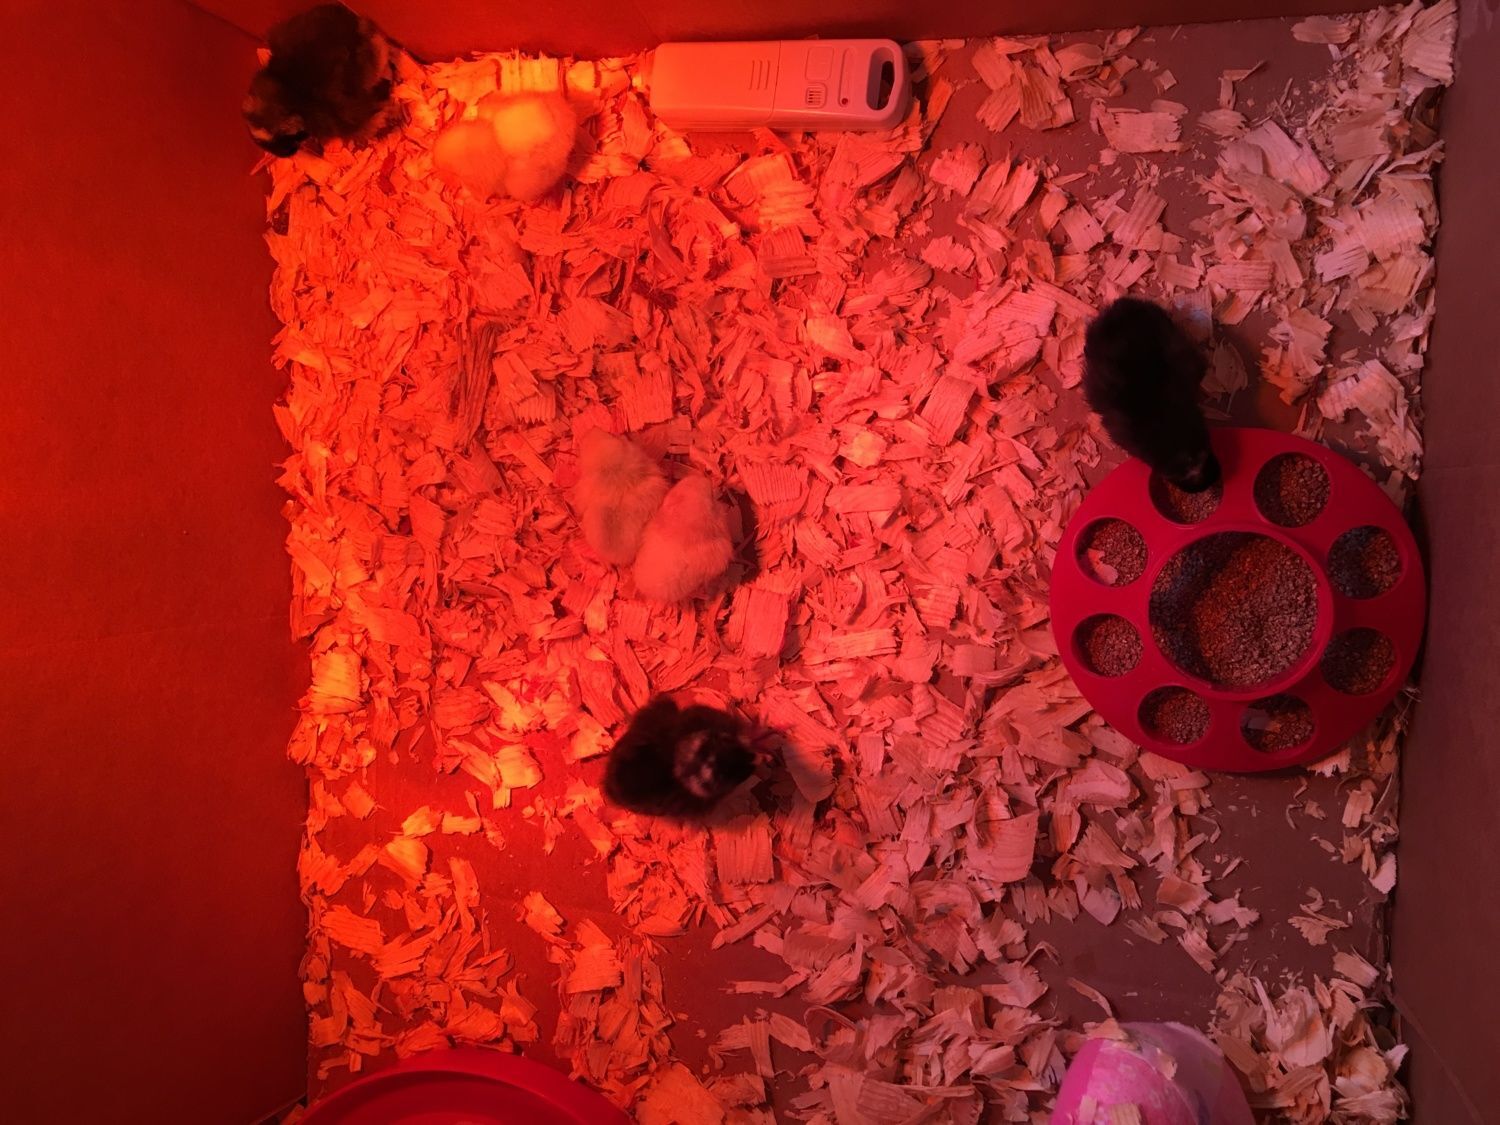
Brooding box fun. We used 2 cardboard boxes, cut and taped.
The roof in the back was for fun, but also helps keep some heat in the box. I ended up cutting the half roof off both front sides to allow for the heat lamp.

We kept it inside for a couple of hours to let the kiddos look and see the "chi-chins"

Here you can see inside. I had too many pine chips inside and took a bunch out. They were buried in them. Water is furtherest from the heat. I also added an old teddy bear. 1st time with chickens but I read it helps them feel like they have a brooding hen. This made sense to me and I've caught them all hanging out under there several times. It's usually their go to hiding spot when I come to wipe some butts. Plus it holds the warmth and gives them something to climb on.


Extras:
Inside the coop, looking towards the water locker (left) and nesting boxes (right).

Nesting box and water locker (aka tool shed right now). The water locker is designed for a 15 gal water barrel. I'm going to run it out the bottom to some poultry nipples on a line of pvc.

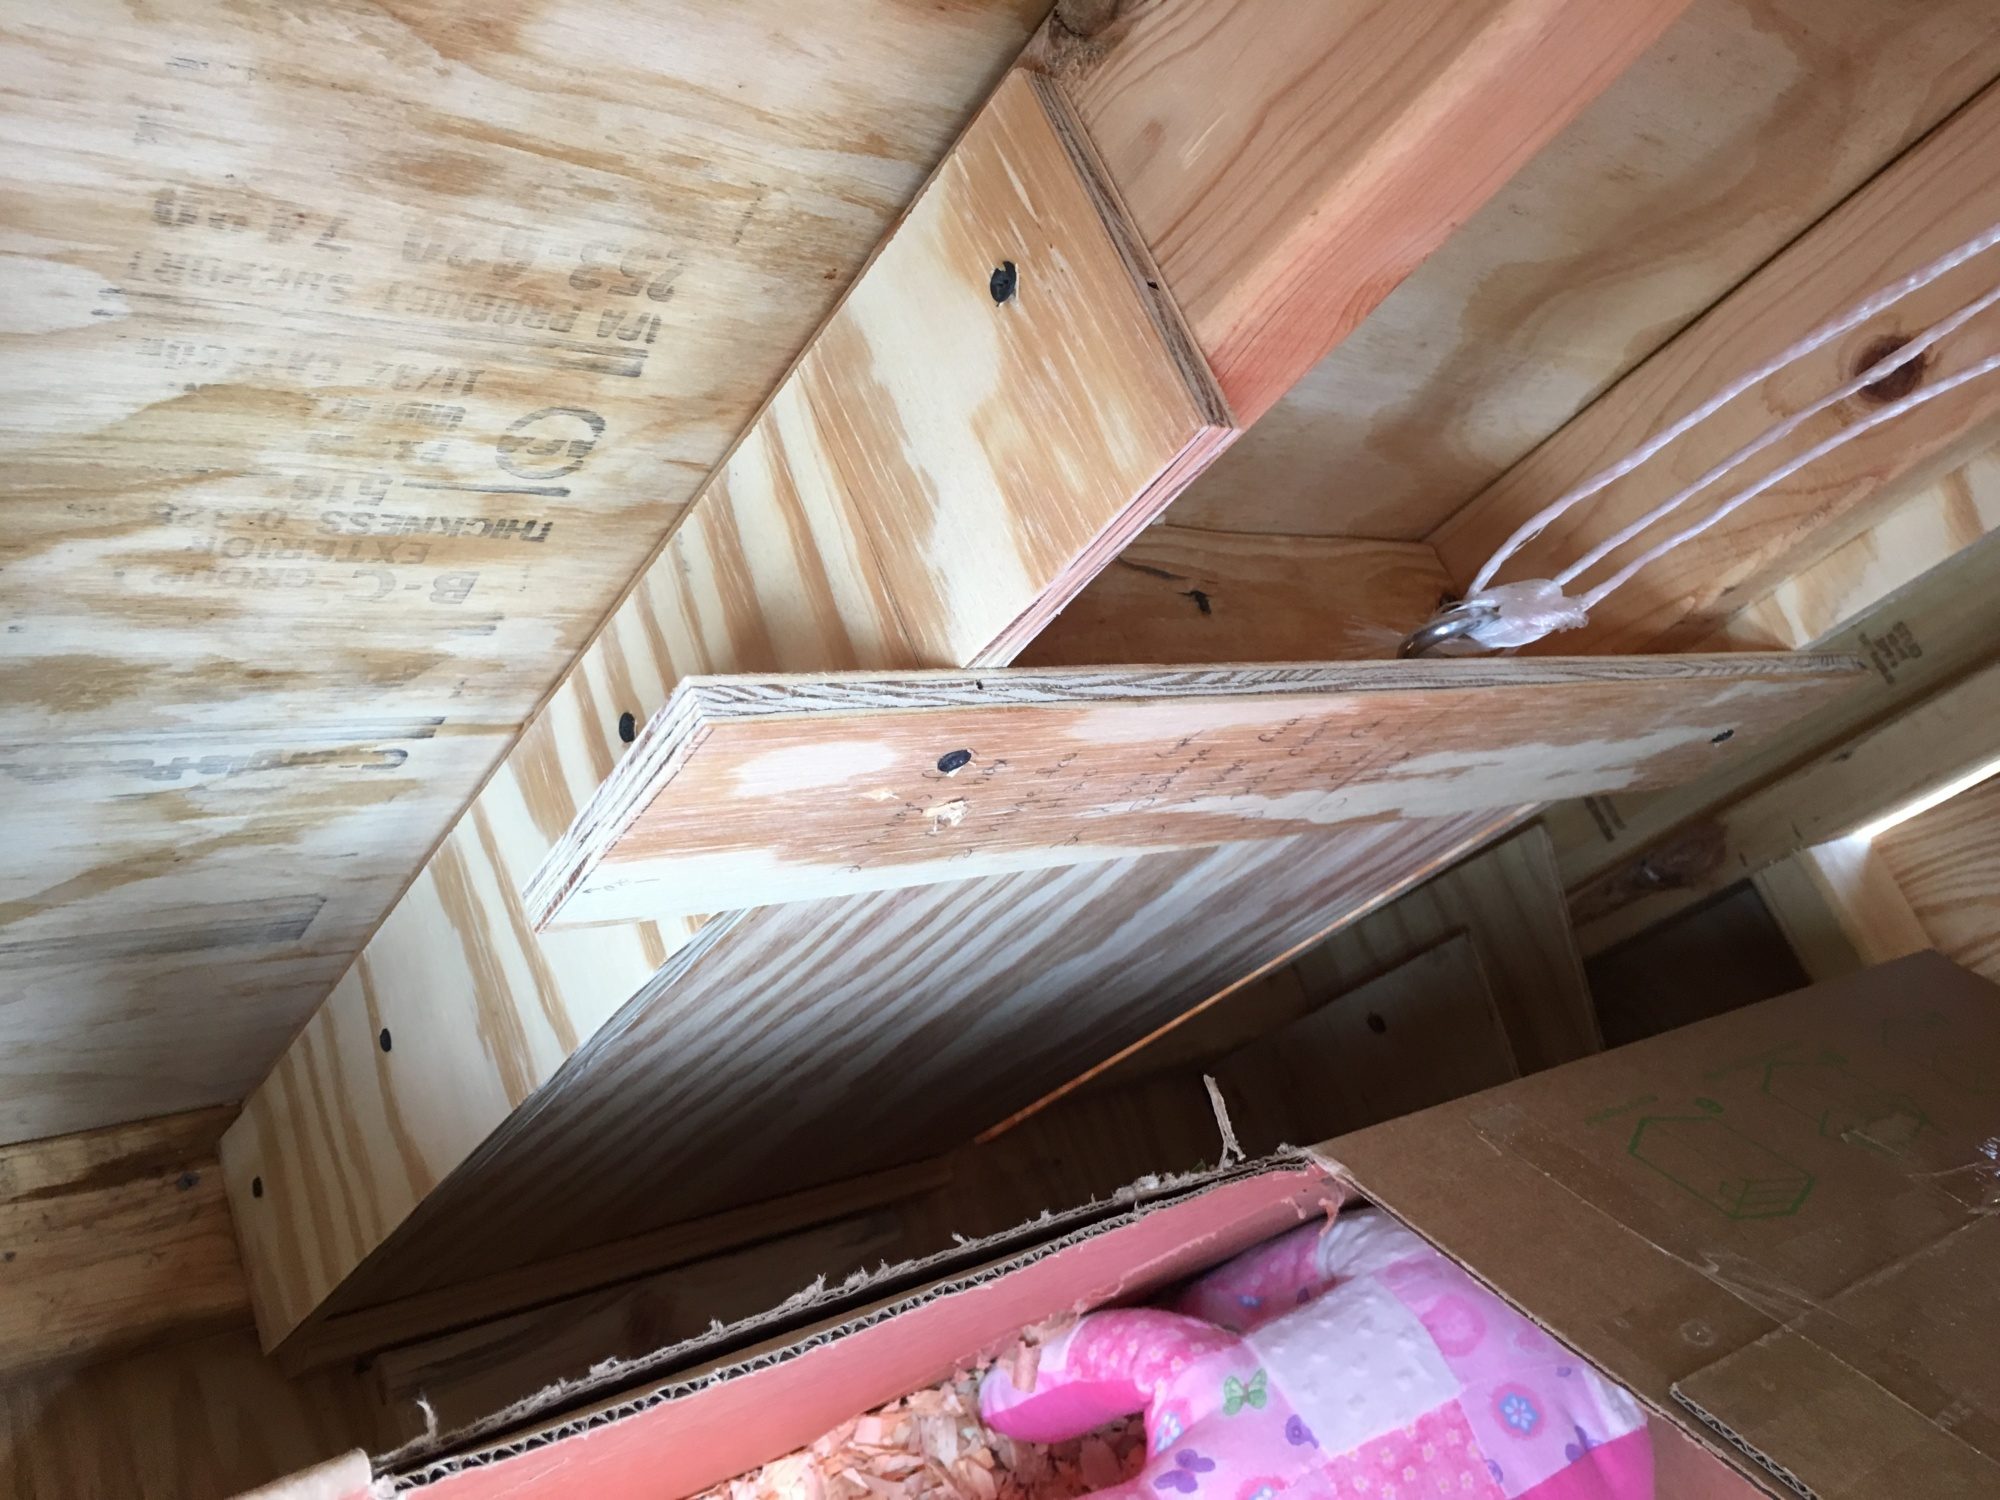
Open top storage above the nesting boxes. I've got the extra bedding and feed up there right now.


Used left over plywood to make a chicken door track. Screwed in some eye bolts and left over twine...google it, there are several ways to do this.
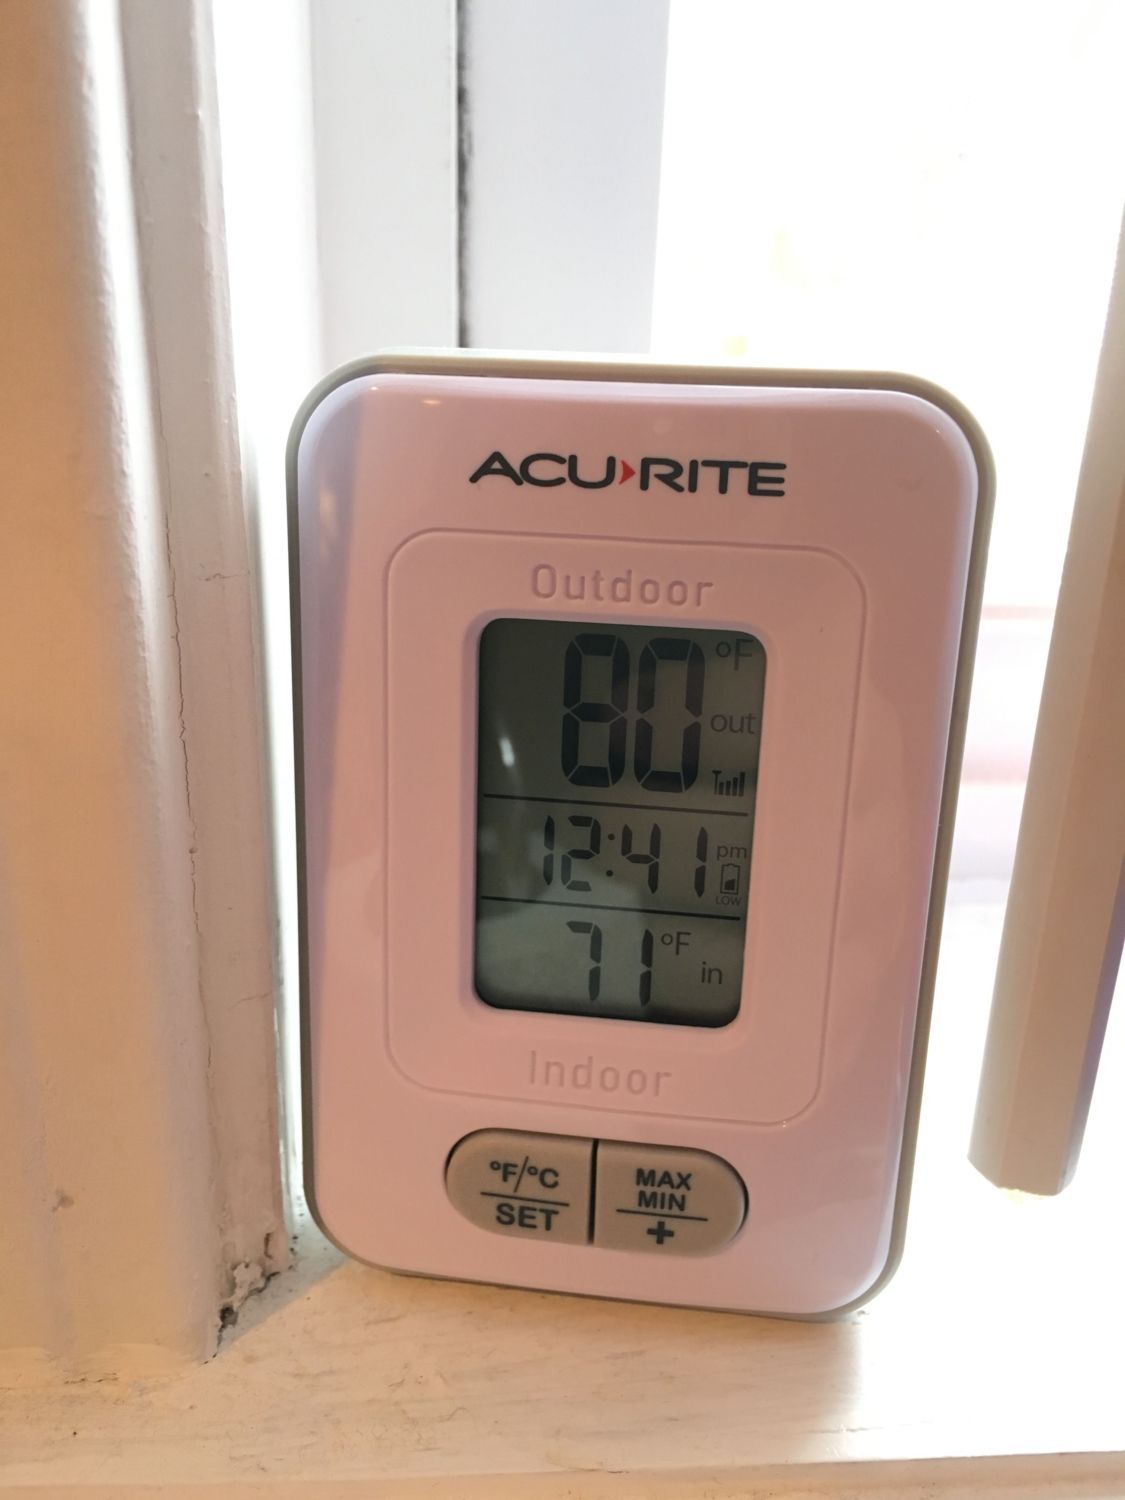
Probably the best $10 investment I made. Wireless thermometer I got from big box super store. The rectangle on the top of the box (right) is the thermostat. The readout station is kept inside. I've moved it to the top right corner on the heat lamp side. It stays between 81-92. When I set it directly under the light it was at 94-101. It did drop down to 80 after I had the door open wiping some pasty butts.
We have 3 ISA Browns and 3 unsexed Plymouth Rocks. The Rocks were trying to escape the temporary container we got from TS when we bought them....So 2 of them have been named Eastwood (see Escape from Alcatraz) and El Chapo. The others we are still working on names for.
When the weather warms up and stops raining, I'll finish the paint, trim and HC. Then time for a bird run. We plan to free range them as much as possible. I'll try and update new pics when its finished.
Like any well meaning dad, I started googling and youtubing. I came across SSLFamilyDAD and his coop
1. 4x6 will provide more shade in the summer
2. keep water tank from freezing in the winter
3. storage locker to keep feed and bedding.
I took the typical 4x4 table top and made it a 4x6.
Pulling the old rusty nails out of the lumber and cutting the lumber down to size.
A lot of my work was done after dark, after the kids were down...and the weather has been exceptional, 30-40s and rain rain rain...I used 4x4 posts for the legs and 2x6's on the runners. The side of the front door is a 2x4. I was afraid the 2x6 would be too big for the chicks to climb over to get under the shade.
2x4 on the bottom front side of the coop, pictured below. Everything else is a 2x6
Nesting boxes. I tried to use all the left over lumber I had before buying 2x4s from the big box stores. (right) This is the back side of the nesting box. On the front side, there is a 2x6 running vertical across the front, to keep eggs in and pine chips out. I then placed some scrap 2x4s on their side and attached plywood on top. This elevated the nesting boxes just a little.
This is the base for my clean out door. I took some spare 4x4s and cut them down. My large coop door will sit right on top of this.
Big E helping out on a lumber run.
I bought roofing joist hangers ($.84 a piece) to attach my rafters. They were cheap and I didn't have to cut into the 2x4s, thus weakening the roof. The tall side was designed to be 4' high and the low side 3'. This would make using a 4x8 sheet of plywood easy to cut and fit into place. I based the design on using 2x4s on the bottom and not the 2x6s. So I have a little bit of a lip on the bottom. I'm looking at attaching hardware cloth to the bottom and then use a trim board to even it all out.
Clamps are a man (or woman's) best friend when working alone. Here you can see the 8" overhang on the roof line. The rafters are about 5'6" or so long. I wanted just enough to keep the rain off the coop and windows/doors.
(left pic) Here you can see the door opening and the clean out.
(right pic) Nesting boxes on the left. Water tank locker on the right. You can't see it here, but I installed a roof across the top of the nesting boxes. So there is a large storage slot there. (detailed pic later)
When I was measuring, I got a little ahead of myself. I cut the plywood down and then cut the window out. I then measured and cut out the rafter openings...this made my window cut off. I'm going to remove the horizontal beam you see in the window and move it up, out of the way.
Lower roof line. I wanted to seal it up almost all the way and just leave a small gap for airflow.
I added plywood and was going to shingle the roof but later took it off and added a metal roof. The rafters did not extend all the way to the end so I have a small gap on each end. I'll probably cover it with hardware cloth and leave it open, again for the air flow. It doesn't get super cold down here (South east) and I've been able to hold a good temperature in there while testing it out before we added chicks.
Left: Correct way to lay metal roof. Keeps falling rain from creeping up under the panels...
Right: Incorrect way
I decided to install the 4 roof panels before cutting to avoid any miscalculations. The coop was built on a 4x6 but it's a little off here and there. I ran a support joist to have something to attach the roof to. Same thing done on the other side.
Semi finished. 1 coat of paint on, still 1 more to go. We are going to trim it out with white around the coop and doors / windows to give it a nice finished look. The weather has not been cooperating thus far.
We decided to keep the brooder in the coop.
1. Less mess inside
2. We don't have a garage or a lot of extra room w/ 2 little ones running all over the house.
3. I've read and believe it will help them acclimate better to the weather quicker.
If and when we do some more baby chicks. I'd like to do something with more of an outside view so they can start from day 1 looking at their surroundings. I've heard it helps them assimilate better as they get older. They are still pretty skittish but we are only on day 2.
Brooding box fun. We used 2 cardboard boxes, cut and taped.
The roof in the back was for fun, but also helps keep some heat in the box. I ended up cutting the half roof off both front sides to allow for the heat lamp.
We kept it inside for a couple of hours to let the kiddos look and see the "chi-chins"
Here you can see inside. I had too many pine chips inside and took a bunch out. They were buried in them. Water is furtherest from the heat. I also added an old teddy bear. 1st time with chickens but I read it helps them feel like they have a brooding hen. This made sense to me and I've caught them all hanging out under there several times. It's usually their go to hiding spot when I come to wipe some butts. Plus it holds the warmth and gives them something to climb on.
Extras:
Inside the coop, looking towards the water locker (left) and nesting boxes (right).
Nesting box and water locker (aka tool shed right now). The water locker is designed for a 15 gal water barrel. I'm going to run it out the bottom to some poultry nipples on a line of pvc.
Open top storage above the nesting boxes. I've got the extra bedding and feed up there right now.
Used left over plywood to make a chicken door track. Screwed in some eye bolts and left over twine...google it, there are several ways to do this.
Probably the best $10 investment I made. Wireless thermometer I got from big box super store. The rectangle on the top of the box (right) is the thermostat. The readout station is kept inside. I've moved it to the top right corner on the heat lamp side. It stays between 81-92. When I set it directly under the light it was at 94-101. It did drop down to 80 after I had the door open wiping some pasty butts.
We have 3 ISA Browns and 3 unsexed Plymouth Rocks. The Rocks were trying to escape the temporary container we got from TS when we bought them....So 2 of them have been named Eastwood (see Escape from Alcatraz) and El Chapo. The others we are still working on names for.
When the weather warms up and stops raining, I'll finish the paint, trim and HC. Then time for a bird run. We plan to free range them as much as possible. I'll try and update new pics when its finished.
