Wiring thermostat. Ummm...I'm a chicken! Pic included

chickintexas

Songster
9 Years
Joined
Mar 19, 2010
Messages
669
Reaction score
4
Points
141
Location
Spring Branch
I've got this huge fear of electricity. I won't even do the tongue test to find out if a 9 volt still has juice or not. I leave that job up to the kids.
wink.png

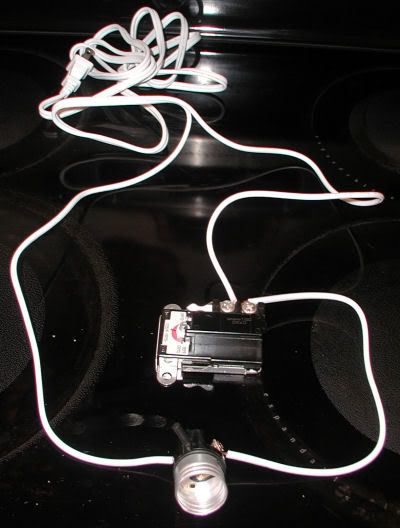
So, here I am. Wiring my hot water heater thermostat to my candelabra light set. I've already got the shakes just thinking about plugging it in. My issue is that my chosen light source isn't like what many others have used. It's a very simple set up.
So...will this work or is this a bad, bad, bad idea? The wires are not crossed: ribbed going in/out the same screw. iykwim.
51627_img_3416.jpg
 
all you want to do is us the thernostat to break 1 wire. from what i can see the thermostat will be bypassed.
 
Hahaha!!! I'm a dummy! I got it figured out before I got your response. You should have seen me cringing as I plugged it in! I was ready to jump out of my skin. Glad that part is over with now.

Thanks for your response, though. It made perfect sense what you said about bypassing the thermostat with the wiring the way I had it. I let my fear blind my common sense.
hide.gif
 
Last edited:
Well, I just electrocuted myself and possibly fried the thermostat. The plug melted a little. Wow, that didn't feel good. Could you take a pic of it done the right way???
 
The pic of wireing in the first post is a direct short and will blow fuses. Just hook one wire from the light socket to one screw on the thermostat. Connect one wire from the power cord to the other screw on the thermostat. hook the remaining wire from the light socket to the remaining wire of the power cord and you will be good to go. Each screw on the thermostat should have only one wire connected to it.
 
I got it figured out and I didn't short anything and I didn't shock myself.
big_smile.png

Working on the testing phase of the temps and humidity. I've been taking lots of pics as I've been putting this thing together and I'll certainly be posting it all including directions when it's completed. I want to get the temps good first and attach the thermostat to the interior wall before I write up and post my personal experience. I love this learning experience!

mrbstephens-I used a candelabra setup/cord kit. It's a very simple cord attached to a light socket. Has a turn wheel to switch it off/on. I cut off the wheel part. The line that was ribbed-I attached it to screw #1 and the end of the ribbed line came out at #2 which goes directly to the light. The unribbed line goes straight from the plug to the light. Uninterrupted. I hope that made some sense. If not, I can get a picture to you later.
 
I just am in the middle of a 14 egg hatch with a theromostat just like the one in the first post ,,,,If this hatch ever gets over i'm going to take it out and bury it , they don't hold the temp close enough for me ,, mine swung from the mid 80's to 103/105 , had to adjust on it every morning and evening , going to replace it with one that has 4 computer chips on a circuit board . I bought the w/h thero off of ebay and they said it was 'ELECTRONIC' wrong it's bi-metal ,, hope yours works for you like you want it to ,, mine was in a 48 inch tall plywood cabinet model with 3 trays .
 

New posts New threads Active threads

Back
Top Bottom