Staff note: We’ve been trying to find a way to restore the missing pics to this article but haven’t had any luck. Hopefully the author will be able to help us get the pics loaded back up!

“It’s only a chicken coop!”
I ordered the chicks to be delivered the week of February 13. We started building the coop that week. We were having excavation done of the coop site that couldn’t be done sooner.
We had friends with construction experience offer to help. We should have taken advantage of them, but decided to try to do it ourselves and learn by doing. We made some mistakes, and often found ourselves saying, “It’s only a chicken coop!” This was our first construction project.
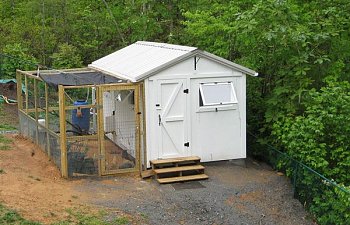
One of our friends labeled our finished project, the “Coop de Ville.” It turned out very well, and as of right now, we haven’t identified anything we would change. We did not add electricity or plumbing. So far that hasn’t been a problem at all.
I studied Building Chicken Coops for Dummies carefully.
It not only has a variety of chicken coop plans you can choose from, it also has several chapters dedicated toward teaching novices like me basic construction techniques. This came in handy many times while building the coop. I had handled power tools before and had taken a woodworking class many years ago, but hadn’t built anything bigger than a night stand. My husband has some basic skills, but hadn’t built anything like this. In other words, we really didn’t have a clue what we were getting into. We are both in our 60's and built this by ourselves except for the excavation.
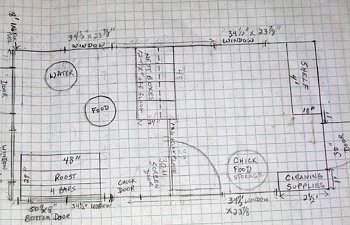
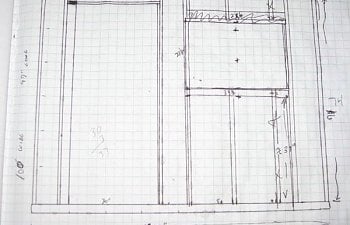
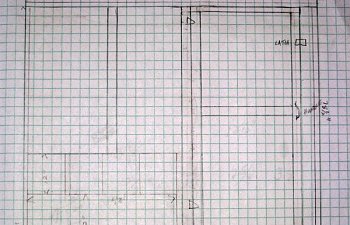
The largest coop design in the book was an 8′x8′ walk-in coop. It looked like what I wanted, except it needed to be 8′x16′. I wanted space for storage. So I drew up my own plans that doubled the plans in the book. I started with a floor plan, then progressed to drawing the floor joists, framing for the walls, roof, and interior walls. I did the plans using a tablet of graph paper. I drew most of them with pencil because we made many changes as we worked.
I got some good ideas by reading the thread, “If you could make your coop again, what would you change?” on Backyard Chickens Forum such as making it bigger, ability to stand up in it, more storage room, insulation, etc.
Construction
Drainage pipe covered with gravel
http://www.amazon.com/gp/redirect.h...8964/ref=sr_1_1?ie=UTF8&qid=1336951461&sr=8-1
Stone dust
http://www.amazon.com/gp/redirect.h...8964/ref=sr_1_1?ie=UTF8&qid=1336951461&sr=8-1
Trench for buried run fence
The site was leveled, and we buried two drainage pipes to remove the water that runs off our sloping yard to that area covering them with fabric and gravel. Our soil is red clay, so we covered the site with a thick layer of stone dust. We had the excavator use his Bobcat to dig a trench one foot deep where the fence for the run would be buried. It was a major inconvenience while we were constructing the coop; but when I saw all those roots, I was happy I didn’t have to dig it by hand.
http://www.amazon.com/gp/redirect.h...8964/ref=sr_1_1?ie=UTF8&qid=1336951461&sr=8-1
Foundation supports
http://www.amazon.com/gp/redirect.h...8964/ref=sr_1_1?ie=UTF8&qid=1336951461&sr=8-1
Tie-downs
Our county does not require building permits for a “temporary building” that does not have permanent footings. Therefore, we chose to use solid cement blocks to set the floor supports on. We spent a lot of time making everything level and square. We used mobile home tie-downs to secure the building to the ground since we get some pretty strong winds on our hilltop.
http://www.amazon.com/gp/redirect.h...8964/ref=sr_1_1?ie=UTF8&qid=1336951461&sr=8-1
Framing the floor of the coop
http://www.amazon.com/gp/redirect.h...8964/ref=sr_1_1?ie=UTF8&qid=1336951461&sr=8-1
Finished Floor
We framed the floor fairly quickly. However, one of the biggest mistakes we made was not cutting the joists to make the floor actually 8′x16′ taking into account the width of the outside 2′x6′s and the extra length of the supposed 16′ boards. We ended up making adjustments throughout the building process to account for the larger floor. Okay, you experienced carpenters can stop laughing! “It’s only a chicken coop!” We used treated wood for the floor frame and plywood floor and anything that might be exposed or touching the ground.
Dewalt driver/drill
We used screws for all the framing, walls, and flooring. That was one of the best tips I learned from Dummies. It not only made the building very strong and stable, the screws allowed us to make easy changes and corrections without having to pry nails and chew up the wood. Also, I found it easier to use a good power screw driver (Dewalt)
than using a hammer to pound nails or use a nail gun. My husband is much better at nailing than I am, but also believed using screws was preferable although more expensive.
http://www.amazon.com/gp/redirect.h...8964/ref=sr_1_1?ie=UTF8&qid=1336951461&sr=8-1
First wall
http://www.amazon.com/gp/redirect.h...8964/ref=sr_1_1?ie=UTF8&qid=1336951461&sr=8-1
Framed walls
Once the floor was built, we used it as the platform onto which we laid out and screwed together the walls. We first built one of the short end walls then lifted it in place, and I held it while my husband braced it. It was much easier than we anticipated. We built the 16′ walls in two sections so it would be easier for the two of us to lift. Again, it was easy to lift and hold while he screwed them in place.
http://www.amazon.com/gp/redirect.h...8964/ref=sr_1_1?ie=UTF8&qid=1336951461&sr=8-1
Roof Framing
http://www.amazon.com/gp/redirect.h...8964/ref=sr_1_1?ie=UTF8&qid=1336951461&sr=8-1
Roof Framing
The most difficult part of the construction for us was the roof. The framing wasn’t too bad. We rented a miter saw with a laser guide that I highly recommend. We cut all of our roof lumber at one time. We built a template to use to build the roof trusses. Neither of us are real happy on a ladder or climbing around on a roof. It didn’t help that we had to work the ladders around a foot deep trench in places. Another mistake we made was trying to save space in the yard and building the coop too close to our backyard fence. There is plenty of room to walk behind the coop, but it was too small for using ladders safely. It was ugly.
Roof on and walls painted
http://www.amazon.com/gp/redirect.h...8964/ref=sr_1_1?ie=UTF8&qid=1336951461&sr=8-1
Hardware cloth over vents
http://www.amazon.com/gp/redirect.h...8964/ref=sr_1_1?ie=UTF8&qid=1336951461&sr=8-1
Fence around bottom of building
We put a metal roof on the coop that matches our house roof. The roof ended up taking a lot longer to put up than we anticipated. We have a vent along the ridge covered with hardware cloth and vents along the bottom sides of the roof also covered with wire mesh to prevent snakes or mice from getting in. There is also wire along the bottom of the coop on three sides so the chickens can use space under the building.
We put foam sheets of insulation on the outside of the plywood walls and in the ceiling. We are more concerned about keeping some of the heat out than keeping the coop warm in the winter. We covered the insulation with a cheap, composite siding which we primed and painted. We built and installed 2 exterior doors using 2x4s and composite siding, one on each end of the building. The steps on each end of the building were pre-made sets we bought from Lowes.
Windows
Open Window
One of my luckiest finds was windows at the Habitat for Humanity store. While designing my coop, I decided I wanted windows that opened out at an angle. This would help keep rain out while allowing the windows to remain open for ventilation. I couldn’t find exactly what I wanted, and the cheapest I could find were about $50 each for small, cheap windows. In a trip to the Habitat store, we found some donated windows that would work for $5. Our truck was full at the time, so we decided to come back a few days later. The day we returned, the windows were on sale for half price. I got six windows for $15. I had to paint them and add hardware, but they are exactly what I wanted and work as planned. The only difficulty we started with was how to prop them open. While watching some TV show, my husband yelled, stopped and replayed a segment in which a guy was lowering hurricane shutters using a rope anchored to the bottom of the shutter and an eye bolt screwed in above. Eureka! Our windows raise and lower easily on a chain, provide the cross-ventilation and light I wanted, and keep the rain out while open. We covered the window openings with hardware cloth to keep critters out. We put sun screens on a couple of windows that get direct sun part of the year. We made the sun screen so it can be rolled up out of the way when not needed.
Interior
Door and wall into coop
Based on my goal of having 12 chickens, I divided the building in half–the coop is 8′x8′ and the storage room/work room is the same size. We designed a wall framed with 2x4s and filled in with chicken wire. We built a door that opens into the storage room that allows easy access to the coop.

Wood barrier at door
We put brackets that hold a 6″ piece of plywood inside both doors into the coop to keep the pine shavings inside the coop. The boards can be removed to clean out the deep litter for cleaning the coop.
Using scrap pieces of plywood, we put up interior walls in the coop to keep the chickens from pecking the insulation. I painted it with white, high gloss kitchen/bathroom enamel paint.
Linoleum on walls surrounding roost
Roost with removable tubs
We nailed down sheet vinyl flooring on the coop side. We also put it on the walls surrounding the roost. When I shovel aside the deep litter pine shavings, the floor still looks like new. I put 2 large landscaping tubs underneath the roost filled with pine shavings to catch the chicken poop which is heaviest under the roost. I turn the shavings and add new until it is time to empty the tubs and add the contents to the compost pile.
Storage room shelves and buckets
Using heavy-duty shelf brackets, I put up shelving in the storage room. I used plywood scraps for shelves. I put up some pegboard using a large piece I had left over from another project. I put the shelves high enough to use as a work surface and place 5 gallon buckets and plastic garbage cans under them in which I store chicken food, diatomaceous earth, pine shavings, and water.
Storage in rafters
Tip: We added latches on the inside of our doors so we can close them while we are inside the building or run and keep the chickens from making an escape.
Tip: We added 2x4s across the ceiling even though they are not needed structurally. We use the space above the “ceiling” to store a variety of supplies and equipment.
Nesting Boxes
Roll-away Nesting Box-chicken coop side.
I built 4 nesting boxes using the basic plans for roll-out nest boxes posted on the Backyard Chickens Forum. I put them low to the floor so my heavy-breed chickens won’t have trouble getting into them.
Roll-away Nesting Box-egg gathering side.
The boxes are built into the wall between the coop and storage room. They have a sloped floor and divider that allows the eggs to roll to the back of the box which is in the storage room. The divider prevents the eggs from being soiled or eaten by the chickens. They can be collected without having to enter the coop. Unlike the plans I referenced, I built my boxes on one level. I also added nailers wherever I needed to make a joint of plywood. The boxes are sturdy.
Nest pads, padding, divider
I put nest pads in the bottom that I bought from Cutler Supply. They allow the eggs to roll easily and are easy to clean. You just shake them out to remove the chicken poop.
Tip: The nest pads are made to go in one direction. Make sure the rows of plastic blades are pointing toward where you want the eggs to roll. I have read that chickens prefer their nest boxes to be dark, so I painted them dark brown.
Tip: I bought self-adhesive pipe insulation to put at the back of the box where the rolling eggs will hit. It works very well and stays put.
Egg in roll-away nest
The roll-away nesting boxes are working as planned.
Roost
Chicken Roost before paint
We built our roost using the basic design we found in the walk-in coop plans in the book, Building Chicken Coops for Dummies.
We adjusted the size to fit our space. It went together very quickly. Most of the wood we used was scrap from the coop construction.
Chicken Door
Solar panel for chicken door
Shelf for Chicken Door battery
I bought a chicken door from ChickenDoor.com. I wanted the freedom having an automatic door would give me. It has a sensor which opens the door at sunrise and closes it at dark. A trickle battery is included. Since I don’t have electricity in the coop, I opted for the small solar panel that charges it. The chickens go into the coop at night in plenty of time before the door closes. But just in case, after closing, the door opens again for a short time to allow any stragglers to get in. I LOVE this door and would not have a coop without one. The chickens get out early in the morning, and I get to sleep in.
Chicken Run
We built an 8′x16′ run along the front of the building. We made it as tall as we could based on fitting it under the rafters of the building. It is over 6′ tall. We framed the walls using 2x4s then used staples to hold the welded fencing onto the frames.
Hardware Cloth at bottom of run
We buried the fence one foot deep bending it outward. We added hardware cloth to the bottom of the fence to prevent the chickens from sticking their heads through it to have them caught by dogs, racoons, or other critters. They will do that!
Shade cloth on run
We covered the top of the run with chicken wire stringing the wire across 2x4s we placed across the top of the run. We also covered most of the top of the run with garden shade cloth.
Chicken Run Door
We built a door going into the run on the end by the storage room door. In addition to the run, the chickens can go under the building giving them an additional 8′x16′ of outdoor space. We fenced in the bottom of the building on 3 sides. I added a thick layer of sand to the ground inside the run. I used two of the large bags from Lowes that they move using a forklift. There are large dead tree branches and log rounds in the run for the chickens to roost on.
Swiss Chard in the run
We also put in large nursery pots of plants from our garden that are from our winter garden and past their use for us. The chickens love to eat the leaves from the kale, Swiss chard, strawberries, etc.
Watering Systems
After having to mess with washing and filling water containers several times a day when the chicks were small, I decided there had to be a better way. After doing some research, I found 3 different types of toggle-type waterers. The water reserve is in a covered bucket away from the chickens where they can’t poop in it or fill it with pine shavings. I bought all three types. I bought two kinds from FarmTek.
Water bucket with nipples
The simplest and cheapest to install is the push-in nipple. You drill a hole in the bottom of a white bucket and insert the nipple using a rubber grommet. We put two or three nipples in each bucket, one inside the coop and one in the run. They don’t leak and the chickens quickly learned how to use the nipples. However, these are their least favorite water source that they use occasionally. I am confident that if these are all they had to use for water, they would use them without difficulty. The nipples cost $2.39 each.
Favorite watering system-outside
Favorite wating system-inside water bucket
The second type I bought from Farm Tek is a screw-in nipple that is screwed into a PVC pipe. You can use a round pipe with a reducing tee (also sold by Farm Tec) or use a square PVC pipe. We used a round pipe with four nipples, reducing tees and teflon tape. We attached the pipe to the exterior wall of the coop for use in the run. This is the waterer the chickens use most often. A covered water bucket sits on a small shelf in the storage room with a hose that runs to the PVC pipe outside. I wouldn’t use this one indoors since the chickens dribble quite a bit of water that falls to the ground. The nipple is $2.39 and the reducing tees are $1.05.
Auto-water cups inside coop
The third and most expensive is the poultry cup waterer from Murray McMurray. This comes with two water cups with automatic levers installed in a pipe that you must hook up to a bucket of water. We put this waterer on the wall inside the coop. The water bucket is on a shelf inside the storage room with a hose that runs to the waterer. The chickens use this when they are inside the coop. The little orange cups work well, but must be removed and cleaned periodically. The two watering cups come pre-connected to the pipe with brackets for hanging. They cost $59.60.
Auto-Feeder
Toggles release feed when pushed by the chickens
We use a traditional hanging feeder inside the coop. We found that most feeders have open tops without a good way to cover the chicken feed to keep it from getting wet if it is hanging outside in the run. Whenever it rained, I would have to take the feeder inside. I was also concerned about rodents.
I saw a post on BackyardChickens Forum about a feeder that works similarly to the water nipples. You drill holes in a white bucket, insert toggle-type levers that release a small amount of food each time a chicken pushes against it. The only thing you buy are the toggle pieces. My husband installed them using a covered, white bucket hanging from a chain in the run with a large clay dish used under clay pots for plants attached to the bottom of the bucket.
The chickens learned quickly how to use it. We are very pleased with it. These can only be bought on ebay. We contacted the seller (who are the people who make the feeder lever) and found them very helpful. Their email address is [email protected]. There is a video of chickens using the system on
.
Rain Barrels
Rain Barrel
We put gutters on the building which we connected to two rain barrels. The roof is metal so we don’t worry about contamination from asphalt shingles. However, this water will be used to water our nearby garden, not to water the chickens except in an emergency.
Conclusion
We are amazed how well the coop turned out considering how ignorant we were when we started. Since February we have learned a lot about raising chickens and constructing a building that we consider valuable skills. We are considering doing it all over again next year to build a cabin on some mountain land we own.

“It’s only a chicken coop!”
I ordered the chicks to be delivered the week of February 13. We started building the coop that week. We were having excavation done of the coop site that couldn’t be done sooner.
We had friends with construction experience offer to help. We should have taken advantage of them, but decided to try to do it ourselves and learn by doing. We made some mistakes, and often found ourselves saying, “It’s only a chicken coop!” This was our first construction project.
One of our friends labeled our finished project, the “Coop de Ville.” It turned out very well, and as of right now, we haven’t identified anything we would change. We did not add electricity or plumbing. So far that hasn’t been a problem at all.
I studied Building Chicken Coops for Dummies carefully.

It not only has a variety of chicken coop plans you can choose from, it also has several chapters dedicated toward teaching novices like me basic construction techniques. This came in handy many times while building the coop. I had handled power tools before and had taken a woodworking class many years ago, but hadn’t built anything bigger than a night stand. My husband has some basic skills, but hadn’t built anything like this. In other words, we really didn’t have a clue what we were getting into. We are both in our 60's and built this by ourselves except for the excavation.


The largest coop design in the book was an 8′x8′ walk-in coop. It looked like what I wanted, except it needed to be 8′x16′. I wanted space for storage. So I drew up my own plans that doubled the plans in the book. I started with a floor plan, then progressed to drawing the floor joists, framing for the walls, roof, and interior walls. I did the plans using a tablet of graph paper. I drew most of them with pencil because we made many changes as we worked.
I got some good ideas by reading the thread, “If you could make your coop again, what would you change?” on Backyard Chickens Forum such as making it bigger, ability to stand up in it, more storage room, insulation, etc.
Construction
Drainage pipe covered with gravel
http://www.amazon.com/gp/redirect.h...8964/ref=sr_1_1?ie=UTF8&qid=1336951461&sr=8-1
Stone dust
http://www.amazon.com/gp/redirect.h...8964/ref=sr_1_1?ie=UTF8&qid=1336951461&sr=8-1
Trench for buried run fence
The site was leveled, and we buried two drainage pipes to remove the water that runs off our sloping yard to that area covering them with fabric and gravel. Our soil is red clay, so we covered the site with a thick layer of stone dust. We had the excavator use his Bobcat to dig a trench one foot deep where the fence for the run would be buried. It was a major inconvenience while we were constructing the coop; but when I saw all those roots, I was happy I didn’t have to dig it by hand.
http://www.amazon.com/gp/redirect.h...8964/ref=sr_1_1?ie=UTF8&qid=1336951461&sr=8-1
Foundation supports
http://www.amazon.com/gp/redirect.h...8964/ref=sr_1_1?ie=UTF8&qid=1336951461&sr=8-1
Tie-downs
Our county does not require building permits for a “temporary building” that does not have permanent footings. Therefore, we chose to use solid cement blocks to set the floor supports on. We spent a lot of time making everything level and square. We used mobile home tie-downs to secure the building to the ground since we get some pretty strong winds on our hilltop.
http://www.amazon.com/gp/redirect.h...8964/ref=sr_1_1?ie=UTF8&qid=1336951461&sr=8-1
Framing the floor of the coop
http://www.amazon.com/gp/redirect.h...8964/ref=sr_1_1?ie=UTF8&qid=1336951461&sr=8-1
Finished Floor
We framed the floor fairly quickly. However, one of the biggest mistakes we made was not cutting the joists to make the floor actually 8′x16′ taking into account the width of the outside 2′x6′s and the extra length of the supposed 16′ boards. We ended up making adjustments throughout the building process to account for the larger floor. Okay, you experienced carpenters can stop laughing! “It’s only a chicken coop!” We used treated wood for the floor frame and plywood floor and anything that might be exposed or touching the ground.
Dewalt driver/drill
We used screws for all the framing, walls, and flooring. That was one of the best tips I learned from Dummies. It not only made the building very strong and stable, the screws allowed us to make easy changes and corrections without having to pry nails and chew up the wood. Also, I found it easier to use a good power screw driver (Dewalt)
 than using a hammer to pound nails or use a nail gun. My husband is much better at nailing than I am, but also believed using screws was preferable although more expensive.
http://www.amazon.com/gp/redirect.h...8964/ref=sr_1_1?ie=UTF8&qid=1336951461&sr=8-1
First wall
http://www.amazon.com/gp/redirect.h...8964/ref=sr_1_1?ie=UTF8&qid=1336951461&sr=8-1
Framed walls
Once the floor was built, we used it as the platform onto which we laid out and screwed together the walls. We first built one of the short end walls then lifted it in place, and I held it while my husband braced it. It was much easier than we anticipated. We built the 16′ walls in two sections so it would be easier for the two of us to lift. Again, it was easy to lift and hold while he screwed them in place.
http://www.amazon.com/gp/redirect.h...8964/ref=sr_1_1?ie=UTF8&qid=1336951461&sr=8-1
Roof Framing
http://www.amazon.com/gp/redirect.h...8964/ref=sr_1_1?ie=UTF8&qid=1336951461&sr=8-1
Roof Framing
The most difficult part of the construction for us was the roof. The framing wasn’t too bad. We rented a miter saw with a laser guide that I highly recommend. We cut all of our roof lumber at one time. We built a template to use to build the roof trusses. Neither of us are real happy on a ladder or climbing around on a roof. It didn’t help that we had to work the ladders around a foot deep trench in places. Another mistake we made was trying to save space in the yard and building the coop too close to our backyard fence. There is plenty of room to walk behind the coop, but it was too small for using ladders safely. It was ugly.
Roof on and walls painted
http://www.amazon.com/gp/redirect.h...8964/ref=sr_1_1?ie=UTF8&qid=1336951461&sr=8-1
Hardware cloth over vents
http://www.amazon.com/gp/redirect.h...8964/ref=sr_1_1?ie=UTF8&qid=1336951461&sr=8-1
Fence around bottom of building
We put a metal roof on the coop that matches our house roof. The roof ended up taking a lot longer to put up than we anticipated. We have a vent along the ridge covered with hardware cloth and vents along the bottom sides of the roof also covered with wire mesh to prevent snakes or mice from getting in. There is also wire along the bottom of the coop on three sides so the chickens can use space under the building.
We put foam sheets of insulation on the outside of the plywood walls and in the ceiling. We are more concerned about keeping some of the heat out than keeping the coop warm in the winter. We covered the insulation with a cheap, composite siding which we primed and painted. We built and installed 2 exterior doors using 2x4s and composite siding, one on each end of the building. The steps on each end of the building were pre-made sets we bought from Lowes.
Windows
Open Window
One of my luckiest finds was windows at the Habitat for Humanity store. While designing my coop, I decided I wanted windows that opened out at an angle. This would help keep rain out while allowing the windows to remain open for ventilation. I couldn’t find exactly what I wanted, and the cheapest I could find were about $50 each for small, cheap windows. In a trip to the Habitat store, we found some donated windows that would work for $5. Our truck was full at the time, so we decided to come back a few days later. The day we returned, the windows were on sale for half price. I got six windows for $15. I had to paint them and add hardware, but they are exactly what I wanted and work as planned. The only difficulty we started with was how to prop them open. While watching some TV show, my husband yelled, stopped and replayed a segment in which a guy was lowering hurricane shutters using a rope anchored to the bottom of the shutter and an eye bolt screwed in above. Eureka! Our windows raise and lower easily on a chain, provide the cross-ventilation and light I wanted, and keep the rain out while open. We covered the window openings with hardware cloth to keep critters out. We put sun screens on a couple of windows that get direct sun part of the year. We made the sun screen so it can be rolled up out of the way when not needed.
Interior
Door and wall into coop
Based on my goal of having 12 chickens, I divided the building in half–the coop is 8′x8′ and the storage room/work room is the same size. We designed a wall framed with 2x4s and filled in with chicken wire. We built a door that opens into the storage room that allows easy access to the coop.

Wood barrier at door
We put brackets that hold a 6″ piece of plywood inside both doors into the coop to keep the pine shavings inside the coop. The boards can be removed to clean out the deep litter for cleaning the coop.
Using scrap pieces of plywood, we put up interior walls in the coop to keep the chickens from pecking the insulation. I painted it with white, high gloss kitchen/bathroom enamel paint.

 Linoleum on walls surrounding roost
Roost with removable tubs
We nailed down sheet vinyl flooring on the coop side. We also put it on the walls surrounding the roost. When I shovel aside the deep litter pine shavings, the floor still looks like new. I put 2 large landscaping tubs underneath the roost filled with pine shavings to catch the chicken poop which is heaviest under the roost. I turn the shavings and add new until it is time to empty the tubs and add the contents to the compost pile.

Storage room shelves and buckets
Using heavy-duty shelf brackets, I put up shelving in the storage room. I used plywood scraps for shelves. I put up some pegboard using a large piece I had left over from another project. I put the shelves high enough to use as a work surface and place 5 gallon buckets and plastic garbage cans under them in which I store chicken food, diatomaceous earth, pine shavings, and water.

Storage in rafters
Tip: We added latches on the inside of our doors so we can close them while we are inside the building or run and keep the chickens from making an escape.
Tip: We added 2x4s across the ceiling even though they are not needed structurally. We use the space above the “ceiling” to store a variety of supplies and equipment.
Nesting Boxes

Roll-away Nesting Box-chicken coop side.
I built 4 nesting boxes using the basic plans for roll-out nest boxes posted on the Backyard Chickens Forum. I put them low to the floor so my heavy-breed chickens won’t have trouble getting into them.

Roll-away Nesting Box-egg gathering side.
The boxes are built into the wall between the coop and storage room. They have a sloped floor and divider that allows the eggs to roll to the back of the box which is in the storage room. The divider prevents the eggs from being soiled or eaten by the chickens. They can be collected without having to enter the coop. Unlike the plans I referenced, I built my boxes on one level. I also added nailers wherever I needed to make a joint of plywood. The boxes are sturdy.

Nest pads, padding, divider
I put nest pads in the bottom that I bought from Cutler Supply. They allow the eggs to roll easily and are easy to clean. You just shake them out to remove the chicken poop.
Tip: The nest pads are made to go in one direction. Make sure the rows of plastic blades are pointing toward where you want the eggs to roll. I have read that chickens prefer their nest boxes to be dark, so I painted them dark brown.
Tip: I bought self-adhesive pipe insulation to put at the back of the box where the rolling eggs will hit. It works very well and stays put.

Egg in roll-away nest
The roll-away nesting boxes are working as planned.
Roost

Chicken Roost before paint
We built our roost using the basic design we found in the walk-in coop plans in the book, Building Chicken Coops for Dummies.
We adjusted the size to fit our space. It went together very quickly. Most of the wood we used was scrap from the coop construction.Chicken Door

Solar panel for chicken door

Shelf for Chicken Door battery

I bought a chicken door from ChickenDoor.com. I wanted the freedom having an automatic door would give me. It has a sensor which opens the door at sunrise and closes it at dark. A trickle battery is included. Since I don’t have electricity in the coop, I opted for the small solar panel that charges it. The chickens go into the coop at night in plenty of time before the door closes. But just in case, after closing, the door opens again for a short time to allow any stragglers to get in. I LOVE this door and would not have a coop without one. The chickens get out early in the morning, and I get to sleep in.
Chicken Run

We built an 8′x16′ run along the front of the building. We made it as tall as we could based on fitting it under the rafters of the building. It is over 6′ tall. We framed the walls using 2x4s then used staples to hold the welded fencing onto the frames.

Hardware Cloth at bottom of run
We buried the fence one foot deep bending it outward. We added hardware cloth to the bottom of the fence to prevent the chickens from sticking their heads through it to have them caught by dogs, racoons, or other critters. They will do that!

Shade cloth on run
We covered the top of the run with chicken wire stringing the wire across 2x4s we placed across the top of the run. We also covered most of the top of the run with garden shade cloth.

Chicken Run Door
We built a door going into the run on the end by the storage room door. In addition to the run, the chickens can go under the building giving them an additional 8′x16′ of outdoor space. We fenced in the bottom of the building on 3 sides. I added a thick layer of sand to the ground inside the run. I used two of the large bags from Lowes that they move using a forklift. There are large dead tree branches and log rounds in the run for the chickens to roost on.

Swiss Chard in the run
We also put in large nursery pots of plants from our garden that are from our winter garden and past their use for us. The chickens love to eat the leaves from the kale, Swiss chard, strawberries, etc.
Watering Systems

After having to mess with washing and filling water containers several times a day when the chicks were small, I decided there had to be a better way. After doing some research, I found 3 different types of toggle-type waterers. The water reserve is in a covered bucket away from the chickens where they can’t poop in it or fill it with pine shavings. I bought all three types. I bought two kinds from FarmTek.

Water bucket with nipples
The simplest and cheapest to install is the push-in nipple. You drill a hole in the bottom of a white bucket and insert the nipple using a rubber grommet. We put two or three nipples in each bucket, one inside the coop and one in the run. They don’t leak and the chickens quickly learned how to use the nipples. However, these are their least favorite water source that they use occasionally. I am confident that if these are all they had to use for water, they would use them without difficulty. The nipples cost $2.39 each.

Favorite watering system-outside

Favorite wating system-inside water bucket
The second type I bought from Farm Tek is a screw-in nipple that is screwed into a PVC pipe. You can use a round pipe with a reducing tee (also sold by Farm Tec) or use a square PVC pipe. We used a round pipe with four nipples, reducing tees and teflon tape. We attached the pipe to the exterior wall of the coop for use in the run. This is the waterer the chickens use most often. A covered water bucket sits on a small shelf in the storage room with a hose that runs to the PVC pipe outside. I wouldn’t use this one indoors since the chickens dribble quite a bit of water that falls to the ground. The nipple is $2.39 and the reducing tees are $1.05.

Auto-water cups inside coop
The third and most expensive is the poultry cup waterer from Murray McMurray. This comes with two water cups with automatic levers installed in a pipe that you must hook up to a bucket of water. We put this waterer on the wall inside the coop. The water bucket is on a shelf inside the storage room with a hose that runs to the waterer. The chickens use this when they are inside the coop. The little orange cups work well, but must be removed and cleaned periodically. The two watering cups come pre-connected to the pipe with brackets for hanging. They cost $59.60.
Auto-Feeder

Toggles release feed when pushed by the chickens
We use a traditional hanging feeder inside the coop. We found that most feeders have open tops without a good way to cover the chicken feed to keep it from getting wet if it is hanging outside in the run. Whenever it rained, I would have to take the feeder inside. I was also concerned about rodents.
I saw a post on BackyardChickens Forum about a feeder that works similarly to the water nipples. You drill holes in a white bucket, insert toggle-type levers that release a small amount of food each time a chicken pushes against it. The only thing you buy are the toggle pieces. My husband installed them using a covered, white bucket hanging from a chain in the run with a large clay dish used under clay pots for plants attached to the bottom of the bucket.
The chickens learned quickly how to use it. We are very pleased with it. These can only be bought on ebay. We contacted the seller (who are the people who make the feeder lever) and found them very helpful. Their email address is [email protected]. There is a video of chickens using the system on
Rain Barrels

Rain Barrel
We put gutters on the building which we connected to two rain barrels. The roof is metal so we don’t worry about contamination from asphalt shingles. However, this water will be used to water our nearby garden, not to water the chickens except in an emergency.
Conclusion
We are amazed how well the coop turned out considering how ignorant we were when we started. Since February we have learned a lot about raising chickens and constructing a building that we consider valuable skills. We are considering doing it all over again next year to build a cabin on some mountain land we own.