AL's Homemade cabinet Incubator
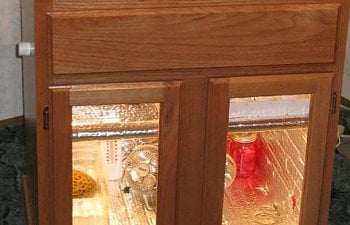
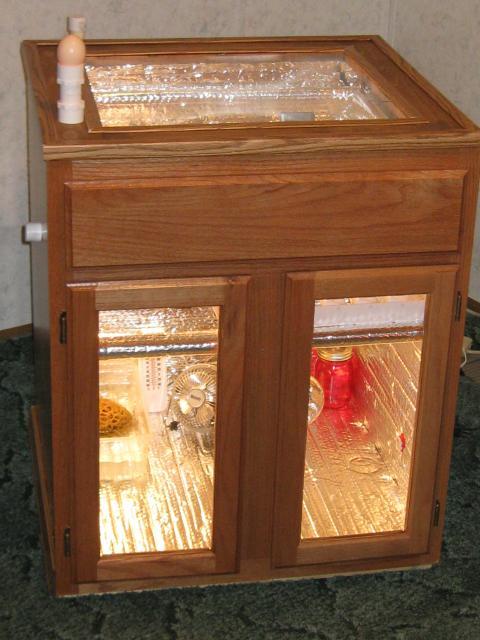
My chicken interest have gotten to the point where I thought that I would like to try my hand at Incubating some eggs. My wife said that since it would have to be in the house that it should at least look pretty nice, So I had to figure out how to design a furniture grade cabinet Incubator, that also would have all of the neat bells and whistles that I thought I would like to have. The following is what the finished product looks like.
Features :
3 large viewing windows, 1 large sliding hatching tray, remote water fill tube, 2 air vents, separate light for viewing when in off cycle, space age insulation, built in candler, 4" oscillating fan, 4 thermometers 2= mercury 2= digital 1= w/remote sensor, both with humidity readouts, well sealed doors & drawer, high powered 250 watt heat lamp, water heater thermostat, 1 automatic egg turner with the capacity to have 5 more added, hatching drawer holds 200 eggs, total up gradable capacity 240 eggs, stained and finished oak cabinet 27"wide x 27"deep x 33" high,
here is the furniture grade cabinet incubator.

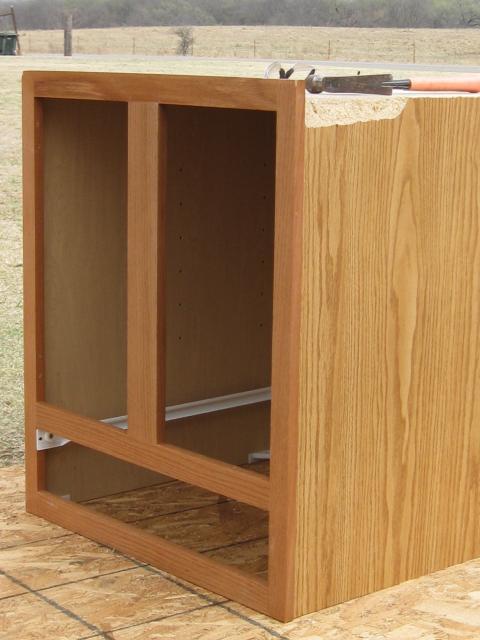
I found a beat up and severely damaged vanity cabinet at my local cabinet shop where I do a lot of business, and was able to get it for a song. I then began to tear down and prepare it.
Torn up and gutted, I had to remake the bottom from 2" x 4" for added strength. you can see damage on the side.
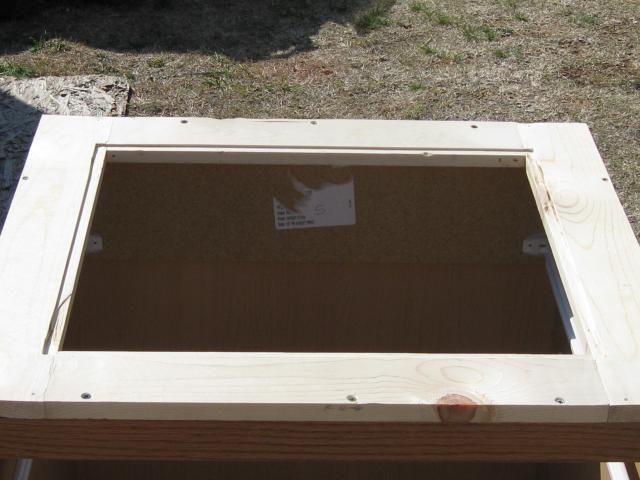
I made a top from 1"x 4" white pine and rabbited the inset for the Plexiglas, and mounted it securely.
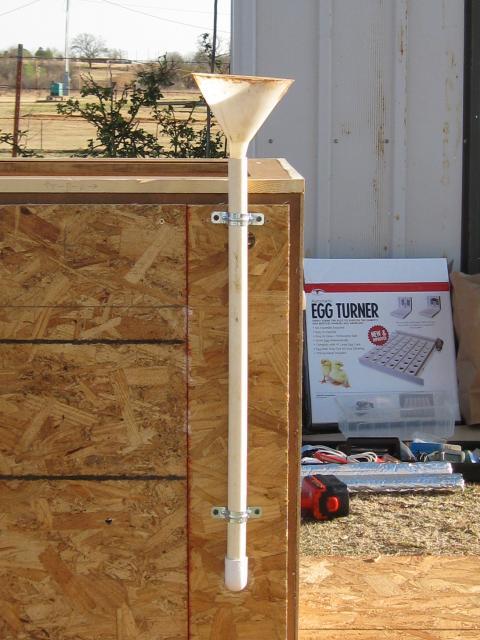
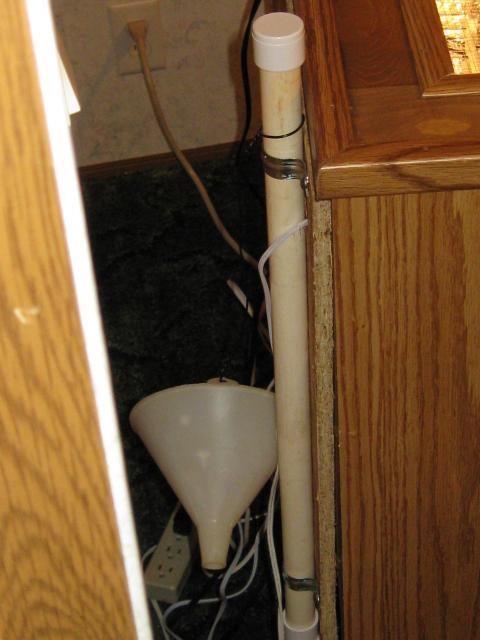
Reinforced the back panel and layed in the pvc water fill tube w/ funnel, also bored the holes for all of the other electrical work.
I tied the funnel to the tube for easy access, and added some trim molding.
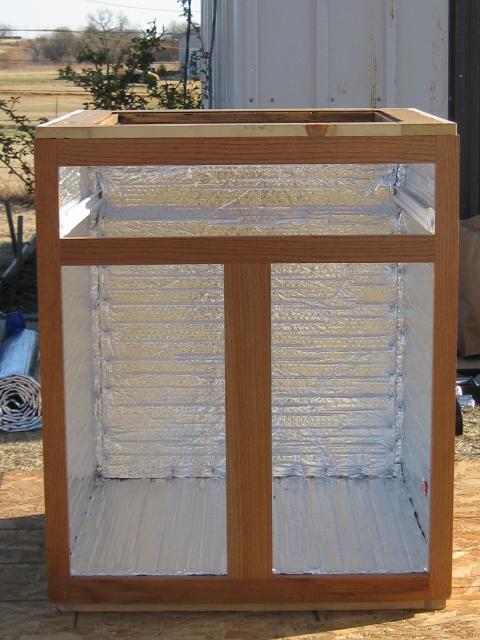
Cut, Glued and stapled in the R13 1/8" foil insulation, it holds heat very well and it is easy to clean and disinfect. an added plus is it reflects the light well so it is easy to view.
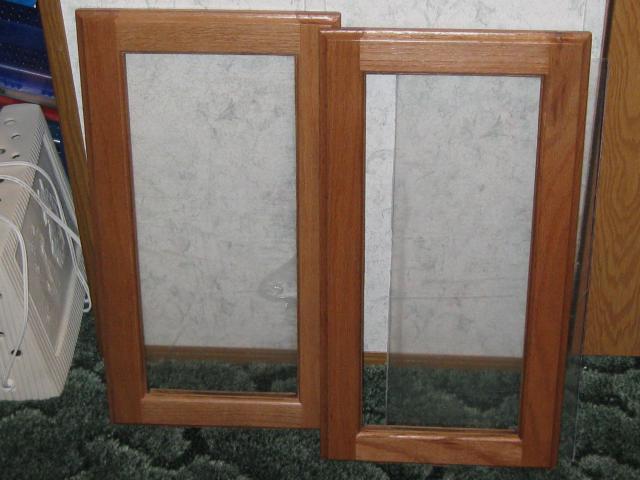
Carefully cut out the damaged door panels to prep for glass, The glass is 1/8" Plexiglas and can be difficult to work with and cut & drill. all glass was screwed in with a layer of silicon sealant. and weather stripping added to all doors & drawer.
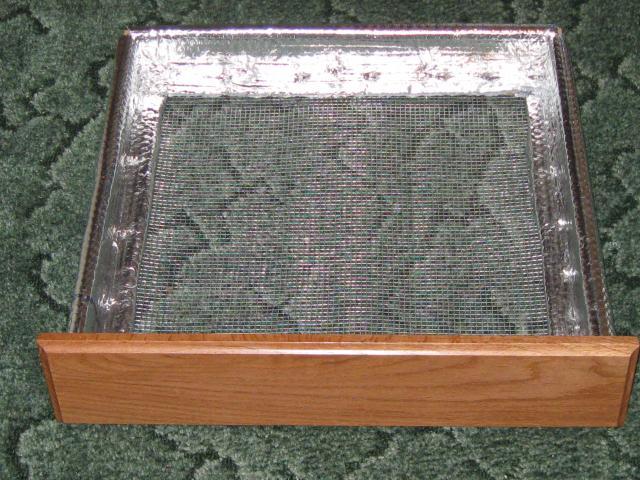
Cut out the bottom of the drawer and installed 1/2" hardware cloth and insulation. it is very strong and can hold over 200 eggs.
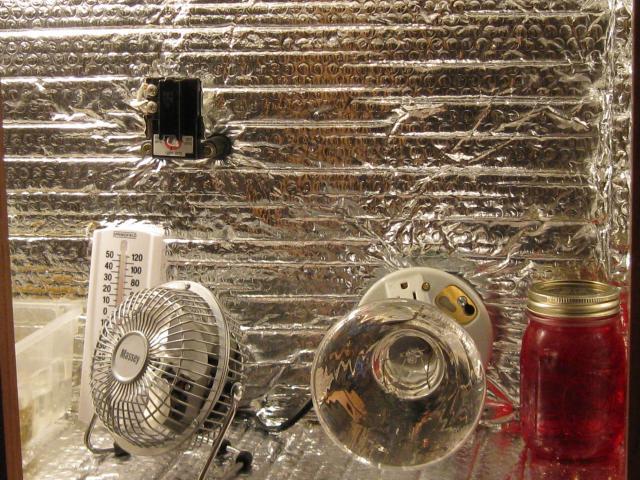
Wired in the 250 watt heat lamp w/metal box, water heater thermostat, and fan, added a heat sink jar in red. Notice the thermostat is spaced away from the back wall about 1 1/2" with rubber spacers to allow for better air flow to the sensor, which is in the rear. a 4" fan provides adequate air circulation. the base of the light is porcelain and has an additional grounded plug for any extra plug in accessories. like a big screen TV or video LOL. all wiring is direct with no splices or wire nuts for safety.
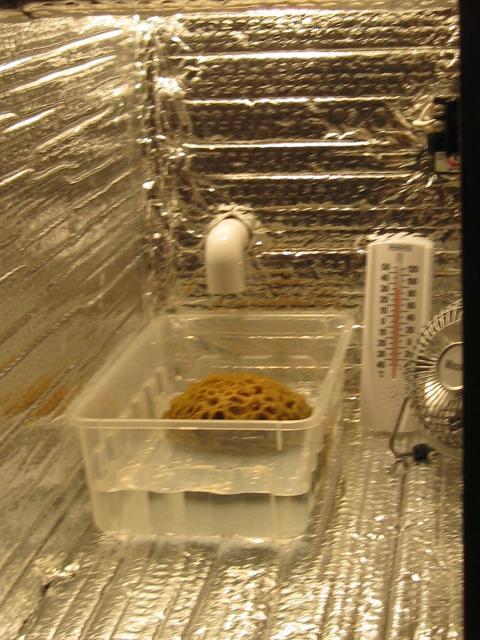
Water pan with sea sponge, and filler tube outlet, the sea sponge holds more air for more stable humidity levels, the pan holds 2 gallons of water and can raise humidity levels 30% in less than 20 min, I only add HOT water when needed.
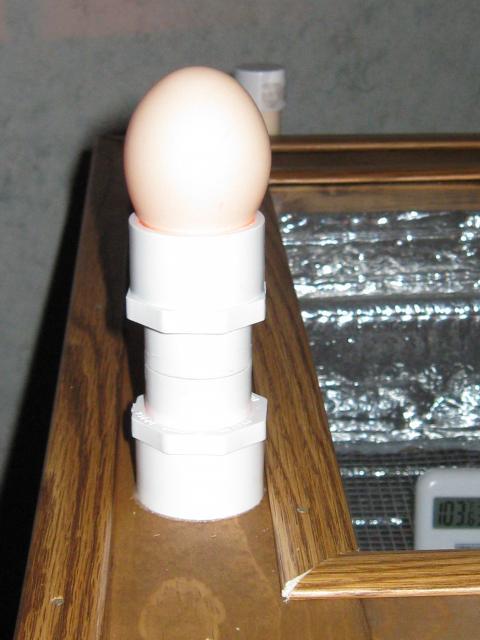
Built in candler: and man this thing works great, and can be switched out for different size eggs. it is operated separately with a 7 watt c sized bulb secured to the cabinet from the underside and operated by a thumb switch in the back panel. I have an egg size adapter for turkey and quail eggs.
This egg is a large brown egg of standard shape and color.
Auto turner mounted to custom stiles, the incubator has the added capacity for 5 more turners, for 245 eggs total. that may be added later if need be. I thought it would be nice to have more capacity if the need arises. You can see the weatherstripping on the door frame.
View of the turner from the top window. and is securely mounted.
The hatching drawer with water wiggler and thermometer, you can see one of the air inlet ports to the left top of this photo. they are capped when not in use. the other is on the bottom on the opposite side. for good cross ventilation of fresh air.
Project Finished and going for a test run to check the operation of temps & humidity, and any leaks or problems.
So there you have it, my first attempt at even making an incubator, to be honest I have learned so much on the BYC, that is what enabled me to tackle such a job. The incubator is now up and running and all seems to be great with everything holding very well, and I added 41 eggs the other day so we will see.
I have added some front door latches and a drawer pull, I have given it much thought and to be honest I can't think of anything I would have done or made different except maybe give myself longer than one weekend to design and build it, that was two very long days. I accomplished what I wanted!!!, make my Incubator my wife would be proud to have in the house. So next time you find that old beat up cabinet in the barn give this some thought before you toss it on the burn pile.
AL
MATERIALS LIST:
I cabinet, 1 roll 24"x 10' foil insulation, 1 tube silicone caulk, 1 sheet 24'x 48" 1/8" thick Plexiglas, 1"x4"x8' white pine, stain, 2-8'pieces of trim molding, wire, 2 light kits, 1 small light kit for candler, 1 porcelain light socket base, 1 metal circuit box, 1 water heater thermostat, 1 - 4" fan, 1-4' piece of 1/2" PVC pipe, 3 -1/2" end PVC end caps, 1-90 degree PVC elbow, thermometers, water wiggler, egg turners, water pan & sponge, heat sink jar, hardware cloth, 5 plug light strip, weatherstripping, various screws & nails and some minor misc parts and basic tools.
Total cost around $ 150.00 Way less for a comparable incubator of this size and capacity, not to mention I think it looks better than a Sportsman model incubator. Designing and building it was fun but not difficult or challenging, so most anybody with just basic skills I feel could do a good job at this Incubator.
My chicken interest have gotten to the point where I thought that I would like to try my hand at Incubating some eggs. My wife said that since it would have to be in the house that it should at least look pretty nice, So I had to figure out how to design a furniture grade cabinet Incubator, that also would have all of the neat bells and whistles that I thought I would like to have. The following is what the finished product looks like.
Features :
3 large viewing windows, 1 large sliding hatching tray, remote water fill tube, 2 air vents, separate light for viewing when in off cycle, space age insulation, built in candler, 4" oscillating fan, 4 thermometers 2= mercury 2= digital 1= w/remote sensor, both with humidity readouts, well sealed doors & drawer, high powered 250 watt heat lamp, water heater thermostat, 1 automatic egg turner with the capacity to have 5 more added, hatching drawer holds 200 eggs, total up gradable capacity 240 eggs, stained and finished oak cabinet 27"wide x 27"deep x 33" high,
here is the furniture grade cabinet incubator.
I found a beat up and severely damaged vanity cabinet at my local cabinet shop where I do a lot of business, and was able to get it for a song. I then began to tear down and prepare it.
Torn up and gutted, I had to remake the bottom from 2" x 4" for added strength. you can see damage on the side.
I made a top from 1"x 4" white pine and rabbited the inset for the Plexiglas, and mounted it securely.
Reinforced the back panel and layed in the pvc water fill tube w/ funnel, also bored the holes for all of the other electrical work.
I tied the funnel to the tube for easy access, and added some trim molding.
Cut, Glued and stapled in the R13 1/8" foil insulation, it holds heat very well and it is easy to clean and disinfect. an added plus is it reflects the light well so it is easy to view.
Carefully cut out the damaged door panels to prep for glass, The glass is 1/8" Plexiglas and can be difficult to work with and cut & drill. all glass was screwed in with a layer of silicon sealant. and weather stripping added to all doors & drawer.
Cut out the bottom of the drawer and installed 1/2" hardware cloth and insulation. it is very strong and can hold over 200 eggs.
Wired in the 250 watt heat lamp w/metal box, water heater thermostat, and fan, added a heat sink jar in red. Notice the thermostat is spaced away from the back wall about 1 1/2" with rubber spacers to allow for better air flow to the sensor, which is in the rear. a 4" fan provides adequate air circulation. the base of the light is porcelain and has an additional grounded plug for any extra plug in accessories. like a big screen TV or video LOL. all wiring is direct with no splices or wire nuts for safety.
Water pan with sea sponge, and filler tube outlet, the sea sponge holds more air for more stable humidity levels, the pan holds 2 gallons of water and can raise humidity levels 30% in less than 20 min, I only add HOT water when needed.
Built in candler: and man this thing works great, and can be switched out for different size eggs. it is operated separately with a 7 watt c sized bulb secured to the cabinet from the underside and operated by a thumb switch in the back panel. I have an egg size adapter for turkey and quail eggs.
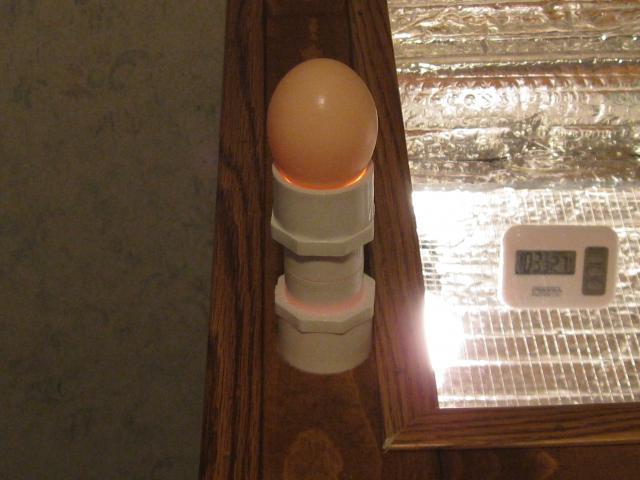
This egg is a large brown egg of standard shape and color.
Auto turner mounted to custom stiles, the incubator has the added capacity for 5 more turners, for 245 eggs total. that may be added later if need be. I thought it would be nice to have more capacity if the need arises. You can see the weatherstripping on the door frame.

View of the turner from the top window. and is securely mounted.
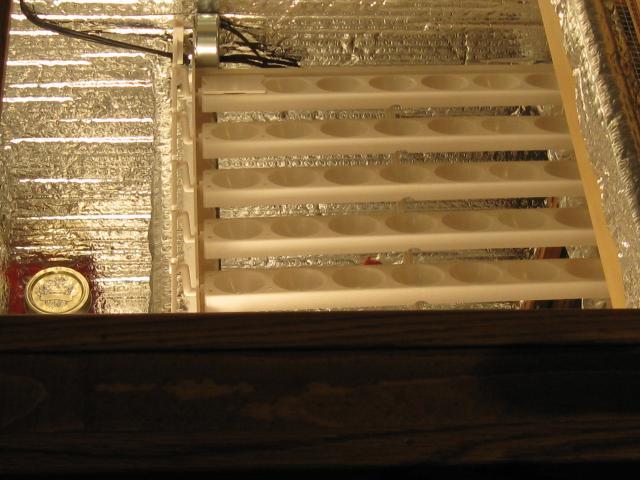
The hatching drawer with water wiggler and thermometer, you can see one of the air inlet ports to the left top of this photo. they are capped when not in use. the other is on the bottom on the opposite side. for good cross ventilation of fresh air.
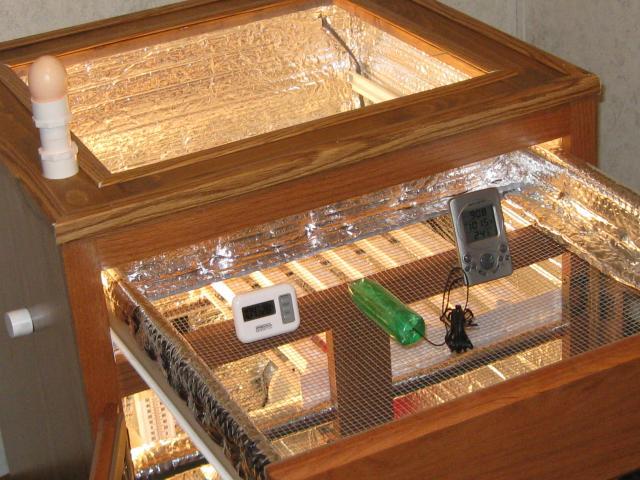
Project Finished and going for a test run to check the operation of temps & humidity, and any leaks or problems.
So there you have it, my first attempt at even making an incubator, to be honest I have learned so much on the BYC, that is what enabled me to tackle such a job. The incubator is now up and running and all seems to be great with everything holding very well, and I added 41 eggs the other day so we will see.
I have added some front door latches and a drawer pull, I have given it much thought and to be honest I can't think of anything I would have done or made different except maybe give myself longer than one weekend to design and build it, that was two very long days. I accomplished what I wanted!!!, make my Incubator my wife would be proud to have in the house. So next time you find that old beat up cabinet in the barn give this some thought before you toss it on the burn pile.
AL
MATERIALS LIST:
I cabinet, 1 roll 24"x 10' foil insulation, 1 tube silicone caulk, 1 sheet 24'x 48" 1/8" thick Plexiglas, 1"x4"x8' white pine, stain, 2-8'pieces of trim molding, wire, 2 light kits, 1 small light kit for candler, 1 porcelain light socket base, 1 metal circuit box, 1 water heater thermostat, 1 - 4" fan, 1-4' piece of 1/2" PVC pipe, 3 -1/2" end PVC end caps, 1-90 degree PVC elbow, thermometers, water wiggler, egg turners, water pan & sponge, heat sink jar, hardware cloth, 5 plug light strip, weatherstripping, various screws & nails and some minor misc parts and basic tools.
Total cost around $ 150.00 Way less for a comparable incubator of this size and capacity, not to mention I think it looks better than a Sportsman model incubator. Designing and building it was fun but not difficult or challenging, so most anybody with just basic skills I feel could do a good job at this Incubator.