This is our first experience having chickens and like any new parents we researched (here) as much as possible before building our coop. The build started in February and was completed in June upon the arrival of 6 pullets- the maximum we are allowed in our town. A large amount of material was scavenged and repurposed keeping the costs lower but we estimate the overall build was probably 1500.00- quite a bit more than I had hoped. Still, the neighborhood is suburban and the better the coop looks the more likely neighbors will be to accept it.
So starting at the very beginning- location and foundation. A required 20 ft from neighbors put us right next to a big oak tree- and we have a high water table. Predators will definitely be a concern with Audubon property adjacent to ours- we have coyotes, fox, mink, fisher cats, eagles, hawks, raccoons, skunks- you get the idea.

When the ground was workable we were clearing and digging for a safe, solid, and level base. A 2 ft hardware cloth skirt was attached to the 4x4's that were the base for our construction. We used a grinder to cut the hardware cloth and it was fantastic- a little luxury that was WORTH EVERY PENNY. The pressure treated 4x4's are painted and put on cinder blocks that we buried and leveled in gravel at ground level. My husband also took the extra precaution of anchoring the foundation into the ground with steel fence t-posts.
I brought in a couple truckloads of mulch/fill that I used to cover the hardware cloth and grade and level the area.These next pictures also show where the T-posts/anchors are attached. It doesn't look it but I swear it's level. Foundation is ready!
Winter weather dictated what we were able to work on at times. We worked together on endless drawings (we both went to art school) and came up with rough plans that changed somewhat throughout the build. I sourced supplies (Craigslist, work, online, hardware stores) and tried to paint as much as possible before assembly would begin. My husband started with framing and buying himself lots of new tools which I thought was reasonable.
Framing...
Openings for windows, nesting box, pop door, and clean out door are on three sides with the fourth side/north side of the coop having a built in closet large enough to hold a bale of pine shavings and bucket of feed. The coop is about 75 ft from the house and I knew hauling supplies would get annoying pretty quickly.
I work on a golf course and hit the jackpot when they build a new maintenance building- there was plenty of leftover material so we were able to get a metal roof and most of that hardware for free. Roof is going up!
Building the walls, doors, and windows. The corner angle brackets look pretty and make a huge difference in bracing the structure- nice and sturdy. The hardware cloth went up covering the run and all windows at this point too.
An excuse to break out my grandfather's table saw!
Here you get a good view of how we attached the hardware cloth and of the corner bracing in the run. Everything was painted as soon as it was assembled if not before.
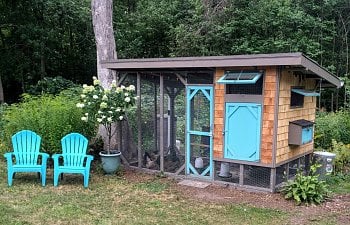
Cedar shingles match our New England Cape. The blue also goes with our house.
My idea was for our new pets to earn their keep- not be another chore. Maintenance needed to be as easy as possible and that meant splurging on an automatic pop door- WORTH EVERY PENNY. A covered run that I could easily stand in and rake out and poop board in the coop covered with Sweet PDZ makes clean up a breeze. There is also a rain barrel connected to the gutter along the back so I have water available- it can be seen in the next picture with a deer hiding in the brush.
I had no idea how fun this was going to be...
And the girls (3 Australorps and 3 Easter Eggers) love to help when the wood gets split- apparently ants are delicious.
The finishing touch was a fascia board that I insisted go across the front of the roof- I didn't think the metal edge looked polished and my husband has some skills when it comes to building so I forced the issue- apparently it isn't the 'right' way to do things.
Pictures here show more detail of the storage closet in the back which is 18" deep- exactly right for a 10 gallon bucket of feed and bale of pine shavings.
Some interior shots which might be helpful...removable kick holds in bedding, brackets hold roost and poop board.
One note on color choice- the blue that we chose was a little brighter than we wanted but chickens make everything so DIRTY they toned it down a lot!
If we were to change anything we might revisit where we put the windows. We were thinking purely for light and ventilation but didn't realize how fun it is to peek inside at them and it's just not the right height to do that. Also our chickens insist on laying their eggs under the poop board instead of in the nesting box- I think it's darker there for them- so we might need to change that in the future.
Interior wall on the left has largest window and pop door...
Interior wall right has another window and the nesting box now with curtains and ceramic eggs thanks to helpful BYC members ...
Another picture of the still unused nesting box- chickens are weird.
And one from inside the run...
Overall we are very happy with the aesthetics and functionality of our coop- and it was a really fun endeavor for the both of us. Thank you BackYard Chickens for all the helpful designs, tips, and resources!
So starting at the very beginning- location and foundation. A required 20 ft from neighbors put us right next to a big oak tree- and we have a high water table. Predators will definitely be a concern with Audubon property adjacent to ours- we have coyotes, fox, mink, fisher cats, eagles, hawks, raccoons, skunks- you get the idea.
When the ground was workable we were clearing and digging for a safe, solid, and level base. A 2 ft hardware cloth skirt was attached to the 4x4's that were the base for our construction. We used a grinder to cut the hardware cloth and it was fantastic- a little luxury that was WORTH EVERY PENNY. The pressure treated 4x4's are painted and put on cinder blocks that we buried and leveled in gravel at ground level. My husband also took the extra precaution of anchoring the foundation into the ground with steel fence t-posts.
I brought in a couple truckloads of mulch/fill that I used to cover the hardware cloth and grade and level the area.These next pictures also show where the T-posts/anchors are attached. It doesn't look it but I swear it's level. Foundation is ready!
Winter weather dictated what we were able to work on at times. We worked together on endless drawings (we both went to art school) and came up with rough plans that changed somewhat throughout the build. I sourced supplies (Craigslist, work, online, hardware stores) and tried to paint as much as possible before assembly would begin. My husband started with framing and buying himself lots of new tools which I thought was reasonable.
Framing...
Openings for windows, nesting box, pop door, and clean out door are on three sides with the fourth side/north side of the coop having a built in closet large enough to hold a bale of pine shavings and bucket of feed. The coop is about 75 ft from the house and I knew hauling supplies would get annoying pretty quickly.
I work on a golf course and hit the jackpot when they build a new maintenance building- there was plenty of leftover material so we were able to get a metal roof and most of that hardware for free. Roof is going up!
Building the walls, doors, and windows. The corner angle brackets look pretty and make a huge difference in bracing the structure- nice and sturdy. The hardware cloth went up covering the run and all windows at this point too.
An excuse to break out my grandfather's table saw!
Here you get a good view of how we attached the hardware cloth and of the corner bracing in the run. Everything was painted as soon as it was assembled if not before.
Cedar shingles match our New England Cape. The blue also goes with our house.
My idea was for our new pets to earn their keep- not be another chore. Maintenance needed to be as easy as possible and that meant splurging on an automatic pop door- WORTH EVERY PENNY. A covered run that I could easily stand in and rake out and poop board in the coop covered with Sweet PDZ makes clean up a breeze. There is also a rain barrel connected to the gutter along the back so I have water available- it can be seen in the next picture with a deer hiding in the brush.
I had no idea how fun this was going to be...
And the girls (3 Australorps and 3 Easter Eggers) love to help when the wood gets split- apparently ants are delicious.
The finishing touch was a fascia board that I insisted go across the front of the roof- I didn't think the metal edge looked polished and my husband has some skills when it comes to building so I forced the issue- apparently it isn't the 'right' way to do things.
Pictures here show more detail of the storage closet in the back which is 18" deep- exactly right for a 10 gallon bucket of feed and bale of pine shavings.
Some interior shots which might be helpful...removable kick holds in bedding, brackets hold roost and poop board.
One note on color choice- the blue that we chose was a little brighter than we wanted but chickens make everything so DIRTY they toned it down a lot!
If we were to change anything we might revisit where we put the windows. We were thinking purely for light and ventilation but didn't realize how fun it is to peek inside at them and it's just not the right height to do that. Also our chickens insist on laying their eggs under the poop board instead of in the nesting box- I think it's darker there for them- so we might need to change that in the future.
Interior wall on the left has largest window and pop door...
Interior wall right has another window and the nesting box now with curtains and ceramic eggs thanks to helpful BYC members ...
Another picture of the still unused nesting box- chickens are weird.
And one from inside the run...
Overall we are very happy with the aesthetics and functionality of our coop- and it was a really fun endeavor for the both of us. Thank you BackYard Chickens for all the helpful designs, tips, and resources!
Cheers!