Schroeder's Quail Pen (and Brooder)
I set off on my quest to create a facility to house coturnix quail without ever having seen a coturnix. I got hooked on the idea from browsing this forum, and have learned just about anything I know of them from this site.
I had plenty of time over the winter to take on this project, so I wasn't hurried in thinking out some of the details
 (okay, my wife says I am a perfectionist). I'm sure as I begin raising the quail I will learn a lot of things that I will change in my next design.
The entire unit is 2 ft wide by 6 ft long by 6+ ft tall. At first I'll have it under a carport, but I made it to withstand the wind and rain, and to be predator-proof, in case I move it out into the open. The wheels give me the flexibility to roll it into the pole barn during the worst part of our Midwest winters. I was able to keep the cost very low because most of the materials I had on hand except for the 1/2 x 1/2 hardware cloth and roofing shingles, which I had to purchase. I split 2x4's lengthwise to create the framework. I used 1/2 in thick poplar for the houses. (I had a portable sawmill mill this 14 inch wide lumber for me 20 years ago and I finally found a use for it.) As any good project manager does, however, I used this project to justify the purchase of a new tool. I bought an air compressor and set of tools, including a staple gun. I would highly recommend you not attack a pen like this without an air driven stapler. It makes the job so much easier, sturdier and more professional looking. In fact, I don't know that the framework would handle the beating of hammered-in staples.
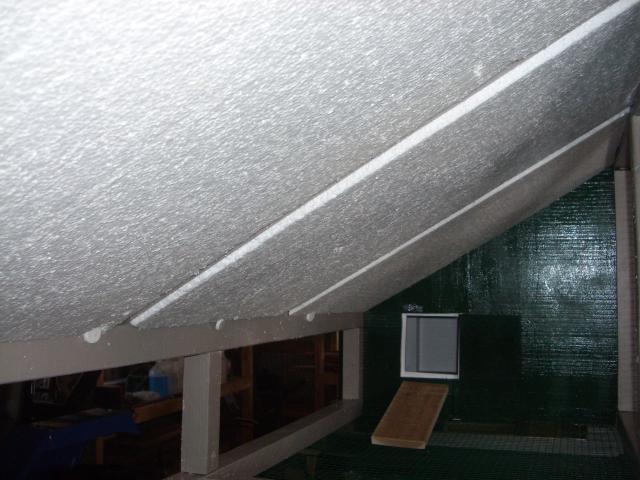
The hardware cloth on the floor is plastic coated, as I hear this is more comfortable on their feet. I attached all the hardware cloth to the inside of the bracing so that the quail wouldn't have exposed rails on which to relieve themselves. In retrospect, I made each level taller (about 2 feet tall) than I should have for coturnix, although it would better accommodate bobwhites or rabbits if I ever decide to use the pens for a different purpose. Because of concern for them bopping their heads on the ceiling, I attached 1 1/2 in thick scraps of styrofoam
to the ceiling of the top pen. Since this photo was taken I have removed the styrofoam. The quail could reach some of it, and they we eating it. The ceiling on the bottom pen is just regular hardware cloth, but I attached it a bit loosely hoping
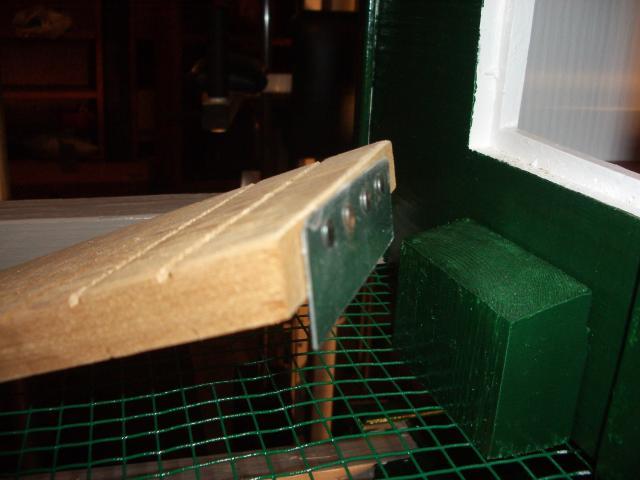
to cushion any collisions. (I may learn that I'll need to afix some netting below this ceiling as a better cushion.) I installed removable floors in the houses for summer and winter use. The little quail doors to the houses are hinged, with a way to lock them in the open and shut positions. I placed them several inches above the floor so that any bedding inside the house would stay put better. These have come in handy when I want to clean the houses and when I want to remove selected birds (without them running and hiding in the house). The ramp is just a piece of cedar with grooves cut in it. I attached a metal plate that drops into a slot at the back of the "porch" so that I can take it out easily for cleaning.
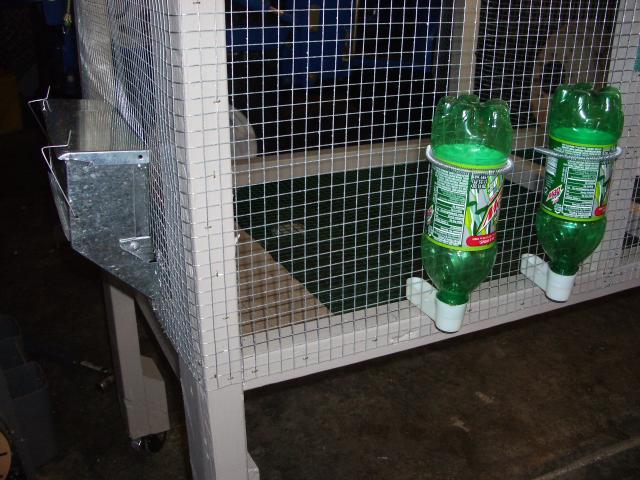
I used the fabric hinges that someone sells on this forum. They are easy to install, work quite well, and save a lot money. The jury is still out on durability. Note I didn't take the doors to the pen areas all the way down to the floor. My theory is it will be harder for the quail to escape this way.
For drop pans, I'm using 2 ft x 3 ft metal sheets from Auto Zone designed for catching oil under a leaky car. I wish I would have known about these before I started so that I could have made the pen dimensions better accommodate them.
I am using pop bottle waterers. So far, my experience has been that 5 or 6 coturnix empty one 20 oz bottle about every 24 hours. The rabbit feeders are attached to the outside of the cage for easy filling and I used pop rivets to attach a hasp (with safety pin) to the lid to thwart the raccoons. I bent a piece of sheet metal and attached it to the feeder with rivets to reduce the size of the opening. I am hopeful this will reduce the amount of feed that is wasted.
The Brooder
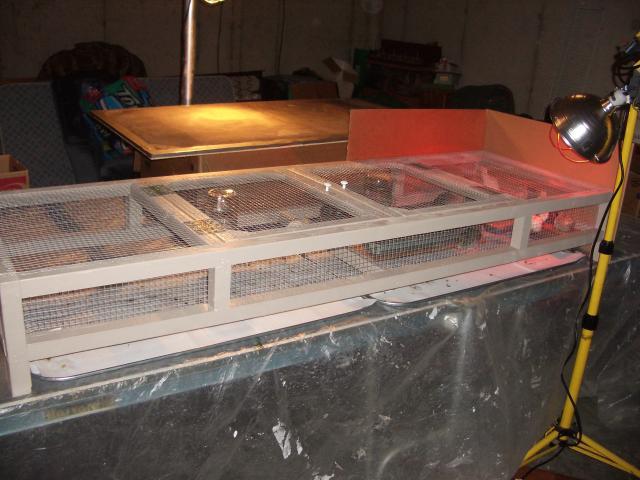
I used the same 1 1/2 x 1 1/2 lumber to construct a brooder box. Again, I stapled all the hardware cloth to the inside of the framing to avoid any difficult-to-clean shelves. This time I already had the drop pans, so I made sure they fit perfectly beneath the box. The dimensions are 2 ft x 6+ ft x 8 inches high. The fabric hinges allow the doors to swing open as much or little as I like. While extra heat is needed, I put a couple of pieces of corrugated cardboard on the outside of one end, and shine the heat lamp into that corner. I also put a thin board on the inside floor of that corner because the young quail seem to prefer to sleep on it rather than the wire.
I bought paper towel in bulk at a wholesale store to use on top of the drop pans. This makes it easy to roll up the poop filled towels and place them in a tightly sealed trash bag. With 24 3-week old quails inside, daily clean up is required or the basement would smell pretty bad.
About 8 months after my first babies, I sold everything and got out of the quail business. They take a lot of time. I had to check feed and water, and empty the drop trays at least once a day, often twice. The eggs are good, but taste no different to me than chicken eggs. Since it takes 5 to equal 1 chicken egg, I thought it makes more sense for me to expand my chicken hobby. Also, my wife insists she has a digestive problem with the quail eggs, so I alone could not keep up with the volume. I called several Asian restaurants and couldn't find anyone interested in purchasing eggs. When it came time to butcher, it just seemed like far more work to me than what the small reward justified. I am now working on a second, mega-chicken coop.
I set off on my quest to create a facility to house coturnix quail without ever having seen a coturnix. I got hooked on the idea from browsing this forum, and have learned just about anything I know of them from this site.
I had plenty of time over the winter to take on this project, so I wasn't hurried in thinking out some of the details

The entire unit is 2 ft wide by 6 ft long by 6+ ft tall. At first I'll have it under a carport, but I made it to withstand the wind and rain, and to be predator-proof, in case I move it out into the open. The wheels give me the flexibility to roll it into the pole barn during the worst part of our Midwest winters. I was able to keep the cost very low because most of the materials I had on hand except for the 1/2 x 1/2 hardware cloth and roofing shingles, which I had to purchase. I split 2x4's lengthwise to create the framework. I used 1/2 in thick poplar for the houses. (I had a portable sawmill mill this 14 inch wide lumber for me 20 years ago and I finally found a use for it.) As any good project manager does, however, I used this project to justify the purchase of a new tool. I bought an air compressor and set of tools, including a staple gun. I would highly recommend you not attack a pen like this without an air driven stapler. It makes the job so much easier, sturdier and more professional looking. In fact, I don't know that the framework would handle the beating of hammered-in staples.
The hardware cloth on the floor is plastic coated, as I hear this is more comfortable on their feet. I attached all the hardware cloth to the inside of the bracing so that the quail wouldn't have exposed rails on which to relieve themselves. In retrospect, I made each level taller (about 2 feet tall) than I should have for coturnix, although it would better accommodate bobwhites or rabbits if I ever decide to use the pens for a different purpose. Because of concern for them bopping their heads on the ceiling, I attached 1 1/2 in thick scraps of styrofoam


I used the fabric hinges that someone sells on this forum. They are easy to install, work quite well, and save a lot money. The jury is still out on durability. Note I didn't take the doors to the pen areas all the way down to the floor. My theory is it will be harder for the quail to escape this way.
For drop pans, I'm using 2 ft x 3 ft metal sheets from Auto Zone designed for catching oil under a leaky car. I wish I would have known about these before I started so that I could have made the pen dimensions better accommodate them.
I am using pop bottle waterers. So far, my experience has been that 5 or 6 coturnix empty one 20 oz bottle about every 24 hours. The rabbit feeders are attached to the outside of the cage for easy filling and I used pop rivets to attach a hasp (with safety pin) to the lid to thwart the raccoons. I bent a piece of sheet metal and attached it to the feeder with rivets to reduce the size of the opening. I am hopeful this will reduce the amount of feed that is wasted.


The Brooder
I used the same 1 1/2 x 1 1/2 lumber to construct a brooder box. Again, I stapled all the hardware cloth to the inside of the framing to avoid any difficult-to-clean shelves. This time I already had the drop pans, so I made sure they fit perfectly beneath the box. The dimensions are 2 ft x 6+ ft x 8 inches high. The fabric hinges allow the doors to swing open as much or little as I like. While extra heat is needed, I put a couple of pieces of corrugated cardboard on the outside of one end, and shine the heat lamp into that corner. I also put a thin board on the inside floor of that corner because the young quail seem to prefer to sleep on it rather than the wire.
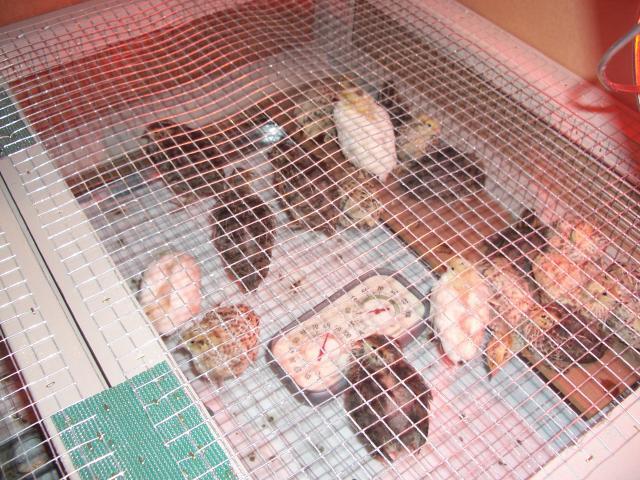
I bought paper towel in bulk at a wholesale store to use on top of the drop pans. This makes it easy to roll up the poop filled towels and place them in a tightly sealed trash bag. With 24 3-week old quails inside, daily clean up is required or the basement would smell pretty bad.
About 8 months after my first babies, I sold everything and got out of the quail business. They take a lot of time. I had to check feed and water, and empty the drop trays at least once a day, often twice. The eggs are good, but taste no different to me than chicken eggs. Since it takes 5 to equal 1 chicken egg, I thought it makes more sense for me to expand my chicken hobby. Also, my wife insists she has a digestive problem with the quail eggs, so I alone could not keep up with the volume. I called several Asian restaurants and couldn't find anyone interested in purchasing eggs. When it came time to butcher, it just seemed like far more work to me than what the small reward justified. I am now working on a second, mega-chicken coop.

