I've tried a number of tractor designs to allow for growing out chicks in a safe way, while taking advantage of all the benefits that a chicken tractor offers. This is my latest design, hopefully easy to understand because I took a lot of pictures as I built it. I have made these in 8x8 and 8x12 versions. This one is 8x12 and the size I recommend unless you are really cramped for space.
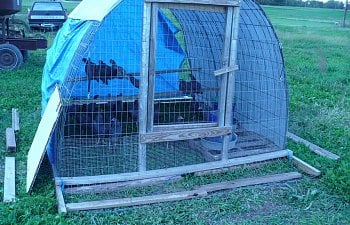
Here are some pictures of the finished project:

And these are detailed pictures of the construction:
Cut angles 8 inches back on both ends of 2 - 16' PT 2x4's. These allow you to more easily drag the finished coop. If you are making the coop 8' instead of 12', you can use 12' 2x4's here.
Drill holes in both ends of the 2 - 8' PT 2x4's.
Get 3" lag screws and washers started in the holes.
Screw the 8' boards on top of the longer, boards as shown. Note the cuts you made earlier as on the bottom of the longer boards.
Space the 8' boards to allow for the cattle panels to fit between them with a little "wiggle room". For a 12', 3 panel design, that would be a little over 150", say 151".
Measure carefully, it's a pain to redo these if you get them wrong.
Finished view of one end.
Put the cattle panels into place. One person can do this, but if you have help, this step is where you can use it best.
Closeup of how the panels are attached to the long boards with large fence staples. The board underneath is just temporary to make it easier to reach the staples with a hammer.
Closeup on the end to show how the panels fit into the frame.
First upright for the door frame. I use untreated 2x3's to save money and weight.
Wrap the exterior with 2x4 welded wire. I use 4' high, 5' or 6' will work too. Start at the door frame.
Wrapping in progress. The welded wire is to keep out most predators that might be able to reach through the cattle panel larger mesh. You need the ends wired anyway.
Detail of how the corners are handled when wrapping.
The welded wire goes between the panels and the wood, and inside the frame on the ends. Use poultry staples to secure it.
Another view, showing the other door frame in place.
Door is made from scrap wood. The welded wire makes it easy to get it square.
Flipper over and nailed on the other side.
Cut pieces of 1/2" hardware cloth for the lower parts that are not getting tarped. I make it 14" high, you can got taller if you want to be more secure. This is to prevent a predator reaching through the welded wire to get at a bird inside. If your birds always roost reliably, you may not need this, but I often put chicks in these that have not yet learned to roost.
HW cloth in place on the end without the door.
More views of the HW cloth placement.
Secure the door to one of the frame pieces. I leave 14" at the bottom to correspond to the HW cloth that will cover that part.
Add a latch to the other side of the door.
Install the completed door and make sure it all fits before nailing the frames to the base.
Finished door. Note the HW cloth along the bottom here also.
Inside door post detail. Make sure everything is covered with HW cloth.
Door posts protrude up through the cattle panel. Secure them with more large staples or wire.
Finished door view.
Detail of the end with extra scrap pieces of welded wire in place.
Tarp added.
Easy to screw down with galvanized screws and fender washers, at least on the first side.
Unless the tarp is perfectly sized, you will need to deal with the excess material on the second side. I use a piece of plastic conduit to hold it down tightly and tie the grommets to the cattle panel on the inside. It's hard to see here, and this is where you may have to get a bit creative, but you are very close to finished at this point.
Material list:
3 - 50" x 16' cattle panels
1 - roll 2x4 welded wire, 4' or more high
1 tarp 12x16 (or slightly larger)
2 - 16' PT 2x4
2 - 8' PT 2x4
5 (or more) 8' 2x3 (use these for roosts inside as well as the door framing if you don't have suitable scraps.
Fencing staples
Poultry wire staples
8 - 3" galv lag screws
8 - galv washers
galv screws and fender washers
2 - hinges
Here are some pictures of the finished project:
And these are detailed pictures of the construction:
Cut angles 8 inches back on both ends of 2 - 16' PT 2x4's. These allow you to more easily drag the finished coop. If you are making the coop 8' instead of 12', you can use 12' 2x4's here.
Drill holes in both ends of the 2 - 8' PT 2x4's.
Get 3" lag screws and washers started in the holes.
Screw the 8' boards on top of the longer, boards as shown. Note the cuts you made earlier as on the bottom of the longer boards.
Space the 8' boards to allow for the cattle panels to fit between them with a little "wiggle room". For a 12', 3 panel design, that would be a little over 150", say 151".
Measure carefully, it's a pain to redo these if you get them wrong.
Finished view of one end.
Put the cattle panels into place. One person can do this, but if you have help, this step is where you can use it best.
Closeup of how the panels are attached to the long boards with large fence staples. The board underneath is just temporary to make it easier to reach the staples with a hammer.
Closeup on the end to show how the panels fit into the frame.
First upright for the door frame. I use untreated 2x3's to save money and weight.
Wrap the exterior with 2x4 welded wire. I use 4' high, 5' or 6' will work too. Start at the door frame.
Wrapping in progress. The welded wire is to keep out most predators that might be able to reach through the cattle panel larger mesh. You need the ends wired anyway.
Detail of how the corners are handled when wrapping.
The welded wire goes between the panels and the wood, and inside the frame on the ends. Use poultry staples to secure it.
Another view, showing the other door frame in place.
Door is made from scrap wood. The welded wire makes it easy to get it square.
Flipper over and nailed on the other side.
Cut pieces of 1/2" hardware cloth for the lower parts that are not getting tarped. I make it 14" high, you can got taller if you want to be more secure. This is to prevent a predator reaching through the welded wire to get at a bird inside. If your birds always roost reliably, you may not need this, but I often put chicks in these that have not yet learned to roost.
HW cloth in place on the end without the door.
More views of the HW cloth placement.
Secure the door to one of the frame pieces. I leave 14" at the bottom to correspond to the HW cloth that will cover that part.
Add a latch to the other side of the door.
Install the completed door and make sure it all fits before nailing the frames to the base.
Finished door. Note the HW cloth along the bottom here also.
Inside door post detail. Make sure everything is covered with HW cloth.
Door posts protrude up through the cattle panel. Secure them with more large staples or wire.
Finished door view.
Detail of the end with extra scrap pieces of welded wire in place.
Tarp added.
Easy to screw down with galvanized screws and fender washers, at least on the first side.
Unless the tarp is perfectly sized, you will need to deal with the excess material on the second side. I use a piece of plastic conduit to hold it down tightly and tie the grommets to the cattle panel on the inside. It's hard to see here, and this is where you may have to get a bit creative, but you are very close to finished at this point.
Material list:
3 - 50" x 16' cattle panels
1 - roll 2x4 welded wire, 4' or more high
1 tarp 12x16 (or slightly larger)
2 - 16' PT 2x4
2 - 8' PT 2x4
5 (or more) 8' 2x3 (use these for roosts inside as well as the door framing if you don't have suitable scraps.
Fencing staples
Poultry wire staples
8 - 3" galv lag screws
8 - galv washers
galv screws and fender washers
2 - hinges