Building a chicken coop from free pallets: By Judy

I am fortunate to live near a vinyl siding company, and they stack stacks of pallets outside that are free for the taking. These aren't the same as the pallets one normally sees at feed stores, etc. However, if you are lucky enough to live near a siding company, perhaps they will be giving away their pallets, also. Hubby doesn't care much for chickens, so I decided to build myself a chickenhouse. I took apart approximately 200 of these pallets. The photo above shows the type of pallet. In each pallet is one 2 X 6 that is 45 inches long, one 1 X 6 that is 47 inches long, and 2 end pieces that are 1 X 6 and about 38 inches long. A few of these pallets also have a covering of 1/4 inch plyboard which is 48" by 40".
Since the longest 2 x 6's I had were 45 inches, I had to piece them together to make my floor jousts, wall studs, and the boards around the top of the walls. Youcan see in this photo how I have scabbed the floor joists together.
I used the 47" 1x6 boards, which had rounded edges and were very smooth, for the flooring. I set my floor joists so that I didn't have to saw these, just used the lengths as they were.
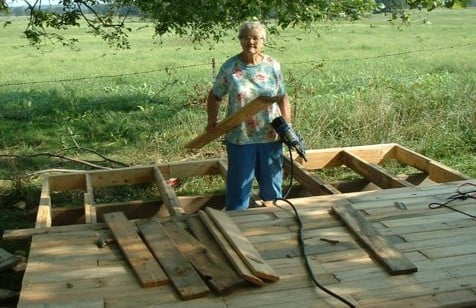
Hubby soon started to feel sorry for me (or probably get embarrassed. LOL) and started helping me lift the walls, and help with the high stuff. You can see that I have scabbed the wall studs together from the 2 x 6's also. Did the same for the boards along the top.
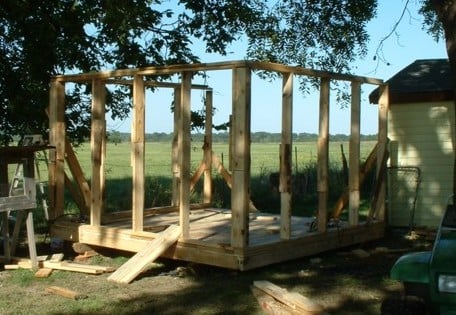
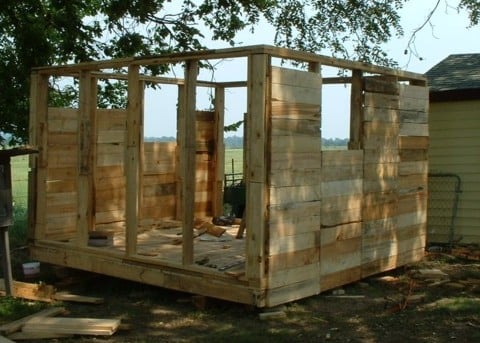
I have started boarding in the walls, with the shorter 1 x 6 end boards from the pallets. Again, instead of using the standard distance between my wall studs, I spaced them so that I didn't have to saw any from these boards. The side with the window in it is facing south.
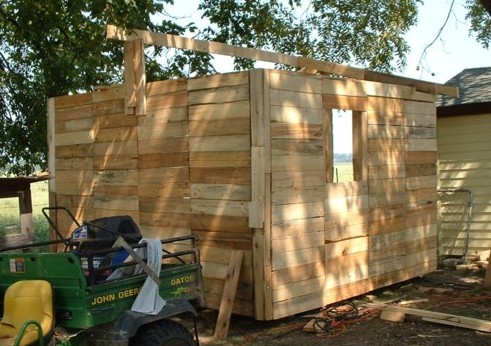
Picture #8. Getting the walls pretty well filled in.
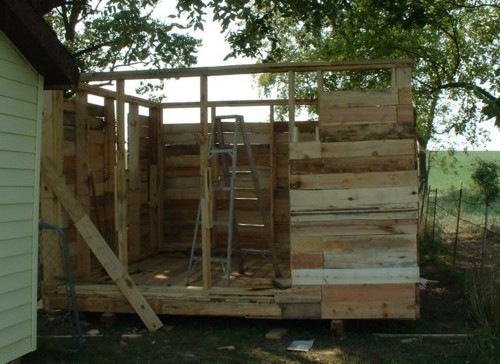
Picture #9. This is the east end of the building, where the door will be. The finished building you see is a storage building.
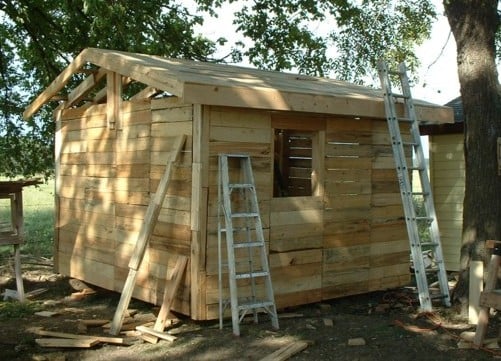
Picture #11. Getting ready to put the rafters up. The ridgepole along the top is one of the very few boards I bought. Hubby didn't think a scabbed together one would do for that. However, I did scab the rafters together from the short 2 x 6's.
The roof was boarded in with the same smooth 1/x 6 boards that were used on the floor. Again, I spaced the rafters so that i didn't have to saw any off these 47 inch boards. I staggered them so that they didn't all meet at the same rafter, for added strength. You can see one of my bantams watching the progress from the small coop I had them in.
Picture #14. The east end again. We made the door from the plywood that was on some of the pallets.
Picture #15. In this picture you can see the other boards I had to purchase, rather than piecing together. The ones that ran along the ends of the rafters.
Picture #16. We have the roof on. Hubby roofed it, while I handed up shingles. He has worked as a roofer, so I was happy to let him take care of that. You can see leaning against the tree the type plyboard that is on some of the pallets.
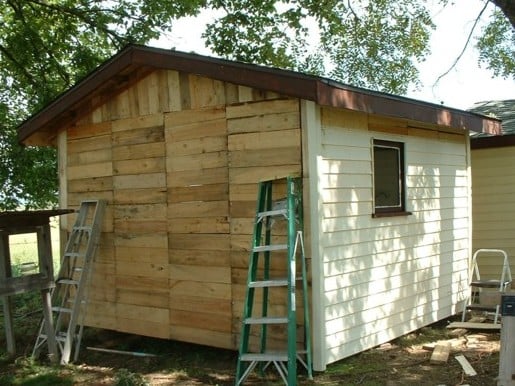
Starting the vinyl siding. We had some left over from when we did the house and outbuildings, but had to buy some to go with it. Hubby said he didn't want it to look junky.? The vinyl, the roofing, the 3 boards I mentioned, and the nails and hinges, etc, were our only expense. We think we saved about $1000 in lumber by using the pallets.
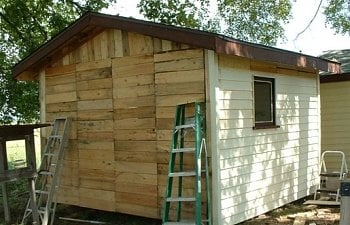
Picture #18. Finished on the outside. East end.
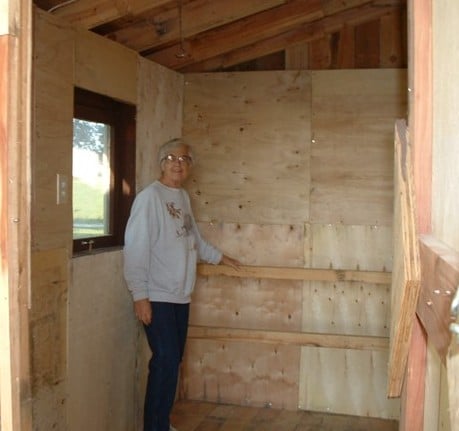
Since I had enough of the plyboards, we paneled the inside with them, and I have just put up the roosts. One thing I would sure do different is I would put both roosts at the same height, instead of staggering them, with the one closest to the wall 3 ft high, and the other one 2 ft. I thought they could hop on the lower one, and the ones who wanted to could use the lower one. But they all insist on sitting on the high one, and the ones that don't fit there sit on top of the nest cover, or the feed barrels.
Picture #27. South side and west end of the finished building.
Picture #29. Laying out my chicken yard. Since I had all the free 2 x 6's, I used them to stabilize the top and bottom of my chicken wire. Then I laid a triple row of them, nailed together and to the bottom 2 x 6, all around the outside edge, to discourage something digging under.
Completed pen, with happy residents.
Henny Penny and I.
Now that I have had the setup for 2 years, I don't have many things I would change. The roost, as mentioned before. And I might put larger windows. The pen was covered with deep sea fishing net that I got off e-bay. This was working wonderfully till the ice storm that hit the area a month ago. (Jan. 2007) and ice formed on each strand over 1/2 inch thick. This pulled the netting down, tearing it up, and since I had strung a couple wires under it to keep it from sagging when humidity was high, the wires pulled my posts out of the ground. My pen was destroyed. We have gotten it up again, and this time I have put deer netting over the top. I don't think anything would have worked in the ice, however.
Hubby has worried that perhaps the whole thing will collapse, since all the boards in the walls are nailed to each stud. He thinks I should have purchased some long boards to tie it together better. But I put cross supports inside. From a bottom corner up to the opposite top corner, on each wall, and so far, it has all been very solid. The house is 11 X 12 ft. I put it on 2 runners which are under the floor at about the place I scabbed the floor joists, so it shouldn't sag.
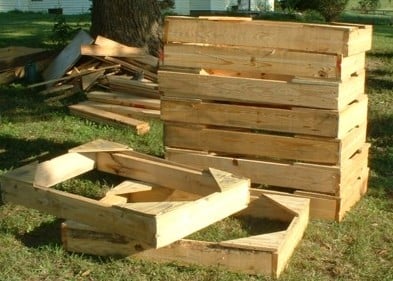
I am fortunate to live near a vinyl siding company, and they stack stacks of pallets outside that are free for the taking. These aren't the same as the pallets one normally sees at feed stores, etc. However, if you are lucky enough to live near a siding company, perhaps they will be giving away their pallets, also. Hubby doesn't care much for chickens, so I decided to build myself a chickenhouse. I took apart approximately 200 of these pallets. The photo above shows the type of pallet. In each pallet is one 2 X 6 that is 45 inches long, one 1 X 6 that is 47 inches long, and 2 end pieces that are 1 X 6 and about 38 inches long. A few of these pallets also have a covering of 1/4 inch plyboard which is 48" by 40".
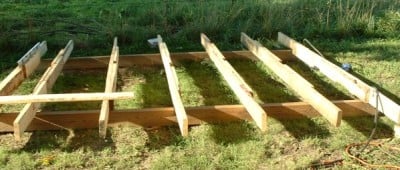
Since the longest 2 x 6's I had were 45 inches, I had to piece them together to make my floor jousts, wall studs, and the boards around the top of the walls. Youcan see in this photo how I have scabbed the floor joists together.
I used the 47" 1x6 boards, which had rounded edges and were very smooth, for the flooring. I set my floor joists so that I didn't have to saw these, just used the lengths as they were.
Hubby soon started to feel sorry for me (or probably get embarrassed. LOL) and started helping me lift the walls, and help with the high stuff. You can see that I have scabbed the wall studs together from the 2 x 6's also. Did the same for the boards along the top.
I have started boarding in the walls, with the shorter 1 x 6 end boards from the pallets. Again, instead of using the standard distance between my wall studs, I spaced them so that I didn't have to saw any from these boards. The side with the window in it is facing south.
Picture #8. Getting the walls pretty well filled in.
Picture #9. This is the east end of the building, where the door will be. The finished building you see is a storage building.
Picture #11. Getting ready to put the rafters up. The ridgepole along the top is one of the very few boards I bought. Hubby didn't think a scabbed together one would do for that. However, I did scab the rafters together from the short 2 x 6's.
The roof was boarded in with the same smooth 1/x 6 boards that were used on the floor. Again, I spaced the rafters so that i didn't have to saw any off these 47 inch boards. I staggered them so that they didn't all meet at the same rafter, for added strength. You can see one of my bantams watching the progress from the small coop I had them in.
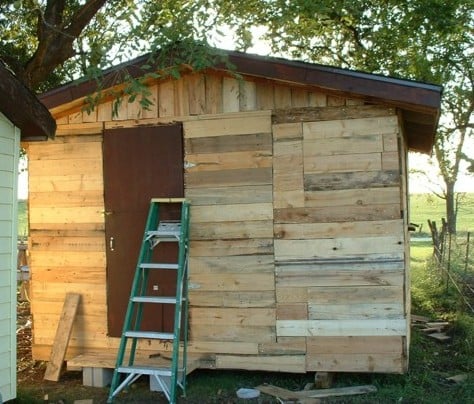
Picture #14. The east end again. We made the door from the plywood that was on some of the pallets.
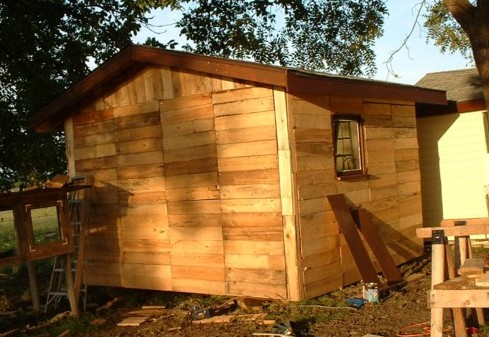
Picture #15. In this picture you can see the other boards I had to purchase, rather than piecing together. The ones that ran along the ends of the rafters.
Picture #16. We have the roof on. Hubby roofed it, while I handed up shingles. He has worked as a roofer, so I was happy to let him take care of that. You can see leaning against the tree the type plyboard that is on some of the pallets.
Starting the vinyl siding. We had some left over from when we did the house and outbuildings, but had to buy some to go with it. Hubby said he didn't want it to look junky.? The vinyl, the roofing, the 3 boards I mentioned, and the nails and hinges, etc, were our only expense. We think we saved about $1000 in lumber by using the pallets.
Picture #18. Finished on the outside. East end.
Since I had enough of the plyboards, we paneled the inside with them, and I have just put up the roosts. One thing I would sure do different is I would put both roosts at the same height, instead of staggering them, with the one closest to the wall 3 ft high, and the other one 2 ft. I thought they could hop on the lower one, and the ones who wanted to could use the lower one. But they all insist on sitting on the high one, and the ones that don't fit there sit on top of the nest cover, or the feed barrels.
Picture #27. South side and west end of the finished building.
Picture #29. Laying out my chicken yard. Since I had all the free 2 x 6's, I used them to stabilize the top and bottom of my chicken wire. Then I laid a triple row of them, nailed together and to the bottom 2 x 6, all around the outside edge, to discourage something digging under.
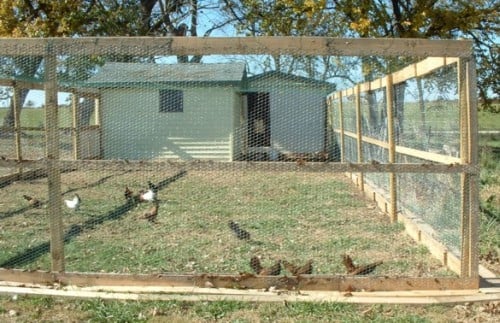
Completed pen, with happy residents.
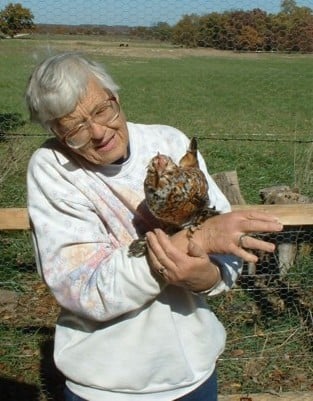
Henny Penny and I.
Now that I have had the setup for 2 years, I don't have many things I would change. The roost, as mentioned before. And I might put larger windows. The pen was covered with deep sea fishing net that I got off e-bay. This was working wonderfully till the ice storm that hit the area a month ago. (Jan. 2007) and ice formed on each strand over 1/2 inch thick. This pulled the netting down, tearing it up, and since I had strung a couple wires under it to keep it from sagging when humidity was high, the wires pulled my posts out of the ground. My pen was destroyed. We have gotten it up again, and this time I have put deer netting over the top. I don't think anything would have worked in the ice, however.
Hubby has worried that perhaps the whole thing will collapse, since all the boards in the walls are nailed to each stud. He thinks I should have purchased some long boards to tie it together better. But I put cross supports inside. From a bottom corner up to the opposite top corner, on each wall, and so far, it has all been very solid. The house is 11 X 12 ft. I put it on 2 runners which are under the floor at about the place I scabbed the floor joists, so it shouldn't sag.