The Incredible Chick-quarium

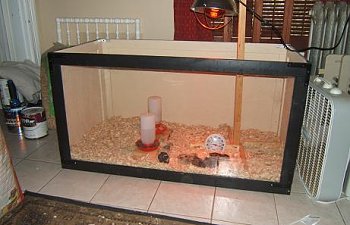
View of the Incredible Chick-quarium from my desk.
Initially my plan was to "house chicks". I figured a nice big rubbermaid tub would do nicely -- so I took myself to a big box store to buy one. But the biggest tub I found was 50 gallons... fine for 5 wee babies, God forbid they should grow. And God forbid I should actually want to see them growing. So I went back to the drawing board... and started nosing around in my workshop. (I tend to keep scraps.)
The new plan came with some criteria... I wanted to see my chicks and I wanted my brooder to suit them from Hatchery Arrival to Coop Departure.
The big box store sells plexi-glass (please don't ask me what "mil" ... "thick enough to suit me" was the size I got. The dimensions are 2'x4'. In my work shop I had several cuts of 1/4" oak plywood sized 2'x4'. I also had lengths of 1"x3"s and 1"x2"s.
I used 2 sheets of 2'x4' oak plywood one for the back and the other, cut in half to 2'x2', to serve as end pieces. These were framed with the 1"x3"s to make panels. Essentially the 1"x3"s were milled (cheek and shoulder cuts) to form a rabbit deep enough to support the oak plywood and the plexiglass.
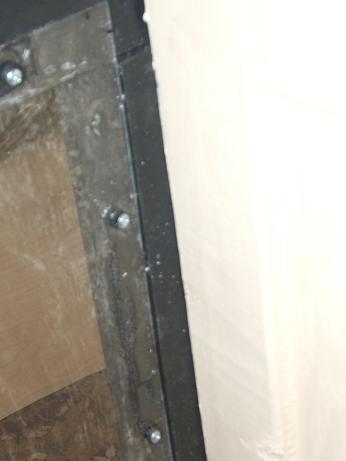
The rabbits and plexi attachment can be seen here:
In adddition to 1/2" screws and rubber washers, the Plexi was further supported with silicone glue. Wood panels were adhered using 1/2" screws and wood glue.
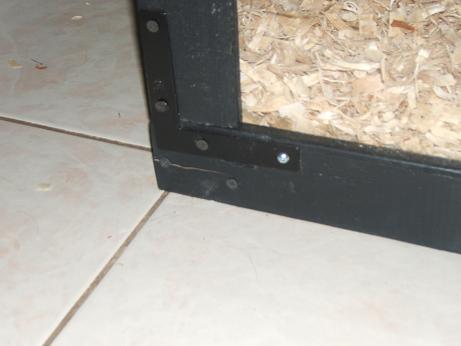
At the lower edge of each panel I screwed a 1"x2" to support a floor made of 1/2" poplar plywood, also scavenged from my workshop -- covered in vynil peel-n-stick floor tiles.
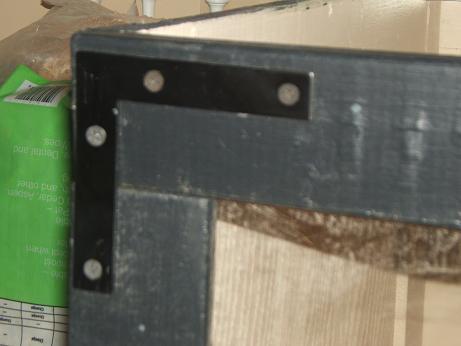
The plexi panel is not as strong as the all wood panels and therefore I attached flat corner brackets (painted black) at each corner for added strength, seen here:
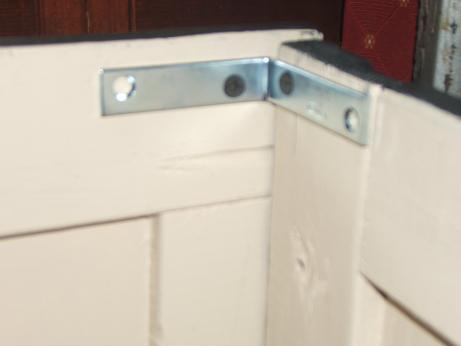
Upper corners are held in place using dimensional corner brackets -- these not only attach the corners, but also aid in maintaining the box square:
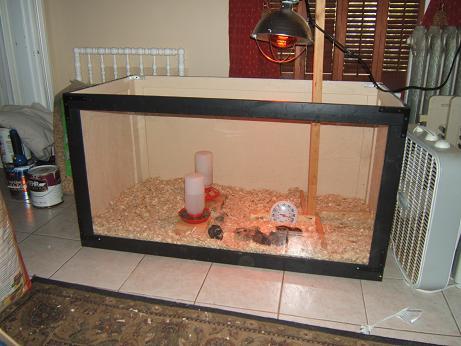
To suspend the heat lamp over the brooder I simply put a support right into the crate -- it's sturdy and secure and easy to build. Mine is a 2"x2" with 1"x3" "legs. The heap lamp can move up or down as needed and within a few weeks it can be removed entirely.
There is currently no top as the chicks are too small to fly out and the cat is too old to leap in -- a top is planned in the coming weeks. This brooder will fill the needs of these chicks till they are upwards of 6 to 8 weeks old -- when their coop, I swear, will be built.
One of my goals for this brooder is that it can be secured with as few as 8 to 10 screws and easily disassembled for easy storage when no longer needed.
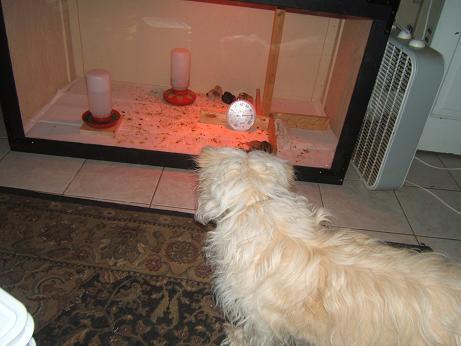
The greater goal of the Incredible Chick-quarium is that everybody can see each other... but can't reach each other:
Initially my plan was to "house chicks". I figured a nice big rubbermaid tub would do nicely -- so I took myself to a big box store to buy one. But the biggest tub I found was 50 gallons... fine for 5 wee babies, God forbid they should grow. And God forbid I should actually want to see them growing. So I went back to the drawing board... and started nosing around in my workshop. (I tend to keep scraps.)
The new plan came with some criteria... I wanted to see my chicks and I wanted my brooder to suit them from Hatchery Arrival to Coop Departure.
The big box store sells plexi-glass (please don't ask me what "mil" ... "thick enough to suit me" was the size I got. The dimensions are 2'x4'. In my work shop I had several cuts of 1/4" oak plywood sized 2'x4'. I also had lengths of 1"x3"s and 1"x2"s.
I used 2 sheets of 2'x4' oak plywood one for the back and the other, cut in half to 2'x2', to serve as end pieces. These were framed with the 1"x3"s to make panels. Essentially the 1"x3"s were milled (cheek and shoulder cuts) to form a rabbit deep enough to support the oak plywood and the plexiglass.
The rabbits and plexi attachment can be seen here:
In adddition to 1/2" screws and rubber washers, the Plexi was further supported with silicone glue. Wood panels were adhered using 1/2" screws and wood glue.
At the lower edge of each panel I screwed a 1"x2" to support a floor made of 1/2" poplar plywood, also scavenged from my workshop -- covered in vynil peel-n-stick floor tiles.
The plexi panel is not as strong as the all wood panels and therefore I attached flat corner brackets (painted black) at each corner for added strength, seen here:
Upper corners are held in place using dimensional corner brackets -- these not only attach the corners, but also aid in maintaining the box square:
To suspend the heat lamp over the brooder I simply put a support right into the crate -- it's sturdy and secure and easy to build. Mine is a 2"x2" with 1"x3" "legs. The heap lamp can move up or down as needed and within a few weeks it can be removed entirely.

There is currently no top as the chicks are too small to fly out and the cat is too old to leap in -- a top is planned in the coming weeks. This brooder will fill the needs of these chicks till they are upwards of 6 to 8 weeks old -- when their coop, I swear, will be built.
One of my goals for this brooder is that it can be secured with as few as 8 to 10 screws and easily disassembled for easy storage when no longer needed.
The greater goal of the Incredible Chick-quarium is that everybody can see each other... but can't reach each other: