Thank you for viewing my Coop page! I hope you enjoy looking at it as much as I enjoyed putting it together!
Also my complete run build can be found at the link below:
https://www.backyardchickens.com/a/updated-my-coop-for-a-french-hen-the-run-2

Updated 11/4/2014 below.
It's an on going project. The coop was built by the original owner back in the 1970's, using reclaimed lumber from an old barn. It's 9 .5 ft. x 13.5 ft. and comes complete with a "haymow."
The coop is only 5 1/2 ft. high inside as is the small run. The original owner was as tall as I am - 5 ft. 3 inches! I started with chickens in the spring of 2012. Once I figured out how many chickens I wanted, I started by dividing the inside. I put up a partition in the back 5 ( x 13.5) feet with 3 doors. One door is for everyday use and the other 2 doors are like "French doors" that open together for easy cleaning. Those are in front of the roosting space.
I framed up the section, put in the doors and put hardware cloth over the openings. I added the nest boxes on the partition so I could access them from the storage side of the coop. I also added a small section with a nest box that's 3 x 3, for a brooder (after 30 days) or a "sickbay" for injured hens. I painted the inside with Lime Wash.
I also put in an automatic door. I really like having it for the most part. I did get one locked out once. Not good. (More on that at the end of post.)
There are two spaces in the "open" part, each with a shelf. One has a plastic tub under it for straw. DE, PDZ, and Pine shaving bags go on top of the tub lid. On the more open side, the shelf is 20" x 36". Large enough to use for "hospital" table if needed. (And it has been needed more than once!) The feed and scratch cans go under there. The coop originally had a run along the length of it 5 ft. wide. and only 4 1/2 ft. tall. There is a rock/stone/cement foundation for it with cut off pipes in the corners an along the length to hold metal fence posts. Around that was chicken wire. There was also aluminum roofing panels for a roof. I wasn't sure how those were originally put on, but I used the same setup, covering the run in chicken wire an placing the panels on top of the wire. That worked for the first year. But I was also concerned they would fly off in a bad wind. We did get some straight line winds that year that ripped the top of a 50 year old spruce tree, but the panels managed to stay put. Whew!
Last summer I started a new run, and redid the original. The new run measures 13 1/2 ft. x 16 ft. I started by putting in metal post supports that you drive 3 ft. into the ground. I put the first one in only 1/2 hour! Sheesh! I got DSO to help with the rest of the stakes. (Guys do have a little more muscle! LOL!) They are 8 ft. apart on the length and in the center and centered on one end. A walk-in door is on the south end and has 2 posts for support. The new run is off set by a foot from the original run due to the stone/cement foundation. The coop is built on a hill. So the slope of the ground made it more difficult to layout the new run. I was working with two slopes actually. The back NE corner of the run is the shortest in height. The side wall is just over 3 ft. whereas the side walls on the front SW corner is 6 ft. high. So it was a challenge to say the least. The next thing to do was to put the posts in and connect them. They are connected with 2 x 6s, and 2 x 4s. Then came the side panels. Each panel was fit to the section it went in. Figuring in angles, height, etc. I made a box from 2 x 4 lumber and attached 2 x 4 wire by wrapping over to the side of each box and fastened with heavy duty fence staples. Each panel is then put in place between posts, fastened by construction lag screws. This puts the fence staples out of the weather, and out of reach of prying predators. I put in the 4 - 8 ft. panels first and left the ends open for accessibility to work.
I used a tarp to help give shade and keep it dry while I worked. Next thing was to put up ridge beam and rafters. I ended up using a combination of ridge beam/board to make it easier on myself. The beam is supported in the center by the center post. But the rafters are attached to it like it's a ridge board. The biggest problem I had was with the squareness of everything. The coop itself is out of square by 3 inches. The original run foundation is off by 3 inches. The new run ended up more of a parallelogram instead of rectangle. So when the beam and rafters went up I had to do everything specific for it's placement. I also had to adjust for the metal roof. After the rafters I put the door in and I put the boards on the gable ends, cutting each one to fit.
Then I put 2 x 4s over the boards to frame the gables and to fit the purlins for the metal roof on.
Next came the purlins. And then I started the metal roof.
I put all but the last one closest to the original run on. I had to leave that open to be able to work on the roof for the original run. I also had to put the rain gutter on between the two runs, next and cover it with hardware cloth to keep critters out. Then, I did the original run roof pretty much the same way except I only had to do "half" of a roof, since it's a lean to type. Then I put the last roof panels on and the ridge cap on. That is pretty much where I have left off. I put clear 20 gauge vinyl over the sides of the original and the west (front) side of the new, for wind block for winter.
The end is still open and need the panels. Gutters need to go up on the east and west sides yet and add a rain barrel. The door is up but needs the wire. I still need to add hardware cloth on the inside of the panels and put wire around the perimeter 2 feet out. On top of that wire I will add stones and paving/patio blocks for walking on and to prevent predators from digging. I also have 2x6s attached to the bottom of the run to the ground to prevent predators from pulling on wire. The original part of the run still also needs a panel and an access door. I also have to paint the entire coop and run. And add some landscaping. There are 3 windows on the south side and two on the east side, one up top and one down, and the one on the front which is the west side. All of the windows need re-glazing or replaced. I made an awning the first year to keep the hot sun out of the west window. It also helps keep the draft out some as I usually leave that window open a crack for ventilation in the winter along with the center one on the south side. All of the windows are covered in hardware cloth. Still from 1970's! Except for one that I replaced on the east side. The center post besides helping to support, will serve as a post to help divide the run in the future, to grow some grass back on the sunnier sides. I can't wait for spring to get this finished! One more thing I do plan on is to enlarge "coop" space and reduce storage space. Chicken math has set in!!! LOL! Thanks for letting me share My Coop with you! And I do plan to update as the spring and coop/run progresses. You can see more pictures on my profile page; Album- "My Coop".
Update: 11/4/2014
Adding the wire to the end panel, prepainting end panels, and painting the the run.
Putting 1x6's on the bottom to prevent predators from prying at the wire.
Prepainted 1x2s to hold the hardware cloth in on the inside. I put those all the around each panel. I will also use them on the outside to hold clear vinyl in place for the winter.
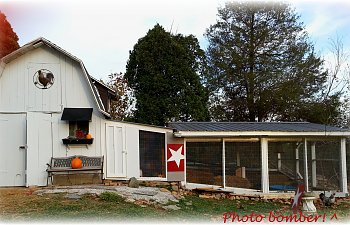
Coop and run painted. I painted up a new "Star" panel the old one was starting to delaminate. I redid the small door on the small part of the run too. Also made a wooden awning the cloth one was badly faded. I still need to add trim boards on the coop, add a better hardware coth apron (current ly its a coated chicken wire and the hareware cloth should be here by the end of the week), add stones and some kind of pavers around and landscape. The list grows by double every time I finish something! Imagine that "Coop Math?" I used 3 different sizes of grit in front of the coop where the bench sits so the girls have a good supply! I put rope lighting all the way around the inside just under the frame to light up the run at night and for the holidays, but the girls get confused and want to go out then.
I will update more in a week or so when I have finished up for the year.
(A side note - "A French Hen" is the name of my online resale shop for gently used things (Still in planning stages but website up.) and more importantly an outlet for my girls' EGGS! I got that name when I originally started out with 3 French Black Copper Marans and 2 Blue Marans. One was a rooster which DSO won't let me have, so I gave him and a companion hen to a good friend. Then I lost a Blue last winter when she got stuck outside while I was out of town and my DD was checking on them daily. But at 3:30 pm she didn't know one got locked out of the automatic door at night. When I got home the next night, it was too late she was too cold and only made through one more night. She's also one that got attacked by DSO's mom's dog and lost most of one of her breast meat to infection. Anyway my only black one died then in the spring being egg bound. So that left me "A French Hen." I love all the different chickens, (so many breeds, so little space!) but I am partial to the Marans.
Also my complete run build can be found at the link below:
https://www.backyardchickens.com/a/updated-my-coop-for-a-french-hen-the-run-2
Updated 11/4/2014 below.
It's an on going project. The coop was built by the original owner back in the 1970's, using reclaimed lumber from an old barn. It's 9 .5 ft. x 13.5 ft. and comes complete with a "haymow."
The coop is only 5 1/2 ft. high inside as is the small run. The original owner was as tall as I am - 5 ft. 3 inches! I started with chickens in the spring of 2012. Once I figured out how many chickens I wanted, I started by dividing the inside. I put up a partition in the back 5 ( x 13.5) feet with 3 doors. One door is for everyday use and the other 2 doors are like "French doors" that open together for easy cleaning. Those are in front of the roosting space.
I framed up the section, put in the doors and put hardware cloth over the openings. I added the nest boxes on the partition so I could access them from the storage side of the coop. I also added a small section with a nest box that's 3 x 3, for a brooder (after 30 days) or a "sickbay" for injured hens. I painted the inside with Lime Wash.
I also put in an automatic door. I really like having it for the most part. I did get one locked out once. Not good. (More on that at the end of post.)
There are two spaces in the "open" part, each with a shelf. One has a plastic tub under it for straw. DE, PDZ, and Pine shaving bags go on top of the tub lid. On the more open side, the shelf is 20" x 36". Large enough to use for "hospital" table if needed. (And it has been needed more than once!) The feed and scratch cans go under there. The coop originally had a run along the length of it 5 ft. wide. and only 4 1/2 ft. tall. There is a rock/stone/cement foundation for it with cut off pipes in the corners an along the length to hold metal fence posts. Around that was chicken wire. There was also aluminum roofing panels for a roof. I wasn't sure how those were originally put on, but I used the same setup, covering the run in chicken wire an placing the panels on top of the wire. That worked for the first year. But I was also concerned they would fly off in a bad wind. We did get some straight line winds that year that ripped the top of a 50 year old spruce tree, but the panels managed to stay put. Whew!
Last summer I started a new run, and redid the original. The new run measures 13 1/2 ft. x 16 ft. I started by putting in metal post supports that you drive 3 ft. into the ground. I put the first one in only 1/2 hour! Sheesh! I got DSO to help with the rest of the stakes. (Guys do have a little more muscle! LOL!) They are 8 ft. apart on the length and in the center and centered on one end. A walk-in door is on the south end and has 2 posts for support. The new run is off set by a foot from the original run due to the stone/cement foundation. The coop is built on a hill. So the slope of the ground made it more difficult to layout the new run. I was working with two slopes actually. The back NE corner of the run is the shortest in height. The side wall is just over 3 ft. whereas the side walls on the front SW corner is 6 ft. high. So it was a challenge to say the least. The next thing to do was to put the posts in and connect them. They are connected with 2 x 6s, and 2 x 4s. Then came the side panels. Each panel was fit to the section it went in. Figuring in angles, height, etc. I made a box from 2 x 4 lumber and attached 2 x 4 wire by wrapping over to the side of each box and fastened with heavy duty fence staples. Each panel is then put in place between posts, fastened by construction lag screws. This puts the fence staples out of the weather, and out of reach of prying predators. I put in the 4 - 8 ft. panels first and left the ends open for accessibility to work.
I used a tarp to help give shade and keep it dry while I worked. Next thing was to put up ridge beam and rafters. I ended up using a combination of ridge beam/board to make it easier on myself. The beam is supported in the center by the center post. But the rafters are attached to it like it's a ridge board. The biggest problem I had was with the squareness of everything. The coop itself is out of square by 3 inches. The original run foundation is off by 3 inches. The new run ended up more of a parallelogram instead of rectangle. So when the beam and rafters went up I had to do everything specific for it's placement. I also had to adjust for the metal roof. After the rafters I put the door in and I put the boards on the gable ends, cutting each one to fit.
Then I put 2 x 4s over the boards to frame the gables and to fit the purlins for the metal roof on.
Next came the purlins. And then I started the metal roof.
I put all but the last one closest to the original run on. I had to leave that open to be able to work on the roof for the original run. I also had to put the rain gutter on between the two runs, next and cover it with hardware cloth to keep critters out. Then, I did the original run roof pretty much the same way except I only had to do "half" of a roof, since it's a lean to type. Then I put the last roof panels on and the ridge cap on. That is pretty much where I have left off. I put clear 20 gauge vinyl over the sides of the original and the west (front) side of the new, for wind block for winter.
The end is still open and need the panels. Gutters need to go up on the east and west sides yet and add a rain barrel. The door is up but needs the wire. I still need to add hardware cloth on the inside of the panels and put wire around the perimeter 2 feet out. On top of that wire I will add stones and paving/patio blocks for walking on and to prevent predators from digging. I also have 2x6s attached to the bottom of the run to the ground to prevent predators from pulling on wire. The original part of the run still also needs a panel and an access door. I also have to paint the entire coop and run. And add some landscaping. There are 3 windows on the south side and two on the east side, one up top and one down, and the one on the front which is the west side. All of the windows need re-glazing or replaced. I made an awning the first year to keep the hot sun out of the west window. It also helps keep the draft out some as I usually leave that window open a crack for ventilation in the winter along with the center one on the south side. All of the windows are covered in hardware cloth. Still from 1970's! Except for one that I replaced on the east side. The center post besides helping to support, will serve as a post to help divide the run in the future, to grow some grass back on the sunnier sides. I can't wait for spring to get this finished! One more thing I do plan on is to enlarge "coop" space and reduce storage space. Chicken math has set in!!! LOL! Thanks for letting me share My Coop with you! And I do plan to update as the spring and coop/run progresses. You can see more pictures on my profile page; Album- "My Coop".
Update: 11/4/2014
Adding the wire to the end panel, prepainting end panels, and painting the the run.
Putting 1x6's on the bottom to prevent predators from prying at the wire.
Prepainted 1x2s to hold the hardware cloth in on the inside. I put those all the around each panel. I will also use them on the outside to hold clear vinyl in place for the winter.
Coop and run painted. I painted up a new "Star" panel the old one was starting to delaminate. I redid the small door on the small part of the run too. Also made a wooden awning the cloth one was badly faded. I still need to add trim boards on the coop, add a better hardware coth apron (current ly its a coated chicken wire and the hareware cloth should be here by the end of the week), add stones and some kind of pavers around and landscape. The list grows by double every time I finish something! Imagine that "Coop Math?" I used 3 different sizes of grit in front of the coop where the bench sits so the girls have a good supply! I put rope lighting all the way around the inside just under the frame to light up the run at night and for the holidays, but the girls get confused and want to go out then. 
I will update more in a week or so when I have finished up for the year.
(A side note - "A French Hen" is the name of my online resale shop for gently used things (Still in planning stages but website up.) and more importantly an outlet for my girls' EGGS! I got that name when I originally started out with 3 French Black Copper Marans and 2 Blue Marans. One was a rooster which DSO won't let me have, so I gave him and a companion hen to a good friend. Then I lost a Blue last winter when she got stuck outside while I was out of town and my DD was checking on them daily. But at 3:30 pm she didn't know one got locked out of the automatic door at night. When I got home the next night, it was too late she was too cold and only made through one more night. She's also one that got attacked by DSO's mom's dog and lost most of one of her breast meat to infection. Anyway my only black one died then in the spring being egg bound. So that left me "A French Hen." I love all the different chickens, (so many breeds, so little space!) but I am partial to the Marans.
")