Gregg's Eggs
Coop

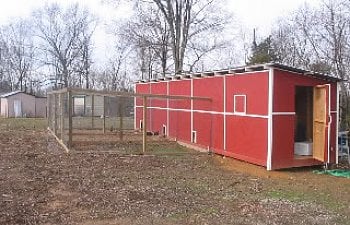
I have started building, what I think of as a "monster size" coop and run. Its finished dimensions will be 320 sq ft (8' x 40') coop and a 480 sq ft (16' x 30') run. The coop will be divided into 4 equal areas, 1 for each of the 3 breeds of chickens I have, and the 4th area will be for feed storage and incubating. The run will be divided into 3 equal areas, 1 for each breed.
I am running electricity and water to the coop from my houses breaker box and water supply. I started by digging the 100ft ditch 18+ in, well below the local frost line, using a ditch witch/digger. I "T'd" off on my water line and ran the pvc to where the coop is going. I installed a breaker in my breaker box and and ran 10-2 out door wire also in the ditch to the coop.
I then installed a water hydrant and a water proof outdoor outlet.
I then built the outside framing for the floor using 4x4 posts and 2x6@8ft and I used 2x6's as joists.
I then laid 4x8 3/4 in "Advantech" ply wood and covered the frame for the floor.
I then began the stick framing for the walls using different length 2x4's depending on the height of the walls. The front walls are going to be 8' and the end and rear walls will be 7'. So the vert. studs I got precut.
I drew my plans using MS Paint, I divided my plans into 8' sections. I found it easier to build it in 8' panels. Each panel was built a little different. There is a total of 12 panels, #1-#5 is the front wall, #1 being the front left panel, #5 the front right panel, #6 is the right end panel w/ door, #7-#11 is the back wall,#7 the rear right panel,and so forth. #12 is the left end panel w/ window. Here is a copy is of the drawing I use the build said panels.
panel #1
panel #2
panel #3
Panel #4
Panel #5
Panel # 6
Panel #7
Panel #8
Panel #9
Panel #10
Panel #11
Panel #12
I finished framing out the exterior walls using precut 92 5/8" 2x4's and 8' 2x4's.
I framed out 1 window at the far end of the coop, where I will be mounting a box fan, to vent out hot stale air from inside the coop. I also framed out 4 windows on the back wall of the coop and 1 on the front to draw in fresh air during the summer. When finished the all will have hinged plywood shudders to keep out cold air in the winter.
I also framed out the partitioning walls and doors leading from one section to another. The dividing walls and doors will be covered with chicken wire. To allow plenty of ventilation through out.
After farming out the walls, I added a second(top plate)2x4 along the top of the walls, over lapping the seams of the 8' x 8' wall panels to help strengthen the walls.
I began putting up the 7/16 OSB sheeting on the exterior walls. I tell you that was not an easy task by myself.
After the plywood was up I then cut out all the windows and chicken doors.
Once the windows and door was cut out I cut put up the rafters. Next the roofing went on.
Coop

I have started building, what I think of as a "monster size" coop and run. Its finished dimensions will be 320 sq ft (8' x 40') coop and a 480 sq ft (16' x 30') run. The coop will be divided into 4 equal areas, 1 for each of the 3 breeds of chickens I have, and the 4th area will be for feed storage and incubating. The run will be divided into 3 equal areas, 1 for each breed.
I am running electricity and water to the coop from my houses breaker box and water supply. I started by digging the 100ft ditch 18+ in, well below the local frost line, using a ditch witch/digger. I "T'd" off on my water line and ran the pvc to where the coop is going. I installed a breaker in my breaker box and and ran 10-2 out door wire also in the ditch to the coop.

I then installed a water hydrant and a water proof outdoor outlet.

I then built the outside framing for the floor using 4x4 posts and 2x6@8ft and I used 2x6's as joists.

I then laid 4x8 3/4 in "Advantech" ply wood and covered the frame for the floor.

I then began the stick framing for the walls using different length 2x4's depending on the height of the walls. The front walls are going to be 8' and the end and rear walls will be 7'. So the vert. studs I got precut.

I drew my plans using MS Paint, I divided my plans into 8' sections. I found it easier to build it in 8' panels. Each panel was built a little different. There is a total of 12 panels, #1-#5 is the front wall, #1 being the front left panel, #5 the front right panel, #6 is the right end panel w/ door, #7-#11 is the back wall,#7 the rear right panel,and so forth. #12 is the left end panel w/ window. Here is a copy is of the drawing I use the build said panels.
panel #1

panel #2

panel #3

Panel #4

Panel #5

Panel # 6

Panel #7

Panel #8

Panel #9

Panel #10

Panel #11

Panel #12


I finished framing out the exterior walls using precut 92 5/8" 2x4's and 8' 2x4's.

I framed out 1 window at the far end of the coop, where I will be mounting a box fan, to vent out hot stale air from inside the coop. I also framed out 4 windows on the back wall of the coop and 1 on the front to draw in fresh air during the summer. When finished the all will have hinged plywood shudders to keep out cold air in the winter.
I also framed out the partitioning walls and doors leading from one section to another. The dividing walls and doors will be covered with chicken wire. To allow plenty of ventilation through out.

After farming out the walls, I added a second(top plate)2x4 along the top of the walls, over lapping the seams of the 8' x 8' wall panels to help strengthen the walls.

I began putting up the 7/16 OSB sheeting on the exterior walls. I tell you that was not an easy task by myself.

After the plywood was up I then cut out all the windows and chicken doors.
Once the windows and door was cut out I cut put up the rafters. Next the roofing went on.