When we decided to go with chickens instead of a cat or a dog for pets, we were wondering how big the project for constructing a coop would become. Then we realized that the metal toy shed in the backyard was not getting much use. So, we decided to turn it into a coop. The shed is about 6'x10' and tall enough to walk in.
The conversion process involved the following steps
- The roof was cleared of all leaf and twig debris and given a fresh coat of rust proofing paint sprayed on.
- The few loose metal panels were secured with additional metal screws. The structure has to be really secure, otherwise, some critter will get in.
- The exterior was first painted barn red. This turned out too bright. So we painted it over with a more quieter aluminum gray.
- The floor was plywood. So we painted on a good coat of oil paint. The side walls were painted from floor up a couple of feet. Then the floor was secured on the bottom with half inch hardware cloth. This is to keep mice out. Please note that the hardware cloth goes on the exterior of the coop, not on the floor. This process involved some crawling under the structure, kind of claustrophobic under there, but it could be done.
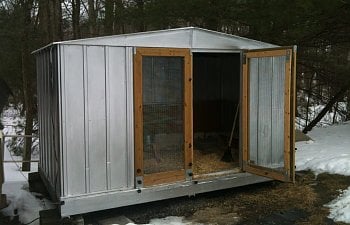
- Then we had to build a door. This was done using outdoor 2x4 wood. Only one side of the panel is hinged. The other side is fixed. The door frames were covered with two layers of hardware cloth- 1/2 inch hardware cloth to keep out small critters, and a 1x1.5 inch hardware cloth to keep anything bigger out.
Some closeup details of mitered corners, mesh installation and electric fence wires at the bottom of the door.
Electric fence
We added a simple electric fence on the front side only. We put the charger unit inside the toolshed which is right next to the coop. We put in a full 8 foot copper clad steel earthing rod behind the coop ( It is driven into the ground. This one went all the way in !). The earthing rod is essential for the electric fence to work properly. We switch on/off this fence by switching power on/off inside the toolshed. This has not been too inconvenient. The toolshed is also used to store feed in a large galvanized bin, the supply of crushed oyster shell grit and the box of diatomaceous earth.
Furnishings
The feeder is a standard galvanized feeder bought at the neighborhood feed store. The waterer is also a traditional galvanized design. For winter we added a metal heater base that was purchased at the same neighborhood feed store.
The floor is covered with pine shavings. The extra wood shavings are left in a corner in the coop.
For roosts, we used fallen tree limbs secured at a couple of places at the back. Also, there is a roost right behind the mesh front. The chickens really like to sit on this and watch outside.
The roosts, waterer, feeder, nesting boxes and mud bath
")
The coop now holds four easter eggers who are laying brown and green eggs. We only let them out for about half an hour a day, with someone keeping an eye on them.
The coop painted red:
The coop repainted gray.
These chickens are winter hardy. They do not need heating ( other than the waterer ). The mesh is open even on single digit New England winter nights. Its very important that the coop have full ventilation and fresh water all the time.
Some of the hardware that was used:
- 1/2" hardware cloth.
- 1 1/2"x1" hardware cloth.
- 3/8" pan head metal screws for reinforcing metal panels
- 1/2" pan head metal screws for attaching hardware cloth to metal and wood
- 1 1/4" pan head metal screws for attaching hardware cloth to wood
- metal brackets for door corners
- pressure treated wood - 2x6, 2x4, furring
- 2 1/2" outdoor screws to hold the 2x4s together as needed
- fender washers 3/4" for securing hardware cloth
- hinges 3, bolts 2
- oil paint for floor, roof and exterior
- electric fence charger, ground rod from home improvement store, aluminum wire, copper wire
- tenon saw and miter box ( yes, I still use hand tools if I can)
- cordless impact screw driver (yes, this is a power tool, but it saves you from blistering up driving all those washered screws to hold the hardware cloth mesh) use earplugs, since the impact driver, even the cordless one, can be pretty loud. It drives all the long screws into wood with ease.
- a good leveraged wire cutter for cutting the hardware cloth. Handle hardware cloth with care, the edges are sharp - gloves, jeans, jacket and eye protection are a must.