PrettyPaws29
In the Brooder
Well, here I am in Georgia - Up at 6:00 am working on a new brooder box! I woke up with all kinds of ideas!
I would love, love, love to see everyone else's brooders that they have made, and any DIY chicken projects, not just brooders! Come on guys - Show off your handy-work! I love sharing DIY projects!
I love having the early mornings to brainstorm and try things on my own with my own independent creativity. Absent of the kids hounding me to help - or the hubby hovering to point out every little think that isn't exactly how he would do it lol! This time of morning has brought many great things out of my brain and into reality - like a lot of furniture pieces that have been given another breath of life as pet beds, and more functional pieces for our homeschooling (like a china cabinet made into our arts and crafts center)
About this new brooder box - I'm wanting to do a new for a very simple reason - we have a 3 box system. One for hatch to 1-2 weeks old - one for 2-4 weeks old - one for 4 weeks to coop time. I want to integrate the last two into one complete brooder box - fit to sit in the house as a piece of furniture (in it's own room - the chick room lol - where all my supplies and extra chicken things hide out at). I will keep the first stage box - the hatch to 1-2 weeks box. I've liked using the three box system because I can keep different ages at one time. Also, usually one is empty and able to double as a separation box for if we end up with sick or injured birds.
While it has worked very well, especially back years ago when we used to keep a lot of different birds, I find myself cycling them around - dragging them here and there around the house depending on their needs at the time. One might be empty - another full of thriving babies, stable in the chicken room - and one with an injured or sick bird. I find myself taking the injured or sick one's with me everywhere and I'd be less inclined to do that if I felt better about where they are and their set up. With what I've come up with, I should have space for two different ages separated if needed, and another always separate area for sick or injured babies. I have an album up with pictures of all three boxes we currently use. But, this morning I woke up with what I envision to be a magnificent plan that will look amazing and function exactly like what I'm wanting out of it.
The Plan:
I'm using an old kitchen table I had in a shed - turned upside-down! (I refuse to throw away furniture - just for this reason) It provides a bottom that is already boxed off and about 6 inches deep. This will be perfect for the floor and bedding. and I can build up the 'box' around it using various materials I already have.
I have the first step done!
I have taken off the legs on the table- they were large, thick at the top and skinny at the bottom with an extraordinary curve in the middle of them. I decided to take them off and use 2x4's at the corners to give me straight walls. And the floor (which remember is the the top of the table) has been secured down. Next will come walls, door and the top!
Finished bottom:

The white planks are actually the slats from plantation blinds. The large, thick, solid, heavy wood blinds with the best coating of really stick and stain proof paint. I really didn't think that these would work out as great as they did.
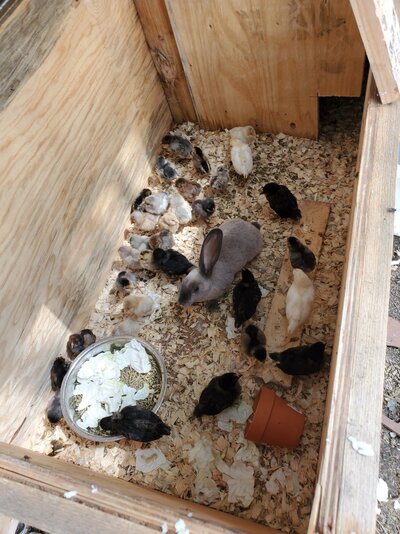
First - I put down pieces of an old, torn up tarp in the holes where the glass sat in, then covered one side and the middle area with the slats. These two areas will be covered with 4-5 inches of wood chippings. The main reason I wanted to use the wooden slats from the blinds here is because when it's time to empty it out for cleaning - these will be very easy to make look (and smell) like new again, Also, I think they look pretty - like the little chicks have wood floors lol!
On the other side, after covering the hole from the glass insert with the tarp, I found an old drawer that fit perfectly into the square. As you can see, the outer edge of it is covered with a simple piece of wood from a drawer that was falling apart (the back piece to it) to create a kind of shelf there. The drawer will be filled with gravel and covered with a screen. Food and water will be put on the 'shelf'.
I also plan on making this so that a divider can be placed between this side and the parts with the white floor in case of injured or sick babies.
What's Next:
Next I will get my 2x4's attached at the corners so that everything is nice and flush as I start building in the walls and the doors.
After the corner pieces are in I'll start piecing together the walls - For the walls I will be using a combination of things (again, this is all stuff I've found just laying around in my many sheds of furniture and stuff).
I will be using more of the wooden slats from the blinds for the two end sides - along with:
These stained glass cabinet doors:

Of course, I'm going to be removing all the hardware from them- but these will be the bottom half of the front and back walls. One will keep the hardware and be a door. I plan on having a small front door and the whole top will be on hinges to make for super easy cleaning time.
I do not have an exact plan for the top yet. I have a large piece of plexi-glass that I would like to frame in, put on hinges and let that be the top. I also have a lot of very large window screens that I am thinking just might be easier. So, still unsure on the top - but I am mulling my options.
I really hope I didn't just make that way too complicated to follow - it seemed so simple in my head , but I'm not sure it's coming out quite so simple lol! I do think I have a great plan that's going to end up being quite nice to look at, highly functional and much easier to clean than what I'm working with now.
I'll keep updating here throughout the day as progress is made, and hopefully by this afternoon you all will be seeing a finished product! We do have to work on the coop today - and we have an injured 3 week old bird - so I've got a lot on - but this idea could not be ignored this morning! So more pictures to come!
So what do you guys think of the overall idea - and the progress made so far? Any suggestions or ideas to make it better (or easier perhaps)? Show off all your DIY chicken stuff - lets all brag on ourselves for a bit on this wonderful Friday!
UPDATE!!!:
Well, after a few hours of removing cabinet door hardware and glass, then cleaning and cleaning, then changing my mind on how I want the overall finished product to look, how I want the doors, and a few other things - then more cleaning - Now there's a bit more progress to show!
Corners are going up. These are the cabinet doors, making up most of the support. Front is coming together:
Looking at the front:

From the left side:

Back with more pictures!
It's starting to look like something now! All four corners!
Front view:

Another front shot - trying to get good lighting on it:

Looking down from the top:

Now I'm going to be tacking on all the white strips, then on to framing up the front opening for the door. And last but not least, the top!
Back wall going up:

View inside through front windows (back wall still not finished):

And we have a full back wall!:


Now.....on to these side walls....
We're (I'm) getting close now. This has ended up being more of an undertaking than expected lol. There's a lot that goes into digging things out of shed you've been throwing things in for 10 years. The hubby and I have only had one spat over it haha! But he is going to have to help me get the top finished, as far a looks - getting some trim up around the top edges and he's going to have to help me figure out how to frame up the top I'm wanting and get it on.
What I'm currently looking at - I did get it lifted up on it's feet and off the floor (I really, really should have remembered to do that at the very beginning):

A look at the outside, one of the side ends:

Another view of the outside from the unfinished wall side:

Almost finished end. Just have to put trim around the bottom once the other end wall is done:

I'm pretty proud of how this thing is turning out. It's massive too. I could climb right in there easily and hang out with baby chickens if I wanted to. It will be short, it will probably be around 36-38 inches tall once the top is on and all finished. Inside measures 58 inches long and 37 inches wide.
DAY 2 Building Brooder
Here I am on day 2 of building this thing. I really thought I would get it finished yesterday - but between it, building a coop and run, and homeschooling a 7 and an 11 year old - well, it just didn't get done lol.
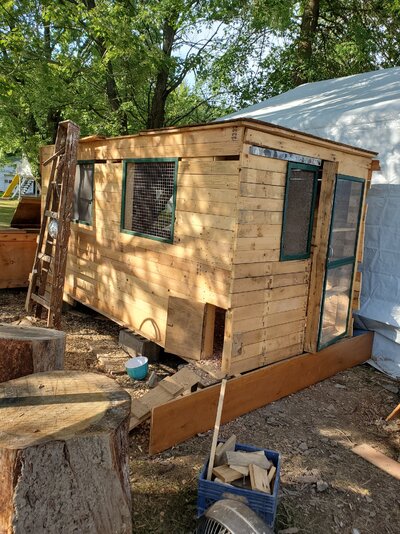
But it's looking great and coming together nicely (I think anyway). Walls are complete and I've put the trim pieces around the bottom:

All that's left now is finish off the tops of the walls, put in the front doors, and then the top:

I think it looks great. It's almost exactly as I had envisioned it too! I've still got to paint it (farther down the road, it definitely wont get done right now haha):

Maybe, just maybe - if I groom these dogs today with good time and can talk myself out of taking a nap - maybe it gets finished today. There isn't really much left, but this is where I'm stumped and wishy-washy as to how I want the last remaining things to look and function. So we shall see.
Day 3:
It's almost done! All I have to do is set up the inside, get the bedding, food and water in and then get the top attached. I can't wait to see the babies in their new place. And they will be able to see the world around them now! Not just things hovering above them lol!


Finished Brooder
New brooder is all finished and I could not be happier with how it turned out! The chicks have moved in and also seem to be enjoying themselves in their new space.
I'm going to make a stand to put it up on - at a later, undefined date lol. But, it's in it;s designated spot:

Very front (middle two doors open):

Inside - food and water side:

Their swing hanging with the pink ribbon. Gray shelf that's fastened to the bottom, but upside down and with the back facing out because they like to get in it. Dust bath in the blue bucket in front of the gray shelf. And another small shelf that also sits fastened to the bottom but upside down. It has large curves and rods in it they like to perch on and play with. All of these were in the larger of the brooders I was using. The older chicks are very, very attached to these specific things lol

All moved in! Excitedly checking the whole place out:

Happy chickens:

I would love, love, love to see everyone else's brooders that they have made, and any DIY chicken projects, not just brooders! Come on guys - Show off your handy-work! I love sharing DIY projects!
I love having the early mornings to brainstorm and try things on my own with my own independent creativity. Absent of the kids hounding me to help - or the hubby hovering to point out every little think that isn't exactly how he would do it lol! This time of morning has brought many great things out of my brain and into reality - like a lot of furniture pieces that have been given another breath of life as pet beds, and more functional pieces for our homeschooling (like a china cabinet made into our arts and crafts center)
About this new brooder box - I'm wanting to do a new for a very simple reason - we have a 3 box system. One for hatch to 1-2 weeks old - one for 2-4 weeks old - one for 4 weeks to coop time. I want to integrate the last two into one complete brooder box - fit to sit in the house as a piece of furniture (in it's own room - the chick room lol - where all my supplies and extra chicken things hide out at). I will keep the first stage box - the hatch to 1-2 weeks box. I've liked using the three box system because I can keep different ages at one time. Also, usually one is empty and able to double as a separation box for if we end up with sick or injured birds.
While it has worked very well, especially back years ago when we used to keep a lot of different birds, I find myself cycling them around - dragging them here and there around the house depending on their needs at the time. One might be empty - another full of thriving babies, stable in the chicken room - and one with an injured or sick bird. I find myself taking the injured or sick one's with me everywhere and I'd be less inclined to do that if I felt better about where they are and their set up. With what I've come up with, I should have space for two different ages separated if needed, and another always separate area for sick or injured babies. I have an album up with pictures of all three boxes we currently use. But, this morning I woke up with what I envision to be a magnificent plan that will look amazing and function exactly like what I'm wanting out of it.
The Plan:
I'm using an old kitchen table I had in a shed - turned upside-down! (I refuse to throw away furniture - just for this reason) It provides a bottom that is already boxed off and about 6 inches deep. This will be perfect for the floor and bedding. and I can build up the 'box' around it using various materials I already have.
I have the first step done!
I have taken off the legs on the table- they were large, thick at the top and skinny at the bottom with an extraordinary curve in the middle of them. I decided to take them off and use 2x4's at the corners to give me straight walls. And the floor (which remember is the the top of the table) has been secured down. Next will come walls, door and the top!
Finished bottom:
The white planks are actually the slats from plantation blinds. The large, thick, solid, heavy wood blinds with the best coating of really stick and stain proof paint. I really didn't think that these would work out as great as they did.
First - I put down pieces of an old, torn up tarp in the holes where the glass sat in, then covered one side and the middle area with the slats. These two areas will be covered with 4-5 inches of wood chippings. The main reason I wanted to use the wooden slats from the blinds here is because when it's time to empty it out for cleaning - these will be very easy to make look (and smell) like new again, Also, I think they look pretty - like the little chicks have wood floors lol!
On the other side, after covering the hole from the glass insert with the tarp, I found an old drawer that fit perfectly into the square. As you can see, the outer edge of it is covered with a simple piece of wood from a drawer that was falling apart (the back piece to it) to create a kind of shelf there. The drawer will be filled with gravel and covered with a screen. Food and water will be put on the 'shelf'.
I also plan on making this so that a divider can be placed between this side and the parts with the white floor in case of injured or sick babies.
What's Next:
Next I will get my 2x4's attached at the corners so that everything is nice and flush as I start building in the walls and the doors.
After the corner pieces are in I'll start piecing together the walls - For the walls I will be using a combination of things (again, this is all stuff I've found just laying around in my many sheds of furniture and stuff).
I will be using more of the wooden slats from the blinds for the two end sides - along with:
These stained glass cabinet doors:
Of course, I'm going to be removing all the hardware from them- but these will be the bottom half of the front and back walls. One will keep the hardware and be a door. I plan on having a small front door and the whole top will be on hinges to make for super easy cleaning time.
I do not have an exact plan for the top yet. I have a large piece of plexi-glass that I would like to frame in, put on hinges and let that be the top. I also have a lot of very large window screens that I am thinking just might be easier. So, still unsure on the top - but I am mulling my options.
I really hope I didn't just make that way too complicated to follow - it seemed so simple in my head , but I'm not sure it's coming out quite so simple lol! I do think I have a great plan that's going to end up being quite nice to look at, highly functional and much easier to clean than what I'm working with now.
I'll keep updating here throughout the day as progress is made, and hopefully by this afternoon you all will be seeing a finished product! We do have to work on the coop today - and we have an injured 3 week old bird - so I've got a lot on - but this idea could not be ignored this morning! So more pictures to come!
So what do you guys think of the overall idea - and the progress made so far? Any suggestions or ideas to make it better (or easier perhaps)? Show off all your DIY chicken stuff - lets all brag on ourselves for a bit on this wonderful Friday!
UPDATE!!!:
Well, after a few hours of removing cabinet door hardware and glass, then cleaning and cleaning, then changing my mind on how I want the overall finished product to look, how I want the doors, and a few other things - then more cleaning - Now there's a bit more progress to show!
Corners are going up. These are the cabinet doors, making up most of the support. Front is coming together:
Looking at the front:
From the left side:
Back with more pictures!
It's starting to look like something now! All four corners!
Front view:
Another front shot - trying to get good lighting on it:
Looking down from the top:
Now I'm going to be tacking on all the white strips, then on to framing up the front opening for the door. And last but not least, the top!
Back wall going up:
View inside through front windows (back wall still not finished):
And we have a full back wall!:
Now.....on to these side walls....
We're (I'm) getting close now. This has ended up being more of an undertaking than expected lol. There's a lot that goes into digging things out of shed you've been throwing things in for 10 years. The hubby and I have only had one spat over it haha! But he is going to have to help me get the top finished, as far a looks - getting some trim up around the top edges and he's going to have to help me figure out how to frame up the top I'm wanting and get it on.
What I'm currently looking at - I did get it lifted up on it's feet and off the floor (I really, really should have remembered to do that at the very beginning):
A look at the outside, one of the side ends:
Another view of the outside from the unfinished wall side:
Almost finished end. Just have to put trim around the bottom once the other end wall is done:
I'm pretty proud of how this thing is turning out. It's massive too. I could climb right in there easily and hang out with baby chickens if I wanted to. It will be short, it will probably be around 36-38 inches tall once the top is on and all finished. Inside measures 58 inches long and 37 inches wide.
DAY 2 Building Brooder
Here I am on day 2 of building this thing. I really thought I would get it finished yesterday - but between it, building a coop and run, and homeschooling a 7 and an 11 year old - well, it just didn't get done lol.
But it's looking great and coming together nicely (I think anyway). Walls are complete and I've put the trim pieces around the bottom:
All that's left now is finish off the tops of the walls, put in the front doors, and then the top:
I think it looks great. It's almost exactly as I had envisioned it too! I've still got to paint it (farther down the road, it definitely wont get done right now haha):
Maybe, just maybe - if I groom these dogs today with good time and can talk myself out of taking a nap - maybe it gets finished today. There isn't really much left, but this is where I'm stumped and wishy-washy as to how I want the last remaining things to look and function. So we shall see.
Day 3:
It's almost done! All I have to do is set up the inside, get the bedding, food and water in and then get the top attached. I can't wait to see the babies in their new place. And they will be able to see the world around them now! Not just things hovering above them lol!
Finished Brooder
New brooder is all finished and I could not be happier with how it turned out! The chicks have moved in and also seem to be enjoying themselves in their new space.
I'm going to make a stand to put it up on - at a later, undefined date lol. But, it's in it;s designated spot:
Very front (middle two doors open):
Inside - food and water side:
Their swing hanging with the pink ribbon. Gray shelf that's fastened to the bottom, but upside down and with the back facing out because they like to get in it. Dust bath in the blue bucket in front of the gray shelf. And another small shelf that also sits fastened to the bottom but upside down. It has large curves and rods in it they like to perch on and play with. All of these were in the larger of the brooders I was using. The older chicks are very, very attached to these specific things lol
All moved in! Excitedly checking the whole place out:
Happy chickens:
Last edited: