shaz reeves
In the Brooder
Although I built my aviary to house a mixed population of rescued and unwanted birds, from my little experience of caring for bantams, I found it offered accommodation that they enjoyed just as much, if not more, than the conventional coop set up. I'm not really that up myself or desperate to win a prize (though security really is important and wish I had a lock, next job perhaps) I honestly think that because it's so different, it may offer something that others don't, hence being brave here and telling the world about it :O
And, if you are going to invest time and money building an avian palace, why not one that is adaptable and could have other uses in the future? One that potentially adds to saleability and value of your property has to be a plus too.
The readymade bird homes available on the market couldn't offer what I wanted and didn't seem to address the issues I'd had problems with in the past at all, so I decided to design my own and finally built it last year. Luckily I took pics (figured that would help with de-construction and moving in the future).
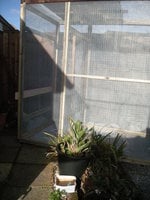
I needed it to be light enough for me to put together and move around, once constructed, wanted it to have a double door entry system so neither the children or I would accidentally let any birds out when attending to their necessities and wanted it to be easily de-constructed/collapsable for moving time. I'm a great believer in socialising with animals and birds, which makes our interactions much pleasanter (the therapeutic benefits of keeping pets is well documented elsewhere) and less stressful for them, not to mention far easier when the time comes for meds to be given, so having enough head height for me to walk around and spend time with the birds comfortably was important to me. I also needed the accommodation to be cat and rodent/vermin proof; wanted part of it to let the rain in, so that the birds could have a natural bath if they wanted to (cockateils and canaries love that); wanted it to be free-draining so the wood wouldn't rot so fast and so there wouldn't be any standing water, no matter how much rainfall there was. I wanted to be able to grow plants in it, to give as natural an environment as possible, even if birds do shred plants pretty quickly, and so they could have greens in their diet (which quite a few birds do).
These are a few of the things I considered before making my plans. There are other important factors for anyone to consider, though, which may impact on the size, shape and position of a hen house/run/flight -
1 Where and when the sun comes into your plot, where the most sheltered, warmest and driest spots are and proximity to the house ie. distance you have to walk to check on them, put them to bed etc and whether the house's security will oversee the run.
2 What the climate is like in your part of the world, if shade, insulation and/or heating/a power source may be required at some times of year, if flooding may be expected or high winds are common.
3 Who the prevailing predators in the vicinity are, their tastes, abilities, strength eg. I've come to the conclusion over the years that nothing bigger than 1/4" x 1/4" mesh can be guaranteed to keep mice out.
4 What the standard sizes of timber and wire mesh are at your local suppliers eg. here the most common aviary mesh rolls are 36" wide, but 24" and 48" are available, at greater cost.
If you do your research and come up with a list of what you want from your run and where you're going to put it, then you need to work out what materials you'll need. I built all my panels from scratch but there are lots of suppliers online from whom you can buy readymade panels, nestboxes etc so you can chose how much or little to make yourself.
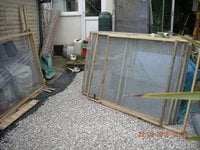
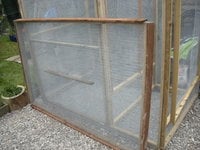
Primarily, I used a 48" wide 1/4" x 1/4" roll of aviary wire mesh on the outside of my panels, to make approx. 48" wide panels. From experience I've found this is the only size mesh that will definately keep mice out. Where practicable, I made sure that all the external surfaces of the wood frame were covered with wire so even the most determined rodent couldn't chew their way through the frame.
The inner surface of the panels I lined with 24" 1" x 1/2" aviary wire mesh ie. the panels were all double skinned (except the floor) to keep cats away from the birds. In my experience birds don't like to walk on 1/4" mesh, their claws can get caught, but I've never seen them have this problem with the larger sizes. Sadly, I have also had problems with cats in the past, sitting on an aviary roof till birds come within reach or jumping at the side to try and snatch one. They can't actually grab one, of course, but if they slash one, or grab a wing or leg, the bird can still die. Foxes have never been a problem for me but I'm guessing that double-wiring will keep them out of reach too.
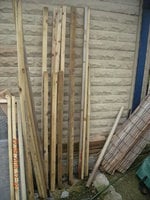
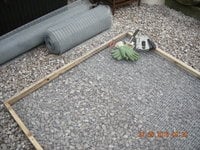
The wood for the frames (1" x 2" pressure treated softwood) came in standard lengths of 6ft or 10ft (or the nearest metric equivilant) which suited me well, with my plan for a 4ft wide, 6ft tall aviary. I drew my aviary on paper, decided on designs for the doors and counted the numbers of each length that I would need. I then worked out the best combination of 10ft and 6ft pieces needed to keep cost and wastage down.
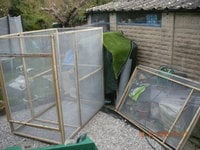
If I can't find my original drawing by the time I finish this, I will draw a new one, a sort of exploded view to show the panels I used, but keep in mind, it's your aviary/coop/cage/run/flight...you can build it any way you want, it can go round a corner or in a quadrangle around a tree if you want it to. It's a polygon made of multiples of the panels you build. The simplest is a cube but I can recommend the double door system for peace of mind, preventing escapes and conveniently, also providing a rodent safe storage area for seed bins.
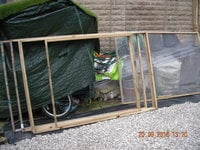
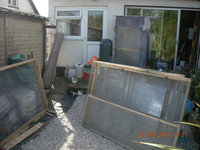
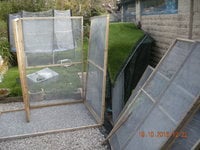
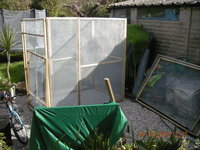
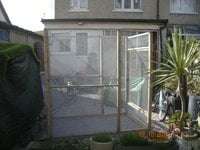
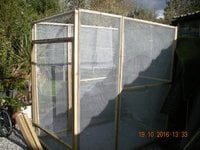
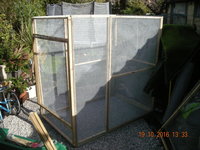
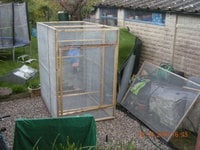
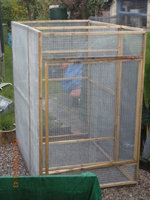
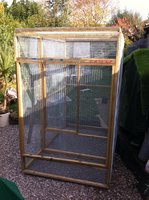
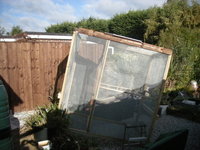
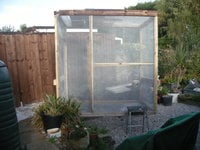
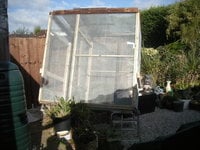
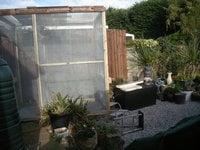
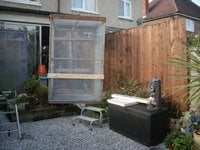
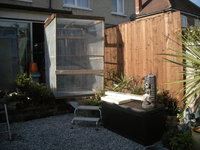
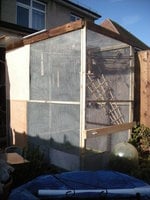
The aviary I built is just one step up from the cube, a cube with an entrance lobby. The far end and roof were 4ft x 6ft double-skinned panels; the floor a 4ft x 6ft outer skin only panel; the sides are made of a 4ft x 6ft double-skinned panel plus a 2ft x 6ft double skinned panel; plus there are the two door panels, there's no necessity to double-skin these but in the end I did, after a fashion.
The two panels that contain doors have 4ft x 6ft frames but have additional support timbers in the middle and yet more to create door frames, and the doors themselves, of course. I chose to have a large door in the outer panel, making it easy to get bins in etc and a half width one on the inner panel, keeping to a minimum the potential escape route and so there's room to stand to one side when it's opened outwards. Neither door reaches the floor or roof, this too reduces the likelihood of birds running or flying out.
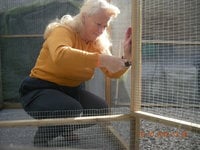
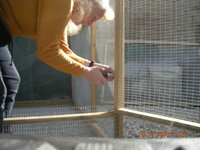
As I was constructing on my own and one pair of hands just isn't enough for some jobs, I decided to hinge some panels together in pairs, it did help, honest. This also meant that I wouldn't have to completely dismantle the aviary to pack it away flat or move it, that it was slightly stronger than if just screwed together in a few places and it was easier to work out which bits went together. I had won a job lot of piano hinges on a well known online auction site and they were perfect for the job.
The climate here isn't sunny anywhere near as often as we would like so protection against the elements, wind, rain and cold are needed most of the year. I put triple-glazed poly sheets on the roof, with some insulation sheets in between, well screwed down, slightly higher at one side than the other, so the rain would run off into the garden (not next door). I had some perspex sheets to hand, from some old secondary-glazing panels, so I screw those to the sides and ends whenever the weather is at it's worst.
I also ran an extension lead out to the entrance lobby, into which I plugged a tubular heater, which I can control from indoors and keep the chill off on a frosty night. The lobby also has a layer of polystyrene insulation down the sides and across the roof (found in a skip outside the building site opposite our house) so little of the heated air from the tubular heater gets wasted.
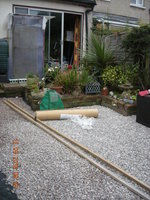
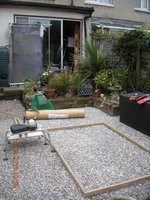
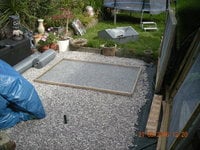
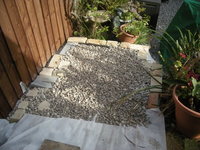
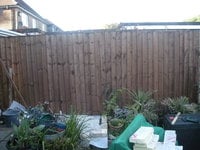
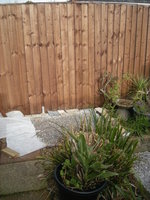
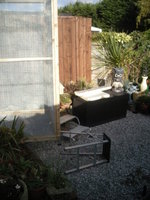
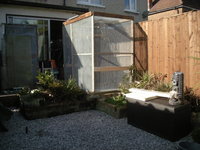
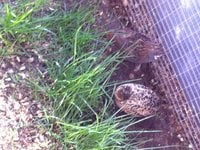
Before putting the aviary into place I put up a new fence, as I figured I wouldn't be able to get to it again for a while. I also purpose built a base for it; on high ground as we get a lot of standing water in the garden (run off from the main road outside our property); of lime gravel within a brick frame, to discourage rodents burrowing underneath and allowing water to drain away freely. Within the aviary I first put down a fine plastic net so no foodstuffs would make their way out of the cage to encourage wildlife, then a layer of gravel, onto which I laid turf and feed and water hoppers.
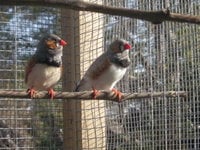
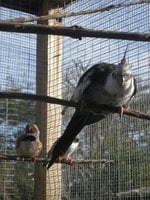
For the mixed population of birds that reside here at the moment, on the walls I fitted nest boxes of various sizes, water dishes, seed bowls, a grit dish and a number of perches. As this includes Chinese quails I put a couple of shelters on the floor, as well as a sand patch.
When I kept bantams I was surprised to find that they roosted in the roof branches at night, just like other birds and, most surprisingly, recently, my son discovered our Chinese quails nestled together in a high nest box, alongside the finches in theirs, at night. So, don't take as gospel everything you read in books about bird-keeping, birds can't read, they do as they please lol. Ground-dwelling birds don't necessarily like dwelling on the ground, if they have a choice.
I hope this proves of interest and use to someone. If you have any queries, suggestions, additions or corrections please message me.
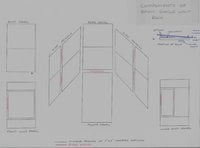
Oki, doki, sketches have now been added. They show which panels are needed for a basic cube + entrance lobby. The dimensions you can decide on, depending on which size mesh rolls you have available and your height, if you'd like headroom. If you'd like something bigger, longer, differently shaped you can add multiples of the relevant panels to your calculations and design. If you have any crises of confidence and would like someone to look it over to check if it will work ok, then you're welcome to send your design to me. NB. This could be added to an existing set up, shed or whatever (house) if you need or want it to, it's very adaptable.
And, if you are going to invest time and money building an avian palace, why not one that is adaptable and could have other uses in the future? One that potentially adds to saleability and value of your property has to be a plus too.
The readymade bird homes available on the market couldn't offer what I wanted and didn't seem to address the issues I'd had problems with in the past at all, so I decided to design my own and finally built it last year. Luckily I took pics (figured that would help with de-construction and moving in the future).
I needed it to be light enough for me to put together and move around, once constructed, wanted it to have a double door entry system so neither the children or I would accidentally let any birds out when attending to their necessities and wanted it to be easily de-constructed/collapsable for moving time. I'm a great believer in socialising with animals and birds, which makes our interactions much pleasanter (the therapeutic benefits of keeping pets is well documented elsewhere) and less stressful for them, not to mention far easier when the time comes for meds to be given, so having enough head height for me to walk around and spend time with the birds comfortably was important to me. I also needed the accommodation to be cat and rodent/vermin proof; wanted part of it to let the rain in, so that the birds could have a natural bath if they wanted to (cockateils and canaries love that); wanted it to be free-draining so the wood wouldn't rot so fast and so there wouldn't be any standing water, no matter how much rainfall there was. I wanted to be able to grow plants in it, to give as natural an environment as possible, even if birds do shred plants pretty quickly, and so they could have greens in their diet (which quite a few birds do).
These are a few of the things I considered before making my plans. There are other important factors for anyone to consider, though, which may impact on the size, shape and position of a hen house/run/flight -
1 Where and when the sun comes into your plot, where the most sheltered, warmest and driest spots are and proximity to the house ie. distance you have to walk to check on them, put them to bed etc and whether the house's security will oversee the run.
2 What the climate is like in your part of the world, if shade, insulation and/or heating/a power source may be required at some times of year, if flooding may be expected or high winds are common.
3 Who the prevailing predators in the vicinity are, their tastes, abilities, strength eg. I've come to the conclusion over the years that nothing bigger than 1/4" x 1/4" mesh can be guaranteed to keep mice out.
4 What the standard sizes of timber and wire mesh are at your local suppliers eg. here the most common aviary mesh rolls are 36" wide, but 24" and 48" are available, at greater cost.
If you do your research and come up with a list of what you want from your run and where you're going to put it, then you need to work out what materials you'll need. I built all my panels from scratch but there are lots of suppliers online from whom you can buy readymade panels, nestboxes etc so you can chose how much or little to make yourself.
Primarily, I used a 48" wide 1/4" x 1/4" roll of aviary wire mesh on the outside of my panels, to make approx. 48" wide panels. From experience I've found this is the only size mesh that will definately keep mice out. Where practicable, I made sure that all the external surfaces of the wood frame were covered with wire so even the most determined rodent couldn't chew their way through the frame.
The inner surface of the panels I lined with 24" 1" x 1/2" aviary wire mesh ie. the panels were all double skinned (except the floor) to keep cats away from the birds. In my experience birds don't like to walk on 1/4" mesh, their claws can get caught, but I've never seen them have this problem with the larger sizes. Sadly, I have also had problems with cats in the past, sitting on an aviary roof till birds come within reach or jumping at the side to try and snatch one. They can't actually grab one, of course, but if they slash one, or grab a wing or leg, the bird can still die. Foxes have never been a problem for me but I'm guessing that double-wiring will keep them out of reach too.
The wood for the frames (1" x 2" pressure treated softwood) came in standard lengths of 6ft or 10ft (or the nearest metric equivilant) which suited me well, with my plan for a 4ft wide, 6ft tall aviary. I drew my aviary on paper, decided on designs for the doors and counted the numbers of each length that I would need. I then worked out the best combination of 10ft and 6ft pieces needed to keep cost and wastage down.
If I can't find my original drawing by the time I finish this, I will draw a new one, a sort of exploded view to show the panels I used, but keep in mind, it's your aviary/coop/cage/run/flight...you can build it any way you want, it can go round a corner or in a quadrangle around a tree if you want it to. It's a polygon made of multiples of the panels you build. The simplest is a cube but I can recommend the double door system for peace of mind, preventing escapes and conveniently, also providing a rodent safe storage area for seed bins.
The aviary I built is just one step up from the cube, a cube with an entrance lobby. The far end and roof were 4ft x 6ft double-skinned panels; the floor a 4ft x 6ft outer skin only panel; the sides are made of a 4ft x 6ft double-skinned panel plus a 2ft x 6ft double skinned panel; plus there are the two door panels, there's no necessity to double-skin these but in the end I did, after a fashion.
The two panels that contain doors have 4ft x 6ft frames but have additional support timbers in the middle and yet more to create door frames, and the doors themselves, of course. I chose to have a large door in the outer panel, making it easy to get bins in etc and a half width one on the inner panel, keeping to a minimum the potential escape route and so there's room to stand to one side when it's opened outwards. Neither door reaches the floor or roof, this too reduces the likelihood of birds running or flying out.
As I was constructing on my own and one pair of hands just isn't enough for some jobs, I decided to hinge some panels together in pairs, it did help, honest. This also meant that I wouldn't have to completely dismantle the aviary to pack it away flat or move it, that it was slightly stronger than if just screwed together in a few places and it was easier to work out which bits went together. I had won a job lot of piano hinges on a well known online auction site and they were perfect for the job.
The climate here isn't sunny anywhere near as often as we would like so protection against the elements, wind, rain and cold are needed most of the year. I put triple-glazed poly sheets on the roof, with some insulation sheets in between, well screwed down, slightly higher at one side than the other, so the rain would run off into the garden (not next door). I had some perspex sheets to hand, from some old secondary-glazing panels, so I screw those to the sides and ends whenever the weather is at it's worst.
I also ran an extension lead out to the entrance lobby, into which I plugged a tubular heater, which I can control from indoors and keep the chill off on a frosty night. The lobby also has a layer of polystyrene insulation down the sides and across the roof (found in a skip outside the building site opposite our house) so little of the heated air from the tubular heater gets wasted.
Before putting the aviary into place I put up a new fence, as I figured I wouldn't be able to get to it again for a while. I also purpose built a base for it; on high ground as we get a lot of standing water in the garden (run off from the main road outside our property); of lime gravel within a brick frame, to discourage rodents burrowing underneath and allowing water to drain away freely. Within the aviary I first put down a fine plastic net so no foodstuffs would make their way out of the cage to encourage wildlife, then a layer of gravel, onto which I laid turf and feed and water hoppers.
For the mixed population of birds that reside here at the moment, on the walls I fitted nest boxes of various sizes, water dishes, seed bowls, a grit dish and a number of perches. As this includes Chinese quails I put a couple of shelters on the floor, as well as a sand patch.
When I kept bantams I was surprised to find that they roosted in the roof branches at night, just like other birds and, most surprisingly, recently, my son discovered our Chinese quails nestled together in a high nest box, alongside the finches in theirs, at night. So, don't take as gospel everything you read in books about bird-keeping, birds can't read, they do as they please lol. Ground-dwelling birds don't necessarily like dwelling on the ground, if they have a choice.
I hope this proves of interest and use to someone. If you have any queries, suggestions, additions or corrections please message me.
Oki, doki, sketches have now been added. They show which panels are needed for a basic cube + entrance lobby. The dimensions you can decide on, depending on which size mesh rolls you have available and your height, if you'd like headroom. If you'd like something bigger, longer, differently shaped you can add multiples of the relevant panels to your calculations and design. If you have any crises of confidence and would like someone to look it over to check if it will work ok, then you're welcome to send your design to me. NB. This could be added to an existing set up, shed or whatever (house) if you need or want it to, it's very adaptable.
Attachments
-
 DSCN9261.JPG706 KB · Views: 66
 -
 DSCN9262.JPG733.9 KB · Views: 60
 -
 DSCN9267.JPG856.9 KB · Views: 60
 -
 DSCN9785.JPG565.5 KB · Views: 60
 -
 DSCN9789.JPG591.8 KB · Views: 60
 -
 DSCN9793.JPG748 KB · Views: 60
 -
 DSCN9796.JPG989.7 KB · Views: 60
 -
 DSCN9797.JPG757.9 KB · Views: 61
 -
 DSCN9812.JPG512.4 KB · Views: 61
 -
 DSCN3515.JPG761 KB · Views: 61
 -
 DSCN3519.JPG620.7 KB · Views: 59
 -
 DSCN3517.JPG753.3 KB · Views: 60
 -
 DSCN3518.JPG516.3 KB · Views: 61
 -
 DSCN3521.JPG470.3 KB · Views: 59
 -
 DSCN3522.JPG844.8 KB · Views: 57
 -
 DSCN3523.JPG788.7 KB · Views: 59
 -
 DSCN3524.JPG641.2 KB · Views: 57
 -
 DSCN3525.JPG729.9 KB · Views: 59
 -
 DSCN3526.JPG728.8 KB · Views: 59
 -
 DSCN3532.JPG673.6 KB · Views: 58
 -
 DSCN4978.JPG622.4 KB · Views: 58
 -
 DSCN4993.JPG617.6 KB · Views: 60
 -
 IMG_4957.JPG888 KB · Views: 57
 -
 DSCN5007.JPG670.7 KB · Views: 56
 -
 DSCN5035.JPG489.2 KB · Views: 56
 -
 DSCN5173.JPG583.3 KB · Views: 58
 -
 DSCN5181.JPG685.2 KB · Views: 55
 -
 DSCN5182.JPG456.2 KB · Views: 58
 -
 DSCN5183.JPG615.5 KB · Views: 54
 -
 DSCN5184.JPG655 KB · Views: 55
 -
 DSCN5185.JPG478.2 KB · Views: 56
 -
 DSCN5186.JPG705.8 KB · Views: 54
 -
 DSCN5187.JPG606.4 KB · Views: 55
 -
 DSCN5188.JPG564.5 KB · Views: 54
 -
 DSCN5189.JPG589.2 KB · Views: 55
 -
 DSCN5208.JPG685.6 KB · Views: 54
 -
 DSCN5212.JPG521.9 KB · Views: 55
 -
 DSCN5214.JPG632.6 KB · Views: 52
 -
 IMG_8773.JPG1.1 MB · Views: 54
 -
 Aviary Design 2016 001.jpg205.2 KB · Views: 53
")


