Incubation Notes, Images, Videos & Links

Expected Hatch Rate
Don’t count your chickens before they are hatched, or even after for that matter!
Shipped eggs have a MUCH lower hatch rate.
The percent hatchability in the commercial poultry industry ranges from 78-88%.
Shipped Eggs = Change Of Plans!
Protocol for shipped eggs CLICK HERE
REQUEST HOW YOU WANT YOUR eggs SHIPPED !!!!
HOW TO REQUEST AND SHIP EGGS Sally Sunshine Way...
HOWTOREQUESTANDSHIPEGGSSallySunshineWay.pdf
Unpacking & USPS Reimbursements SHIPPED EGGS.pdf
Don't forget to request cold or heat packs according to weather to and from!
Percent Fertility is the percentage of fertile eggs of all eggs set.
% Fertility = # of fertile eggs
# of total eggs set
Percent Hatchability is the percentage of fertile eggs which actually hatched out as live young.
% Hatchability = # of eggs which hatch out
# of fertile eggs
More info for above see this pdf


Choosing an incubator
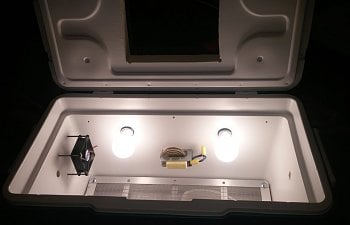
Many different styles of incubators are available, most common are Styrofoam types found at most feed stores. These incubators hold more eggs and are usually less expensive, but they require more involvement in the hatching process. Egg turners are usually optional that can be added for convenience. There are also some great “hands free” incubators, commercial incubators as well as Simple Inexpensive Homemade Incubators. We make “Coolerbators” they work 100% better than our store bought incubator because it has less than .5 degree variance and we have very successful hatches in it!
Many different styles of incubators are available, most common are Styrofoam types found at most feed stores. These incubators hold more eggs and are usually less expensive, but they require more involvement in the hatching process. Egg turners are usually optional that can be added for convenience. There are also some great “hands free” incubators, commercial incubators as well as Simple Inexpensive Homemade Incubators. We make “Coolerbators” they work 100% better than our store bought incubator because it has less than .5 degree variance and we have very successful hatches in it!

HELP How do I decide on an incubator?
Still air or forced air incubator? There are 2 main types of incubator. Still air and forced air. The difference is simply a fan. In forced air incubators, a fan circulates the air around the incubator which keeps the temperature constant in all parts of the incubator. The temperature can be measured anywhere within the airflow. In a still air incubator, there is no fan, the heat stratifies (forms layers) inside the incubator so the temperature is different between the top and bottom of the incubator. Poultry Keeper Choosing the Right Incubator CLICK HERE
Incubator warehouse.com Egg Incubator Buyers Guide CLICK HERE
LOCATION OF INCUBATOR
Locate your incubator in a room in which temperature is 70 degrees, free from drafts, away from windows and direct sunlight.
Did you know that the Incubating practice originated more than 2,500 years ago in Egypt and China. Methods of incubation were kept secret for a long time. In Europe attempts to use incubation are known from the 14th century. Owing to the imperfection of incubation apparatus (casks submerged in rotted manure, bakers’ ovens, and so on) and inadequate study of the conditions of incubation, it did not become common. Only since the end of the 19th and beginning of the 20th century, with the invention of better incubators, has incubation become widely used in Europe and the USA; since the middle of the 20th century it has been the principal method of propagating poultry.
Collection, Washing & Storage of Eggs
Choose eggs that are of good size, not abnormally big or small. Do NOT set dirty, cracked, or porous eggs. Clinical studies at the University of Arkansas have shown that if your going to set a dirty egg, set the dirty egg, DO NOT SAND, WASH OR WIPE dirty eggs as hatchability decreases with these practices!
Cuticula is the thin membrane that covers the whole eggshell that is made from the sticky fluid when laid which covers it and quickly dissolves due to carbondioxyde activity.This membrane can be penetrated by gasses but functions as a kind defensive mechanism to prevent the entry of bacteria.
The washing and rubbing action also serves to force disease organisms through the pores of the shell. Place the eggs upright in an egg carton with the FAT, air cell end of the egg UP! Allow eggs to sit in a moderately cool, somewhat humid place for storage. Basements are great. Moderately cool means 55-65 degrees. Rotate your eggs a 3 times a day to keep the embryo from sticking. An easy way to turn all of the eggs at once is to place a thick book under one end of the carton, and later remove the book and put it under the other end of the carton, 3 times a day. Before adding eggs to the incubator always WARM eggs UP slowly to room temperature. IF THE EGGS ARE COLD Condensation can cause bacterial growth on the eggs! You can collect eggs up until 10 days or so, but after the 7th day lower hatch rates may result. Stored eggs take longer to hatch (about one hour per day of storage).
It is important to ALWAYS wash your hands before handling your hatching eggs!
Omphalitis, yolk sack infection is caused by a bacterium that enters through the porous egg shell and easily kills embryo's and newly hatched chicks. Unfortunately, incubation conditions are ideal for breeding bacteria as well as incubating eggs. For more information on storing eggs refer to Recommendations for hatching egg handling and storage

If you MUST store longer than 10 days...
"When eggs were stored in the small-end-up position for 2 to 4 weeks, it was, NOT beneficial to turn them daily as had been previously demonstrated to be advantageous for eggs stored small-end-down."
Locate your incubator in a room in which temperature is 70 degrees, free from drafts, away from windows and direct sunlight.
Did you know that the Incubating practice originated more than 2,500 years ago in Egypt and China. Methods of incubation were kept secret for a long time. In Europe attempts to use incubation are known from the 14th century. Owing to the imperfection of incubation apparatus (casks submerged in rotted manure, bakers’ ovens, and so on) and inadequate study of the conditions of incubation, it did not become common. Only since the end of the 19th and beginning of the 20th century, with the invention of better incubators, has incubation become widely used in Europe and the USA; since the middle of the 20th century it has been the principal method of propagating poultry.
Collection, Washing & Storage of Eggs
Choose eggs that are of good size, not abnormally big or small. Do NOT set dirty, cracked, or porous eggs. Clinical studies at the University of Arkansas have shown that if your going to set a dirty egg, set the dirty egg, DO NOT SAND, WASH OR WIPE dirty eggs as hatchability decreases with these practices!
Cuticula is the thin membrane that covers the whole eggshell that is made from the sticky fluid when laid which covers it and quickly dissolves due to carbondioxyde activity.This membrane can be penetrated by gasses but functions as a kind defensive mechanism to prevent the entry of bacteria.
The washing and rubbing action also serves to force disease organisms through the pores of the shell. Place the eggs upright in an egg carton with the FAT, air cell end of the egg UP! Allow eggs to sit in a moderately cool, somewhat humid place for storage. Basements are great. Moderately cool means 55-65 degrees. Rotate your eggs a 3 times a day to keep the embryo from sticking. An easy way to turn all of the eggs at once is to place a thick book under one end of the carton, and later remove the book and put it under the other end of the carton, 3 times a day. Before adding eggs to the incubator always WARM eggs UP slowly to room temperature. IF THE EGGS ARE COLD Condensation can cause bacterial growth on the eggs! You can collect eggs up until 10 days or so, but after the 7th day lower hatch rates may result. Stored eggs take longer to hatch (about one hour per day of storage).
It is important to ALWAYS wash your hands before handling your hatching eggs!
Omphalitis, yolk sack infection is caused by a bacterium that enters through the porous egg shell and easily kills embryo's and newly hatched chicks. Unfortunately, incubation conditions are ideal for breeding bacteria as well as incubating eggs. For more information on storing eggs refer to Recommendations for hatching egg handling and storage


If you MUST store longer than 10 days...
"When eggs were stored in the small-end-up position for 2 to 4 weeks, it was, NOT beneficial to turn them daily as had been previously demonstrated to be advantageous for eggs stored small-end-down."
CONCLUSIONS: ABSTRACT CLICK HERE
"When eggs were held in storage, the small-end-up pack position without turning, their hatchability was equal to or better than that of eggs packed small-end-down. When eggs were stored in the small-end-up position for 2 to 4 weeks, it was, not beneficial to turn them daily as had been previously demonstrated to be advantageous for eggs stored small-end-down. Thus, the inconvenience and expense of daily turning can be avoided without loss. Evidence is also provided that hatchability was equally good whether eggs were stored on their sides and turned through 180° daily or stored small-end-up without positional change."
TIP: Use your turners during storage!

SANITIZING/WASHING EGGS
Most commercial hatcheries sanitize their eggs. There are differences of opinions about how to sanitize eggs, if you feel they need to be. Some experts advocate washing and even lightly scrubbing eggs with soft brushes. Others feel that the most that should be done is dipping for a few seconds. Because of the varying opinions on sanitizing eggs, the following is an opinion of Brower and not necessarily a hard and fast recommendation. Accomplish sanitizing by dipping eggs in solution containing disinfectant that is just strong enough to kill bacteria and viruses. However, the disinfectant should not be so strong as to damage the embryos.
Mix the sanitizing solution according to the manufacturers' instruction. A recommended cleaning solution is Tex-Trol. TexTrol may be available at a local retail outlet. For the name of a retailer search for it online. If using Tex-Trol, mix one half ounce of concentrated disinfectant to one gallon of warm water. You can also use 1 ounce of Clorox to 2 gallons of water. The water should be 100 to 110 degrees Fahrenheit (37° to 44°C). If the egg is warmer than the solution, contamination can be pulled through the pores of the egg before the agent has a chance to neutralize any pathogens.. Submerge the eggs for one to three minutes with dirtier eggs left in solution longer than ones that essentially look clean. Allow the eggs to air dry at room temperature and store as described above--or set in your incubator. A soft paper tissue can be used to dry the eggs but don’t rub the egg with a tissue or any material. Eggs have a natural protective cuticle that helps retard contamination. Rubbing removes the cuticle and can actually drive pathogens through the shell.
(1 Tablespoon = 3 Teaspoons per gal )
Sanitizing solution of chlorine (bleach) 6% hypochlorite and water at a concentration of 100 ppm (parts per million) = To make a100 ppm chlorine solution, combine 2 ml. (1/2 tsp.) of bleach with one quart of water.

The Cuticle removal
in hatching eggs as a means to reduce weight loss: Has actually been found to increase embryo weight during incubation and has direct relationship between rate of egg water loss, embryonic metabolism, and growth during incubation. But that warning of contamination is there if you don't follow cleaning procedures correctly. Chlorine treated eggs were not altered either. So with all that it is found that cuticle removal can be an effective method for increasing growth and egg weight loss.
in hatching eggs as a means to reduce weight loss: Has actually been found to increase embryo weight during incubation and has direct relationship between rate of egg water loss, embryonic metabolism, and growth during incubation. But that warning of contamination is there if you don't follow cleaning procedures correctly. Chlorine treated eggs were not altered either. So with all that it is found that cuticle removal can be an effective method for increasing growth and egg weight loss.
Preventing ‘sweating’ eggs is IMPORTANT! Prior to EGG placement in the incubator, place the eggs at a room temperature for several hours.

'Sweating' of eggs refers to the phenomenon of condensed water sitting on the egg shell surface. This occurs when cold eggs are suddenly exposed to a higher environmental temperature. The warm air with a certain moisture content cools down rapidly directly around the colder eggs. Since cold air contains less water than warm air, relative humidity will increase until the air is saturated. And at that moment, condensation will take place on the cool egg surface.
Is it Fertile or Infertile?
To check the fertility, simply break an egg in a bowl, Find the white spot on the yolk. If you do not, use a spoon to gently flip the yolk over until you find it. If it has a Bulls eye look it is fertile. A true fertile egg contains a well developed germinal disc (blastoderm), which indicates that the oöcyte, or zygote, was fertilized and an embryo developed during egg formation.
Fertility:To check the fertility, simply break an egg in a bowl, Find the white spot on the yolk. If you do not, use a spoon to gently flip the yolk over until you find it. If it has a Bulls eye look it is fertile. A true fertile egg contains a well developed germinal disc (blastoderm), which indicates that the oöcyte, or zygote, was fertilized and an embryo developed during egg formation.

- IS IT FERTILE? Many images see post #43324
- Managing Fertility click HERE
- Reproductive Physiology of the Hen post #40628
- HOW long does a ROO SPERM REMAIN IN HEN post #40628
- Polyspermy is typical in birds. Several sperm enter the germinal disc region post #40644
Clears at CANDLE are not always infertile! CLICK HERE FOR MORE INFO
Record Keeping
Accurate and detailed records are very important in incubation. In addition to records of individual eggs it is important to keep records of the temperature and the humidity, so that trends in temperature and humidity may be detected early and can be corrected for next hatch.
Sorry the new BYC wont allow me to add an excel file as seen aboveAccurate and detailed records are very important in incubation. In addition to records of individual eggs it is important to keep records of the temperature and the humidity, so that trends in temperature and humidity may be detected early and can be corrected for next hatch.
Incubation PERIODS/TIME Chart

Areas of MOST IMPORTANCE in Hatching EGGS
Ventilation (Oxygen), Temperature, Humidity, Egg Turning/Positioning
VENTILATION (OXYGEN)
Ventilation is VERY important during the incubation process.
While the embryo is developing, oxygen enters the egg through the shell and carbon dioxide escapes. Oxygen requirements will increases during development and during hatching. Unobstructed ventilation holes, both above and below the eggs, are essential for proper air exchange. REMOVE RED VENT PLUGS, TOO MANY PEOPLE FORGET TO REMOVE THEM AT DAY 10! NOTE: When Lockdown occurs, vent openings are frequently restricted in an attempt to boost incubator humidity. Instead of helping the chick hatch, the chick is suffocated from lack of oxygen. Never decrease ventilation openings at hatching in an attempt to increase humidity. Increase humidity by other methods. If any vent adjustments are made, they should be opened more. Try adding a dampened sponge or towel to help boost humidity during lockdown.
Hatching at High Altitudes post #37908
THINGS TO READ: O2 deprivation to day 10 of incubation followed by regular oxygen concentrations leads to stronger chicks post #33815

TEMPERATURE
CALIBRATE CALIBRATE!!
Never trust the thermometer that comes with the incubator, always check it.
This could mean life or death for your babies.
ALWAYS run your bator a few days first for watching its temp swings
TIP: There are ALWAYS Uneven temps in bators
so rotate egg placement at each candle!
Did you know "The yolk is orange and on its surface is a visible germinal disc; radiating from this area is the more watery white yolk, which is less dense. During turning, the yolk’s structure makes the part containing the germinal disc stay most dorsal (closest to the incubating bird) for heating"
With a Forced Air Incubator (fan model) you can get the best hatch rate by keeping the temperature at 100º F - 100.5. throughout days 1-18 and NEVER LET IT GO BELOW 99.8!!! Watch for evening temp flux! Lockdown day lower to 99.5 and when first external pip shows lower to 98.5 degrees!
HOWEVER, when using a Still Air incubator (no fan) at 102º F. The reason for different temperatures is that with a fan model the circulating air warms all around the egg while still air temperatures are warmer at the top of the egg than at the bottom.

ZONES OF COLD INJURY fro EMBRYONIC DEVELOPMENT CLICK HERE
What to do when you find a HIGH TEMPS in Bator CLICK HERE
10/13 day old embryos begin to produce excess heat in the incubator CLICK HERE
WHERE TO SET YOUR THERMOMETER
The temperature is measured at the level where the embryos develop (at the top of the HORIZONTAL egg). NOTE:If the eggs are in vertical position, elevate the thermometer just below the top of the egg. The temperature is measured at the level where the embryos develop (at the top of the egg). Never allow the thermometer to touch the eggs or incubator because incorrect readings can result. A high temperature tends to produce early hatches. A consistently cooler temperature tends to increase incubation times and produce weakened chicks. In both cases the total chicks hatched will be reduced. Prepare your incubator and run it for several days before adding eggs, to be positive you are maintaining correct incubation temperature.
NOTE: It is common that when adding eggs the temperature will drop but should come back up to correct temperature within an hour or two. Don’t rest the thermometer's bulb touching the eggs or the incubator. Incorrect readings will result.
TIPS:
Probe thermometer & water weasel (Water Wiggler, Water Snake) found on Amazon or Ebay make for EXCELLENT internal temp guides! The perfect internal temperature of an embryo is 99.5 degrees. If you can't find a water wiggler you can make your own with ziplock filled with water folded in half and insert the probe in the center middle.The temperature is measured at the level where the embryos develop (at the top of the HORIZONTAL egg). NOTE:If the eggs are in vertical position, elevate the thermometer just below the top of the egg. The temperature is measured at the level where the embryos develop (at the top of the egg). Never allow the thermometer to touch the eggs or incubator because incorrect readings can result. A high temperature tends to produce early hatches. A consistently cooler temperature tends to increase incubation times and produce weakened chicks. In both cases the total chicks hatched will be reduced. Prepare your incubator and run it for several days before adding eggs, to be positive you are maintaining correct incubation temperature.
NOTE: It is common that when adding eggs the temperature will drop but should come back up to correct temperature within an hour or two. Don’t rest the thermometer's bulb touching the eggs or the incubator. Incorrect readings will result.
TIPS:
Thermo/hygro suggestions CLICK HERE
HEAT SINKS/ Stones/Pebbles ADD THEM TO STYRO!post #43903
Calibration is a MUST: HOW TO CALIBRATE post #9068
MAJOR TIP...
HAVE A PLAN IN CASE YOU LOOSE ELECTRIC post #522


HUMIDITY
The Air Bubble in the Egg,
Weight Loss in the egg is where most fail with incubation,
next being temp issues and not having calibrated thermos and hygros!
"HUMIDITY IS NOT A SET NUMBER EVER!"
Humidity it a "tool" to get the correct weight loss!
DO NOT GO WITH WHAT YOUR INCUBATOR INSTRUCTIONS SUGGEST!!
DRY HATCH incubation DOES NOT MEAN RUN DRY! It is not only the final size of the air cell that matters, but also the time it takes to form. In the first ten days of incubation, the embryo is small and floats in the amniotic fluid. Weight loss during this phase is mainly the effect of water evaporating from albumen and internal liquids. After this stage, changes occur quickly: the growing embryo gradually fills the egg, excepting the air cell. Low RH set points at days 14-18 of incubation increase evaporation from the allantois – and once the allantois is emptied of fluid, moisture will be drawn from the embryo, causing its dehydration.Weight Loss in the egg is where most fail with incubation,
next being temp issues and not having calibrated thermos and hygros!
"HUMIDITY IS NOT A SET NUMBER EVER!"
Humidity it a "tool" to get the correct weight loss!
DO NOT GO WITH WHAT YOUR INCUBATOR INSTRUCTIONS SUGGEST!!
The average chicken egg has thousands of pores running through the shell allowing the embryo to exchange oxygen, carbon dioxide. and water. Soon after an egg is laid, a small air bubble or “air cell” forms in the large end of the egg from this water loss. Humidity levels in the incubator determine moisture evaporation during the 21 days of incubation and hatching. The air cell is crucial for the chick to break out of the egg shell at the end of the incubation period. The chick can drown if the air cell is too small or the chick may be retarded in growth if the air cell is too large. This is why maintaining the proper humidity is crucial. Slightly lower humidity levels are more likely to be less disastrous than slightly higher humidity levels. There are quite a few opinions on Humidity, but it is no set number.
AGAIN....
Humidity is NOT A SET NUMBER, you need it YES!,
However, you use it as a tool to "adjust" egg weight loss during incubation.
We candle on days 7,10,14,18 To WATCH WEIGHT LOSS IN EVERY EGG!
After day 7 its good to keep a closer eye on weight loss via weighing OR watching air cells!
An EGG MUST lose approximately 14%-15 of its weight during the incubation process. THIS IS YOUR GOAL!! You can monitor this by marking Air cells and also by weighing. Please refer to CANDLING section of this Article for more Air Cell info.

pic above Size of air cell on day 7, 14, and 18 of incubation
MEASURE WEIGHT LOSS IN EGGS,
I choose the easier method, keeping a close eye on air cell growth during incubation. You begin by ONLY adding a small amount of water and keep Humidity between 20%-30% and adjusting as you weigh or candle depending on moisture loss. IN SOME AREAS OF THE COUNTRY YOU MAY NOT NEED TO ADD ANY WATER! USE IT AS A TOOL FOR THE CORRECT WEIGHT LOSS IN THE EGG! So if your air cells look too large at each candle period you must add some humidity, too small air cell lower it, and if your weighing you adjust as needed. UNTIL DAY 18 LOCKDOWNthen stop turning and raise humidity to 65-70%. I will post more about weighing eggs later in the candle and set section!
Views of Day 18 Candle..... click to enlarge

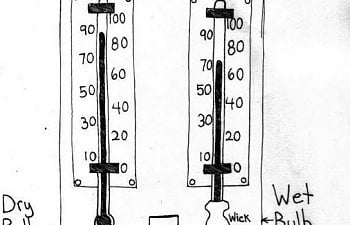
How Does a Hygrometer Work?
http://weather.about.com/od/weatherinstruments/a/hygrometers.htm
Shown here is a WET Bulb Hygrometer and wick
Wet bulb is exactly what it states. It is the temperature relative of the humidity in degrees.
A Hygrometer Wick is placed over the stem of the thermometer and the other end of the sleeve is placed in a jar or pan in the incubator.


HOW TO CALIBRATE HYGRO with SALT TEST
GOOGLE HOW TO CALIBRATE WITH SALT !
A few TIPS & TRICKS!
It’s a good idea to keep the incubator plugged into a surge protector.
Use distilled water in your incubator to help prevent bacteria growth. Omphalitis, Mushy Chick Disease and Yolk Sack Infection may be caused by a bacterium that enters through the porous egg shell. Unfortunately, incubation conditions are ideal for breeding bacteria as well as incubating eggs. Brinsea sells a disinfectant, formulated to be used for cleaning eggs, incubators, safe and effective against yeasts, fungi, viruses and bacteria which can cause fatal damage to the growing embryo.
Pennies can be added to water wells. Copper helps to destroy the cell walls of bacteria, thus keeping bacteria out of the incubator. Pennies before 1982 have more copper content and pure copper kills 99.9% of bacteria.
Below image is a Simple waterer/suctioner out of aquarium tubing placed through side of incubator and into water wells. Use a Kids medicine syringe to add/suck water without opening or disturbing eggs.
In the image below are the different sized cups I use the first 18 days of incubation INSTEAD of using the wells in the bottom of the incubator. I had a hard time getting humidity correct, so I started using different size containers and caps for water holding, I could easily remove & replace as necessary. It WORKS WELL and I can keep them clean and sanitized better and not disturb my eggs! I will remove these cups on day 18 so the chicks don’t drown in them
and use the lower wells at lockdown at day 18.

2" funnel & we shoved it into a small piece of 1/4" tubing, a cleat on the inside of the unit (a wide-crown staple or cable staple would work also) to hold the tubing in place.
This way you can add water to the middle of the bator without missing the water troughs and without opening the unit. see below
(Thanks tlpounds)
This way you can add water to the middle of the bator without missing the water troughs and without opening the unit. see below
(Thanks tlpounds)

REMEMBER~
Surface area of water will increase
humidity more so than depth!
If you need a safe boost at lockdown
ust add a dampened sponge or rag.
A "ShamWoW" is great as a wick and can hang from the sides or across top of incubator.
Setting Eggs & Turning
It is important to ALWAYS wash your hands before handling your hatching eggs!
ust add a dampened sponge or rag.
A "ShamWoW" is great as a wick and can hang from the sides or across top of incubator.
Setting Eggs & Turning
It is important to ALWAYS wash your hands before handling your hatching eggs!
It is likewise important to SANITIZE your incubator AND equipment before AND after use!
Omphalitis, yolk sack infection is caused by a bacterium that enters through the porous egg shell and easily kills embryo's and newly hatched chicks. Unfortunately, incubation conditions are ideal for breeding bacteria as well as incubating eggs.
Failure to turn eggs during incubation CLEARLY reduces hatchability in every scholarly study & clinical trial.
Mark eggs, using a pencil, with an X on one side and an O on the other. Make sure to turn the eggs at least 3 times a day, or odd number of times. Turning by hand they should always be turned an odd amount of times and move them to a different part of the tray to protect them from temperature variation. You basically roll the eggs with your fingers/palm from X to O. It is important to NOT ROLL the eggs in the same direction every time. Improper rolling can cause the chalazae that holds the yolk in place to tear. Turning the egg prevents the embryo from touching and attaching to the membrane inside the egg. The most convenient way to turn eggs is to purchase an egg turner. Take extra precautions when turning eggs during the first week of incubation. The developing embryos have delicate blood vessels that rupture easily when severely jarred or shaken, thus killing the embryo.
When adding Eggs the temperature will immediately drop. DO NOT ADJUST THE THERMOSTAT, or risk accidentally cooking them. Wait 2/4 hours and if the temperature is still low, make a small adjustment, as small as you can. (Note: Small adjustments on the manual Styrofoam incubators make BIG changes!)
Do not incubate eggs on paper trays or in boxes.
This guarantees heterogeneous egg/embryo temperatures,
resulting in high levels of early mortality.
This guarantees heterogeneous egg/embryo temperatures,
resulting in high levels of early mortality.

CANDLING & WEIGHING EGGS

Sites to refer to for Candling Images and Videos
Progression Though Incubation:
BYC article CLICK HERE
Metzer Candling Duck Eggs: CLICK HERE
Development of a Chick: CLICK HERE
AGAIN! Understand the Air Cell
The average chicken egg has thousands of pores running through the shell allowing the embryo to exchange oxygen, carbon dioxide and water. Soon after an egg is laid, a small air bubble or “air cell” forms in the large end of the egg from water loss. Humidity levels in the incubator determine moisture evaporation during the 21 days of incubation and hatching. The air cell is crucial for the chick to break out of the egg shell at the end of the incubation period. The chick can drown if the air cell is too small or the chick may be retarded in growth if the air cell is too large. This is why maintaining the proper humidity is crucial. Slightly lower humidity levels are more likely to be less disastrous than slightly higher humidity levels.
MARKING and OBSERVING the size of the air cell is a way of checking for correct weight loss of the egg and is commonly used. However, this can be inaccurate due to the different, types, shapes, and ages of eggs. The protrusion of the embryo into the air cell also may effect observations. Again, it is the most common method for non-commercial hatchers. With experience you can adjust your humidity as needed by visual inspection of air cells. However, Weighing is the MOST accurate. If the incubation humidity is too low (very dry conditions), the air sac will be larger than normal and the humidity in the incubator should be increased to reduce the rate of water loss. If the air space is smaller than normal then the opposite applies.
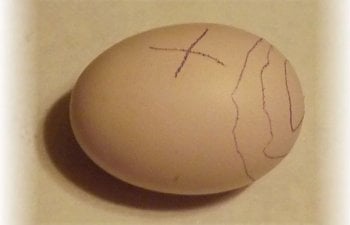
Track the air sac with pencil tracings when you candle,
On the 7, 14 & 18th days its ok after day 7 to candle more often to keep better track!
WEIGHING EGGS
Chicken eggs need to lose 14% moisture over 21 days, NOT day 18 lockdown. I have always done well at 16% though. Weigh all the eggs on the first day, before you put them in the incubator and weigh again days 10, 14 & 18. Several formulas can be used to determine the rate of weight loss or overall per cent weight loss and to correct the humidity if the values are off. For accuracy, a digital scale should be used which can weigh in grams. Don't forget to subtract the weight of the container holding the eggs from the total weight when calculating the average egg weight. If you use a rack to incubate your eggs it is best to weigh the entire rack instead of each egg to get an average. If you are incubating upright in a carton you will also weigh the entire carton so that the eggs are not disturbed. SHIPPED eggs.
Some Explanations & TIPS from
cochins1088 on weighing Eggs!
Eggs should lose approximately 11% - 12% of their mass at 18th day of incubation. To monitor mass loss, a person must keep track of an egg’s weight. Optimally eggs should be weighed right after they’re laid, but this isn’t always possible. When eggs are shipped, weigh them as you remove them from the package. Keep in mind that the eggs will lose some of their mass during storage. According to Aviagen, eggs lose about 0.5% of their masses per week in storage.On the 7, 14 & 18th days its ok after day 7 to candle more often to keep better track!


WEIGHING EGGS
Chicken eggs need to lose 14% moisture over 21 days, NOT day 18 lockdown. I have always done well at 16% though. Weigh all the eggs on the first day, before you put them in the incubator and weigh again days 10, 14 & 18. Several formulas can be used to determine the rate of weight loss or overall per cent weight loss and to correct the humidity if the values are off. For accuracy, a digital scale should be used which can weigh in grams. Don't forget to subtract the weight of the container holding the eggs from the total weight when calculating the average egg weight. If you use a rack to incubate your eggs it is best to weigh the entire rack instead of each egg to get an average. If you are incubating upright in a carton you will also weigh the entire carton so that the eggs are not disturbed. SHIPPED eggs.
Some Explanations & TIPS from
cochins1088 on weighing Eggs!
How to Calculate Mass Loss
First subtract the current weight of an egg from the original weight of the egg. This number will give you the weight loss. Then take the weight loss and divide it by the original weight of the egg. This will give you the fraction of weight that was loss. Lastly, multiply the fraction of weigh loss by 100. This will give you the percent of mass loss.
For example:
Original weight (50 g) - Current weight (45 g) = Weight lost (5 g)
Weight lost (5 g) divided by Original weight (50 g) = Fraction of weight lost (0.1)
Fraction of weight lost (0.1) multiplied by 100 = Percent of weight lost (10%)
For those of you who incubate large numbers of eggs, you can weigh the trays to find the average mass of each egg.
For example:
If a tray weigh of eggs initially weighs 700 grams and the empty tray weighs 200 grams, than the eggs must initially weigh 500 grams. If there are 10 eggs in the tray, then each egg weighs approximately 50 grams.
Let’s say that 2 eggs are removed because they were infertile.
After 18 days, your tray weighs 560 grams. If you subtract the weight of the tray (200 grams), than the eggs must weigh 360 grams. There are 8 eggs in the tray, so each egg weighs approximately 45 grams.
With this example, the eggs lost 10% of their mass by day 18.
Note: Kitchen scales work great. The WeighMax Pocket Mini CD Digital Scale below works great if you weigh individual eggs. I pasted an egg carton cup firmly to hold the eggs. Be extremely careful not to tip your scale and crack your eggs!CANDLE EGGS
DAY 1
Always wash hands before handling eggs.
The shell of an egg is thin and opaque when held near a bright light. The easiest type of egg to candle is the white shelled egg and some of the hardest eggs to candle are dark brown eggs, like the Maran eggs pictured below.
You could try two or more flashlights to see into them!
Candle days are 1, 7, 14 & 18th day
You will need a Candler, bright light, LED flashlight, Some say their cell is best!
Turn on your Candler and shut off the lights in the room so it is dark, evenings are best. Hold the flashlight/Candler like the image below and set the egg air cell/fat end down on your hand. This will prevent any light leakage from the flashlight. Your hand protects the egg from the hard surface of the light and helps more of the light to go through the egg.
CAUTION: Be very careful when you handle the egg
so you don't accidentally crack it or DROP it!
Slowly & gently rotate the egg until you can see inside the egg. On Day 1 candling you will mark air cells and check for cracked or porous eggs. Lightly mark the air cell with a pencil. Candle quickly if the light gets hot, you will kill the embryo. On Day 1 candle you will NOT see much inside the egg but you may have a glimpse of yolk moving as you gently rotate lightly colored eggs.
Chicken Embryo Development, views from the Inside AND Out. *Graphic Photos**
CLICK HERE
CANDLES AND EGGTOPSY
Porous Egg
TINY Sappy spots possibly due to Rough Shipment of EGGS
Day 11 candle funky air cells from shipped eggs.
BLOOD RINGS clearly visible on light polish eggs
Saddle Shaped Air cell, where it dips on two sides
BLOOD RINGS clearly visible on light polish eggs
Note the pictures below on day 10
The two on the right have “scrambled” contents from shipping
CANDLE EGGS
DAY 7
When you Candle on day 7 there should be some light blood vessels surrounding it and you may see the embryo move. See above and below video. My favorite time to candle! Eggs that are clear should be re-candled at 10 days before tossing. If your not sure and it doesn’t smell leave it! If your egg is colored or a brown egg, it is harder to see through the shell, you may want to wait a few days and try again. Or find a better candler. You can see the large round yolk move inside the egg, this is NOT the embryo at day 7! Its just the yolk!
CANDLE EGGS
DAY 14


Candle day 14 is to determine growth, weigh, pencil mark air cell size and dispose bad eggs.It will begin to look pretty dark in there! Look for movement.
You should again see some good veining.
CANDLE EGGS
DAY 18 & LOCKDOWN!
DAY 18 & LOCKDOWN!

Candle day 18 is to determine growth, weigh, pencil mark air cell size and dispose bad eggs. It will look pretty dark and FULL in there! You may or may not see movement on this candle. Its ok if not, don’t panic! The chick may easily be resting! See how that air cell is beginning to dip more to one side and if you lay the egg down it will roll into the hatching position. I set my eggs with lowest dip in the aircell up. This position for hatching is good so the chick is able to turn into position and I can easily see my pips too! Day 18 laying horizontal for actual hatching helps a chick hatch 1-2 hours earlier. I lay my eggs down LOWEST DIP of the AIRCELL UP! This is the normal and most likely hatching position and the chick will break through or Internally pip and externally pip in that probable area. See the image below with the x, x being lowest dip in air cell and probably pip area/s.

LOCKDOWN!
Stop turning, Remove Turner and Raise Humidity to 65% - 70%
depending on what your air cells may still need
NOTE: It is now known that the different embryos communicate with each other by a series of clicking sounds,the rate of clicking being the important feature. Ensuring the eggs on the hatching trays are in contact with each other facilitatesthe synchronization of hatching where the eggs are incubated in a modern machine. This assists in reducing the time between when the first and last chicks hatch.
After Day 18 candle you will “LOCK DOWN” your eggs. Lower the temperature see suggest temps below and increase the humidity the last three days. STOP turning and the incubator stays closed, for the next three days while the chicks hatch! If you’re having a hard time with humidity it is OK to open quickly to boost, add warm water or increase the size of the pan or add a wet sponge. NEVER ADJUST HUMIDITY BY cutting back airflow. VENTILATION is EXTREMELY important at this stage!
TIPS: COVER THE HATCHING AREA Before LOCKDOWN!
A foam grip drawer mat, or window screening on the wire bottom of incubator on day on day 18 lockdown. A cloth, crinoline, or paper towels could work as well. This ALSO protects the navel, the place where the abdomen closes after surrounding the remains of the yolk, from injury. It also makes cleaning the incubator easier. NO the wire on the incubator bottom should not injure or effect your chicks after they hatch. Dollar store baskets are great to keep hatching chicks separated by breed.
While you WAIT Please PREPARE BROODER:
Prepare everything you need for them once they have hatched.
Now is the time to do final checks on brooder, heat lamp and feed.
See bottom of article for links on chick care.
Click on the link below for Brooder Ideas!
https://www.backyardchickens.com/a/homemade-chicken-brooder-designs-pictures
Rocking Egg Video!
Eggs can rock for several days before hatching, but how exciting it is!
A foam grip drawer mat, or window screening on the wire bottom of incubator on day on day 18 lockdown. A cloth, crinoline, or paper towels could work as well. This ALSO protects the navel, the place where the abdomen closes after surrounding the remains of the yolk, from injury. It also makes cleaning the incubator easier. NO the wire on the incubator bottom should not injure or effect your chicks after they hatch. Dollar store baskets are great to keep hatching chicks separated by breed.


While you WAIT Please PREPARE BROODER:
Prepare everything you need for them once they have hatched.
Now is the time to do final checks on brooder, heat lamp and feed.
See bottom of article for links on chick care.

Click on the link below for Brooder Ideas!
https://www.backyardchickens.com/a/homemade-chicken-brooder-designs-pictures
Rocking Egg Video!
Eggs can rock for several days before hatching, but how exciting it is!

Understanding The Hatching Process
Between the 15th and 16th days, the chick orients itself so that its head is near the air cell at the large end of the egg. Not long before the chick is ready to attempt to make its way out of the shell its neck acquires a double bend so that its beak is under its right wing and pointed toward the air cell. 21 DAYS is just a baseline for hatching eggs. Many chicks can take 23 - 25 days!
Some pip internally and fully hatch in hours while others will be 24 hours or more.
Egg movement! Eggs can “Rock n Roll” days before they are due to hatch!
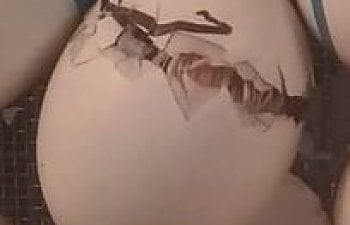
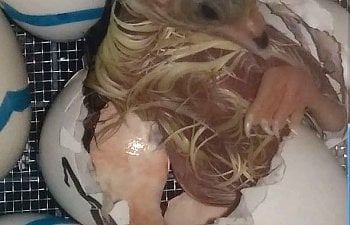
The initiation of hatch occurs partially from the increased carbon dioxide level in the egg. This process causes the embryo to begin twitching it's muscles allowing the inner shell membrane to be punctured by the egg tooth. The chick then begins breathing the air in the air cell. Using its egg tooth, it pecks at the shell thousands of times and after a few hours the chick pips a small hole through the shell and begins to breathe air directly from the outside. After the chick has made a hole in the shell, it stops pipping for 8+ hours sometimes up to 24 hours and rests. During this time, it is acclimating its lungs.
In regards to opening and closing the bator to remove already hatch chicks; It is important to remember that chicks can go 3 days without food/water. It is better to wait for the remaining chicks to hatch to insure reducing the impact to unhatched pipping eggs.
But my new chick is running around in the bator knocking eggs around!
LET THEM GO! DO NOT OPEN THE INCUBATOR! They are fine!
Oh NO!
It PIPPED the WRONG END!
MALPOSITIONS
It is common to lose about 1-2% of the chicks due to deformities and malpositions. Deformities occur during embryo development, while malpositions occur the last week of incubation. Malpositioned embryos are unable to pip the eggshell and escape due to improper positioning within the egg. The chicks can have difficulty positioning for pipping, absorbing the yolk sac, or changing from embryo to chick breathing air. The majority of malpositioned embryos that have died in the shell probably resulted from exhaustion and/or lack of oxygen. One GOOD thing to remember is that SOME malpositions are Lethal and some are not! Occasionally, malpositioned chicks will hatch unassisted but the hatch does need to be monitored closely to ensure that the chick is not becoming stressed, or stuck. Often as a result of the position in the shell they have been unable to absorb all of the yolk. Please refer to Navel SECTION BELOW.
Common reasons of Malpositions are:
Eggs are set with small end up. Advancing breeder hen age and shell quality problems. Egg turning frequency and angle are not adequate. Inadequate % humidity loss of eggs in the setter. Inadequate air cell development, improper temperature and humidity regulation, and insufficient ventilation in the incubator or hatcher. Imbalanced feeds, elevated levels of mycotoxins, and vitamin and mineral deficiencies. Lower than recommended temperatures in the last stage of incubation.
Normal hatching position and the six
recognized malposition Images: CLICK HERE
ASSISTING MALPOSITIONED CHICKS.....
HOW AND WHEN TO ASSIST! CLICK HERE
What Went Wrong During Incubation
BELOW High Humidity causes red hocks
Eggtopsy: What happened to my egg? CLICK HERE "Shrink wrap" vs. "Sticky chick"? CLICK HERE
Signs of Deficiency in the Embryo CLICK HERE
New Chick Care Links and InfoHow to Spot Problems of Newly Hatched Chicks CLICK HERE
Dont forget to have Sav-A-Chick™ Electrolyte and Vitamin Supplement on hand!
TIP: GROW GEL / FEED Newly hatched chick!


DIP THE BEAK OF THE CHICK IN THE WATER BEFORE YOU TURN IT LOOSE in the brooder. For the first two days put sterilized marbles or stones in the waterer so they dont drown. A taste of water right away helps them to find more water soon. If your chicks are at all stressed, add about 3 tablespoons of brown or table sugar to each quart of water for extra energy. Most baby bird loss is caused because the bird doesn't start to eat or drink. Never let your bird run out of water.
Homemade Electrolyte Recipe for weak/ill chicks
2 C. Water
2 TBL. Brown Sugar, honey or molasses
1/2 tsp Salt
1/2 tsp. Baking Soda
Mix until all dry ingredients dissolve & Keep refrigerated
You could also use electrolyte drinks Gatorade or Pedialyte, or
3 drops of POLYVISOL (liquid childrens A-B-D vitamins)
Slowly drip along inner edge of lower beak.
Culling ~
Don't incubate unless you can Euthanize or have someone that can do it for you! It will happen!
GOOGLE "How to Cull or Euthanize chicks"
FINISHED ~
SANITIZE EQUIPMENT & PAT YOURSELF ON THE BACK!
A few Cool Videos!
THIS is a video of a CANDLE at DAY 10!
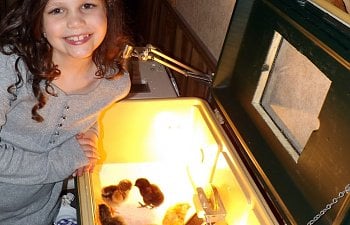
Let the kids and Grandkids help you incubate and care for chicks!
Our Daughter helped make our very first coolerincubator and followed us along on our first attempt! She learned alot! and they sure do love chicks!
Our Son Lucas in below image and video...
Our Son Lucas in below image and video...

Disclaimer: Please note this information is offered as friendly advice only and, whilst I have made every effort to ensure it is accurate, I can not be held responsible if it proves not to be useful in your case!
Sally Sunshine
Educational Incubation & Hatching, w/ Sally Sunshine Click HERE & NOTES section click HERE
Hatching 101 Article click HERE & Assisted Hatching Guide Click HERE
Cabinet Coolerbator ~ Pallet Coops ~ Saloon Coop ~ Pallet Duck House & Duck Care
Processing Support Group~ PINTEREST ALL POULTRY ~Our Serama House of Littles Click HERE ~Mushy Chick Disease ~ Nasty Chicken Butt ~ Easy no Strain Fermented Feed ~ Easy 5gal Waterer
A little fun compliments of my friend Oz!
My new Avy Created by my friend cochins1088 from BYC,
How cool is that!

Sally Sunshine
Educational Incubation & Hatching, w/ Sally Sunshine Click HERE & NOTES section click HERE
Hatching 101 Article click HERE & Assisted Hatching Guide Click HERE
Cabinet Coolerbator ~ Pallet Coops ~ Saloon Coop ~ Pallet Duck House & Duck Care
Processing Support Group~ PINTEREST ALL POULTRY ~Our Serama House of Littles Click HERE ~Mushy Chick Disease ~ Nasty Chicken Butt ~ Easy no Strain Fermented Feed ~ Easy 5gal Waterer
A little fun compliments of my friend Oz!

My new Avy Created by my friend cochins1088 from BYC,
How cool is that!