After having a couple of coops that were really hard to work with, I decided that this time I'd spend some extra time and get it right!
This coop was built almost entirely out of scraps, including a wooden shipping crate, some parts of other coops, and plywood from old cabinet doors. The roof tiles were free on Craigslist, and most of the hardware was salvaged.
I did have to lay down about $200 for materials to build the enclosed run, because it is visible from our neighbors' yard and I wanted it to look pretty. Don't hate us, please, dear neighbors.
Things I learned from other coops:
1. I don't want to step in muddy chicken poop in the winter to gather eggs or add food.
2. Though it might seem logical, don't put the waterer next to the feeder. It gets dirty real fast when the birds dunk their heads for a drink without wiping their beaks.
3. Access, access, access. It should be easy to get to all parts of the coop to clean them and inspect the birds.
4. There should be an easy way to block off the coop from the run and vice-versa for cleaning.
5. I hate possums and want them all to go away hungry.
6. Feeding all the neighborhood squirrels is a good way to go broke on chicken feed.
7. Storage for feed should be worked into the design, not far away in the garage.
8. Water should be easy to change.
9. Chickens should not be able to discover that the grass really is greener on the other side of the fence in the neighbor's yard.

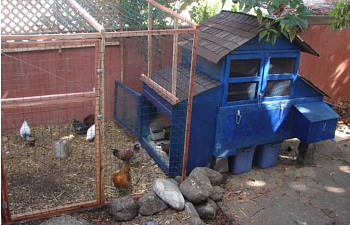
Basic layout of my coop/run - not at all to scale. I kind of made it up as I went along, based on what materials were handy. To make a space below for storage of feed and scratch, I put the coop up on some piers that were lying around the house. It looks a little funny, but it is solid as a rock.
In this view, we're looking from the run into the vestibule, where the water is. I have a auto-filling poultry fountain, attached to a hose. The fountain is mounted on a little door, so that I can unlatch it and dump out any muck from the outside. It gets cleaned a lot more often now than it used to when I had to climb into the coop to change it, and I like that the water is close to the run since that's where they spend most of their time.
The water vestibule gets kind of damp when it rains, so instead of shavings here I have a mix of sand and oyster shell as a substrate. The floor is wood with a lot of holes drilled in it to let air flow through. This has been working a lot better than the moldy shavings, and gives the girls some extra calcium and grit to scratch around in.
Here you can see the tall section of the coop, where the roosts are. The weather is mild in Southern California, so the front is mostly screened. I like that I can look in at night and take inventory easily. Below the screen is a clean out panel that makes it really easy to shovel out the mess into a wheelbarrow.
Next to the roosting area is where the feeder hangs. I was having trouble with birds sitting on the feeder, jumping on it, etc before so I wanted it in a low-roofed area. This section of the roof lifts up so I can refill it easily without going inside.
Lastly, I have two nest boxes on the front and side corners. They all like the front one better, even though they are exactly the same...a line will form for the preferred box before anyone will lay in the second.
Well, that's it! It took me about a week to build, all by myself. The husband thinks I've finally gone mad, but he had to admit that the design was cool and had a lot of smart ideas in it.
This coop was built almost entirely out of scraps, including a wooden shipping crate, some parts of other coops, and plywood from old cabinet doors. The roof tiles were free on Craigslist, and most of the hardware was salvaged.
I did have to lay down about $200 for materials to build the enclosed run, because it is visible from our neighbors' yard and I wanted it to look pretty. Don't hate us, please, dear neighbors.
Things I learned from other coops:
1. I don't want to step in muddy chicken poop in the winter to gather eggs or add food.
2. Though it might seem logical, don't put the waterer next to the feeder. It gets dirty real fast when the birds dunk their heads for a drink without wiping their beaks.
3. Access, access, access. It should be easy to get to all parts of the coop to clean them and inspect the birds.
4. There should be an easy way to block off the coop from the run and vice-versa for cleaning.
5. I hate possums and want them all to go away hungry.
6. Feeding all the neighborhood squirrels is a good way to go broke on chicken feed.
7. Storage for feed should be worked into the design, not far away in the garage.
8. Water should be easy to change.
9. Chickens should not be able to discover that the grass really is greener on the other side of the fence in the neighbor's yard.

Basic layout of my coop/run - not at all to scale. I kind of made it up as I went along, based on what materials were handy. To make a space below for storage of feed and scratch, I put the coop up on some piers that were lying around the house. It looks a little funny, but it is solid as a rock.

In this view, we're looking from the run into the vestibule, where the water is. I have a auto-filling poultry fountain, attached to a hose. The fountain is mounted on a little door, so that I can unlatch it and dump out any muck from the outside. It gets cleaned a lot more often now than it used to when I had to climb into the coop to change it, and I like that the water is close to the run since that's where they spend most of their time.
The water vestibule gets kind of damp when it rains, so instead of shavings here I have a mix of sand and oyster shell as a substrate. The floor is wood with a lot of holes drilled in it to let air flow through. This has been working a lot better than the moldy shavings, and gives the girls some extra calcium and grit to scratch around in.
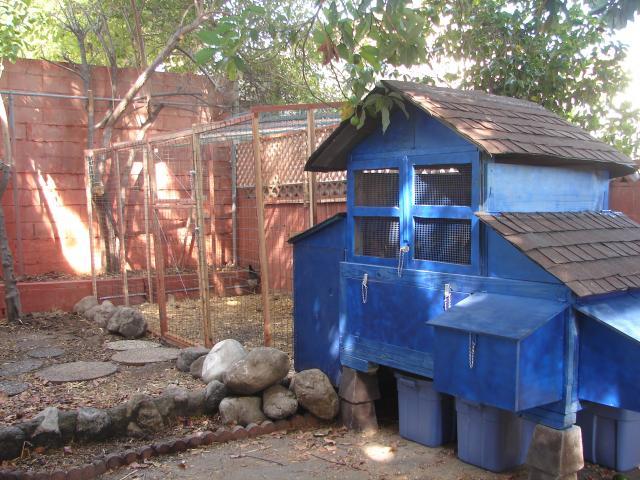
Here you can see the tall section of the coop, where the roosts are. The weather is mild in Southern California, so the front is mostly screened. I like that I can look in at night and take inventory easily. Below the screen is a clean out panel that makes it really easy to shovel out the mess into a wheelbarrow.
Next to the roosting area is where the feeder hangs. I was having trouble with birds sitting on the feeder, jumping on it, etc before so I wanted it in a low-roofed area. This section of the roof lifts up so I can refill it easily without going inside.
Lastly, I have two nest boxes on the front and side corners. They all like the front one better, even though they are exactly the same...a line will form for the preferred box before anyone will lay in the second.
Well, that's it! It took me about a week to build, all by myself. The husband thinks I've finally gone mad, but he had to admit that the design was cool and had a lot of smart ideas in it.