Henny Penny's House
Welcome to my BYC page! I am a mom of two grown daughters and an 12 year old son.
I wait tables three nights a weeks and occasionally decorate cakes for friends and family.
I have been buying eggs from a neighbor who had about 30 Isa Browns for the last several years.
This year I got to take care of her chickens when her family went on vacation and I actually
enjoyed the chickens! When they sold their farm and moved, I decided to get 6 chickens
for the eggs and fertilizer. My husband and I have spent the last month building our coop and run.
I wanted the coop/run to be movable as we have over an acre and a half. My husband is an engineer
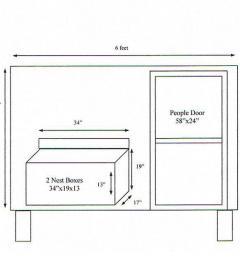
so after I designed the basic 4 x 6 footprint of the coop, he took on the task of building
it to his exacting specifications. I had to remind him, "it's just a coop!"

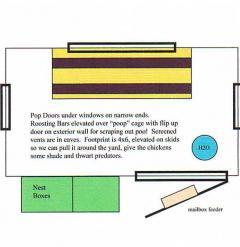
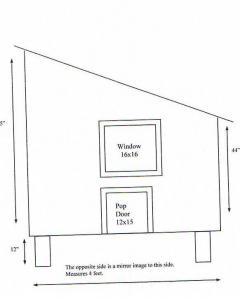
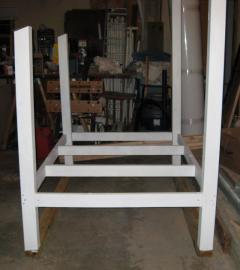
Here are the floor plan and elevations. My DH built the frame on pressure treated 4x4's
so we could pull the coop around the yard. As he built, I painted and looked forward to
completion and picking up my 6 pullets.
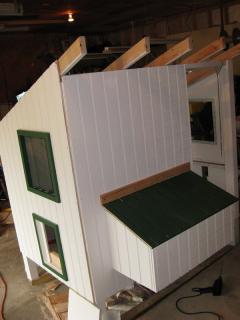
The flooring is a fiberglass sheathing we found at an RV salvage place, The rounded off 2x4's for
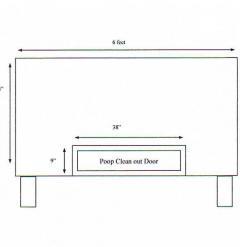
the roosting bars are above a "cage" that the poo goes into so that I can just scrape
it out the little door on that wall.
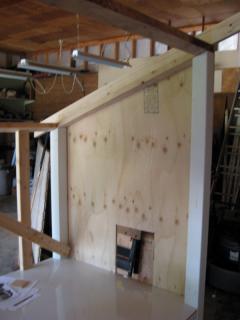
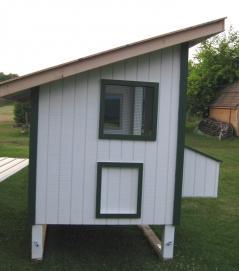
The external nesting box, pop door and windows. We finally got it out of the garage and around
the back for the finishing touches, The ends are designed the same so that we can flip the
run to either end of the coop. My FIL made my 16x16 windows as I couldn't find that
size retail. Beans, the kitten, was an orphan that my neighbor found and adopted. She fell asleep in
the coop after close inspection of every nook and cranny. My DH designed the metal rod mechanism
that push/pulls the pop door open/shut. He made sure the wood (lines) for the doors lined up with the wood
on the coop. That's an engineer for ya!
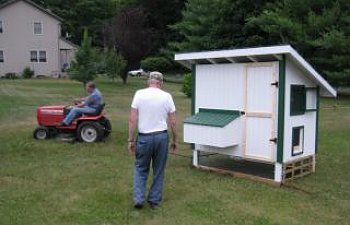
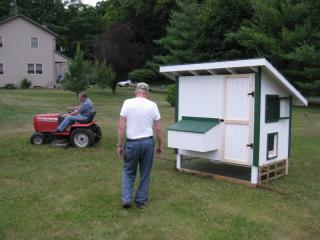
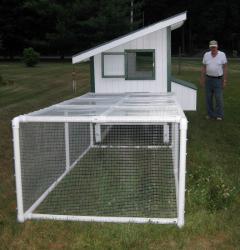
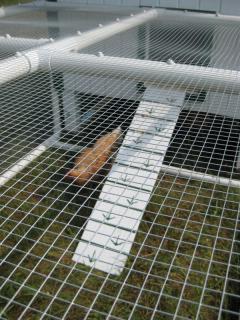
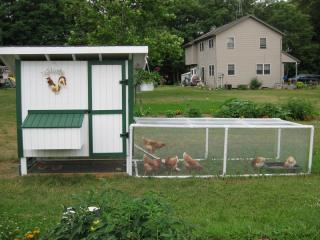
My DH and FIL getting the coop in place and attaching the run. The run is made of PVC and
half inch hardware cloth. My DH can move it around by himself. The run snuggles up to the end of the coop
and is 10 feet long by 4 feet wide and 3 feet tall. There is hardware cloth on the 6 foot sides under the
coop and an end-cap that is interchangable when we flip the run to the other side.
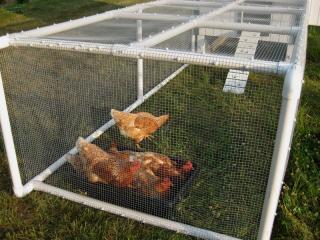
My FIL and my ISA Brown pullets checking out the coop's run and dust bath tub. All 6 of them tried to get
into the dust bath at the same time. Silly girls! I mixed some dirt from my garden with DE for their bathing.
Welcome to my BYC page! I am a mom of two grown daughters and an 12 year old son.
I wait tables three nights a weeks and occasionally decorate cakes for friends and family.
I have been buying eggs from a neighbor who had about 30 Isa Browns for the last several years.
This year I got to take care of her chickens when her family went on vacation and I actually
enjoyed the chickens! When they sold their farm and moved, I decided to get 6 chickens
for the eggs and fertilizer. My husband and I have spent the last month building our coop and run.
I wanted the coop/run to be movable as we have over an acre and a half. My husband is an engineer
so after I designed the basic 4 x 6 footprint of the coop, he took on the task of building
it to his exacting specifications. I had to remind him, "it's just a coop!"
Here are the floor plan and elevations. My DH built the frame on pressure treated 4x4's
so we could pull the coop around the yard. As he built, I painted and looked forward to
completion and picking up my 6 pullets.
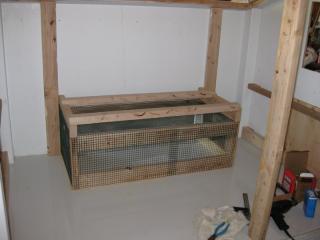
The flooring is a fiberglass sheathing we found at an RV salvage place, The rounded off 2x4's for
the roosting bars are above a "cage" that the poo goes into so that I can just scrape
it out the little door on that wall.

The external nesting box, pop door and windows. We finally got it out of the garage and around
the back for the finishing touches, The ends are designed the same so that we can flip the
run to either end of the coop. My FIL made my 16x16 windows as I couldn't find that
size retail. Beans, the kitten, was an orphan that my neighbor found and adopted. She fell asleep in
the coop after close inspection of every nook and cranny. My DH designed the metal rod mechanism
that push/pulls the pop door open/shut. He made sure the wood (lines) for the doors lined up with the wood
on the coop. That's an engineer for ya!

My DH and FIL getting the coop in place and attaching the run. The run is made of PVC and
half inch hardware cloth. My DH can move it around by himself. The run snuggles up to the end of the coop
and is 10 feet long by 4 feet wide and 3 feet tall. There is hardware cloth on the 6 foot sides under the
coop and an end-cap that is interchangable when we flip the run to the other side.
My FIL and my ISA Brown pullets checking out the coop's run and dust bath tub. All 6 of them tried to get
into the dust bath at the same time. Silly girls! I mixed some dirt from my garden with DE for their bathing.
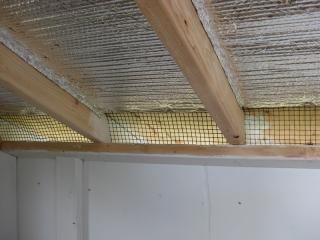
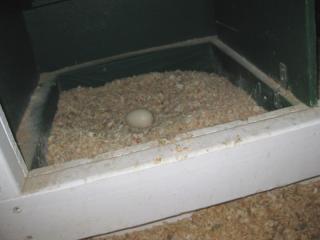
The eaves on either side are open for now. I put a fake egg in each nest box and it's
so much fun to collect the eggs. The neighbor kids are taking turns gathering eggs.
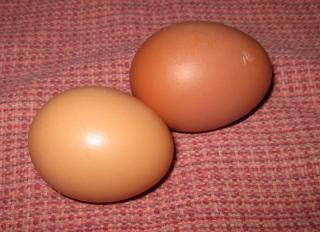
Such a thrill to gather my first 2 eggs. Today (7/18/09) there was 6 eggs in the nesting boxes!
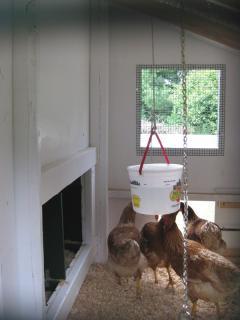
I painted the interior with semi-gloss latex; white inside the coop to keep it bright and green in
the nest boxes so that they stay somewhat dark for the girl's privacy! I got the water nipples
at FarmTek and put 3 of them on the bottom of a bucket that holds a gallon of water mixed
with 1 TBS. of ACV. They took to the nipple system with no problems and appear
healthy and happy in their new home. They are spoiled rotten and even the neighbors buy them
meal worms and crickets. We have the space to change the coop/run once a week so the
grass can recover. In the winter we will put it in the garden and till up the coop/run plot and plant
some sort of rye grass mix for next summers rotation.
I am pretty pleased at how it turned out and the only thing I'd change is to not have the
roosting cage. I'd probably just put one roosting bar across the back as they all crowd on the back
bar next to the wall anyway. The deep litter system is working so well that I could do without it.
With the removal of a few screws the cage could come out but the DH worked so hard on it that
I hate to ask him to take it out. I figure we have about $500 wrapped up into the coop and run.
The girls have a lot of eggs to lay to pay for their new digs!
Thanks for looking at my coop and lovely ISA Browns! They sure are fun!