The Grand Sparrow Haven Lodge
We have added chickens to the menagerie that is Sparrow Haven. If you are simply interested in reading about the coop, I plan on adding pictures with summary text as I go. I hope this can be helpful to someone out there.
This is the first time we have ever had chickens. I was raised around chickens but that was in Florida, which is very different from Ontario, Canada. Not only the weather but the attitude is different. My parents let the chickens fend for themselves except for feeding once a day. The coop was a simple wood structure with an open underside roost area. There was a fenced in yard but for the most parts the chickens went in and out as they pleased. The only time we spent any time with the chickens as a kids was a butchering time.
Here and now, the chickens are working pets. We have them for eggs and for amusement. The weather gets downright frigid here in the winter time and we do not want the chickens harmed by weather, predator, or negligence. To make sure we did everything we could to protect the girls we researched long and hard before even ordering the chicks from the feed store. We found and spent a great deal of time on Back Yard Chickens, learning about every aspect of raising chickens. Then we ordered the chicks and began the building of the Lodge.
We decided the coop was going to be 4 ft x 5 ft with exterior nest boxes. The whole coop is raised off the ground by 3 ft since we usually get 3 or more feet of snow each winter. Every wall, including the roof and floor, is insulated using 2 inch hard foam giving an R value of 10. In addition we are using 3/4" OSB for the exterior cladding and 1/4" interior plywood for the interior walls. The roof is recycled white tin. The entire coop is also wrapped in wind barrier and then engineered 4' x 8' siding on top of that. A light bulb was wired into the coop for extra heat in the winter if needed. All in all this coop cost us about $1500.00 to build, including the hardware cloth used for the exterior run, all the wood used for construction and trim, and the paint we used for the interior. The storm windows are double paned glass recycled from old house windows.
We wanted the coop to be portable and thought the smaller size would make it so. We were wrong. By the time we had added all the cladding, siding, and such the coop was heavy. It took us an entire day, with lots of swearing, sweating, and pulled muscles to get it to it's final resting place. Luckily we chose the final site, once we realized it would never move again, carefully. It sits under a deciduous tree so it gets shade in the summer, which can reach 35 degrees Celsius and high humidity for several days at a time, but gets full sun in the winter.
Day One

We framed the floor using 4 x 4 pressure treated wood for the legs, 2 x 3 pine for the jousts, 5/4 x 6 pressure treated for the flooring sills, and OSB for the floor itself. We used 2 x 3 pine for the studs. We used 3" decking screws to hold it all together. We also managed to start insulating, if only the floor.
We framed the floor using 4 x 4 pressure treated wood for the legs, 2 x 3 pine for the jousts, 5/4 x 6 pressure treated for the flooring sills, and OSB for the floor itself. We used 2 x 3 pine for the studs. We used 3" decking screws to hold it all together. We also managed to start insulating, if only the floor.
Close up of the exterior nest boxes. This part of the job took the longest. If I had to do it all over again I think I would make the coop larger and add removable boxes. Even adding the insulation and exterior cladding on the boxes took forever.
Day Four
The interior wall was installed and then the insulation. Since the insulation had to be cut to size it was easier to have one wall in place to hold it without having to use nails or glue. We wanted the exterior cladding to extend past the connection points of the wall sill and the flooring so we decided the interior wall was the best choice. This also allowed us to cut the hole for the light fixture and allow for the electrical cord that would connect the light socket to the exterior box, where a plug will allow connection to an extension cord in the winter.
It took us a total of 3 days to get the insulation, light fixture, and exterior cladding installed. The majority of that time was trying to cut the wood to all the correct angles for the exterior nest boxes. Did I mention that I really regret making these nest boxes? They took forever to figure out how to frame, mount, insulate, and clad.
Day Ten
The exterior cladding is done and the wind barrier is almost done. Now that we have added the exterior OSB we realized that there is no way this coop is going to be portable. We decided to ignore that problem until it was time to worry about it and went on to finish the coop. This portion took far longer than I wanted it to. It took two days to frame, insulate, and clad the doors. Then it took another couple of days to build the nest box drop down door and plane it to make it fit. It seemed like we would take two steps forward and then three steps back at every stage from this point on.
The chicks arrived healthy and hungry. Thankfully they didn't need the coop right away. They were content with a box in the house.
Day Eighteen
By this time the chicks needed some space to run around so we built them a 4 x 10 tractor to let them spread their wings. We used a rabbit water bottle, a metal tray feeder, and even included a dust bath which they loved. Here the babies who are 5 weeks old enjoy the dust and sun.
We finally had to move the coop to its final location. It took us the entire day to get it moved and almost killed ourselves in the process. Lesson learned. If we have to do it again the coop will be built in its final location. Because the coop isn't portable we decided to add a small exterior run that will allow the chickens access to fresh air and a small amount of grazing. This run is secure enough that we don't have to worry about predators if we are a little late getting the coop closed for the night. We allow tractor time as well as supervised free ranging on most days.
The Final Results(short some trim and paint)
The ramp to the hatch. Notice the hatch is insulated and locks closed with a barrel latch.
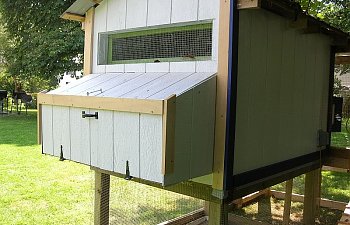
The nest box outside and in. The dividers are painted and can be removed if absolutely necessary. The hook and eye is very tight, but to make the coop even more secure the door itself is snug and requires some leverage to get it open.
Inside the coop. Hanging feed ad water stations, windows for ventilation, and painted roosts that can be removed for cleaning. The shavings are kept in by the piece of plywood. We plan on using a modified deep litter method. The coop will be cleaned out every month or maybe two depending on the mess inside.
The electrical box showing the extention cord connected. The light fixture plug and extention cord socket are protected from the elements inside the box. The box snaps shut and takes some serious strength to get open. That makes it very secure against the weather and rodents.
We have added chickens to the menagerie that is Sparrow Haven. If you are simply interested in reading about the coop, I plan on adding pictures with summary text as I go. I hope this can be helpful to someone out there.
This is the first time we have ever had chickens. I was raised around chickens but that was in Florida, which is very different from Ontario, Canada. Not only the weather but the attitude is different. My parents let the chickens fend for themselves except for feeding once a day. The coop was a simple wood structure with an open underside roost area. There was a fenced in yard but for the most parts the chickens went in and out as they pleased. The only time we spent any time with the chickens as a kids was a butchering time.
Here and now, the chickens are working pets. We have them for eggs and for amusement. The weather gets downright frigid here in the winter time and we do not want the chickens harmed by weather, predator, or negligence. To make sure we did everything we could to protect the girls we researched long and hard before even ordering the chicks from the feed store. We found and spent a great deal of time on Back Yard Chickens, learning about every aspect of raising chickens. Then we ordered the chicks and began the building of the Lodge.
We decided the coop was going to be 4 ft x 5 ft with exterior nest boxes. The whole coop is raised off the ground by 3 ft since we usually get 3 or more feet of snow each winter. Every wall, including the roof and floor, is insulated using 2 inch hard foam giving an R value of 10. In addition we are using 3/4" OSB for the exterior cladding and 1/4" interior plywood for the interior walls. The roof is recycled white tin. The entire coop is also wrapped in wind barrier and then engineered 4' x 8' siding on top of that. A light bulb was wired into the coop for extra heat in the winter if needed. All in all this coop cost us about $1500.00 to build, including the hardware cloth used for the exterior run, all the wood used for construction and trim, and the paint we used for the interior. The storm windows are double paned glass recycled from old house windows.
We wanted the coop to be portable and thought the smaller size would make it so. We were wrong. By the time we had added all the cladding, siding, and such the coop was heavy. It took us an entire day, with lots of swearing, sweating, and pulled muscles to get it to it's final resting place. Luckily we chose the final site, once we realized it would never move again, carefully. It sits under a deciduous tree so it gets shade in the summer, which can reach 35 degrees Celsius and high humidity for several days at a time, but gets full sun in the winter.
Day One


Day Four


It took us a total of 3 days to get the insulation, light fixture, and exterior cladding installed. The majority of that time was trying to cut the wood to all the correct angles for the exterior nest boxes. Did I mention that I really regret making these nest boxes? They took forever to figure out how to frame, mount, insulate, and clad.
Day Ten

The chicks arrived healthy and hungry. Thankfully they didn't need the coop right away. They were content with a box in the house.
Day Eighteen


The Final Results(short some trim and paint)