My husband and I recently built our empty nest home on a 60 acre parcel of land in the upper mid-west. I have always wanted chickens and so I have been lurking on BYC for a year, researching everything chicken related, asking lots of questions as I learned how to care for chickens. I want to thank the BYC community for all of the expert advice and resources that was the inspiration in my brooder and coop designs. Here I present my brooder, aka the chick cave. The coop article will come later.
My DH agreed to help me build a coop for six chickens. Once I explained chicken math to him he made me agree to no more than seven in the main flock ( ). To keep me at my limit he threatened to buy a new tractor implement for each chick numbering over 7.."in the main flock", I reminded him (words matter). I set out making coop and brooder plans using BYC and affiliates as a resource. I planned to use a 2x3 wire dog crate for the brooder that would provide the chicks 1 sq ft each until about 4 weeks of age when they go to the coop permanently. The crate had two doors; one on the short end and the other on the long side. I made panels along the crate floor and bottom edges going up about 8-9 inches as a draft barrier and cut out for the side door.
 The whole project took just a couple of hours and I was pretty satisfied. Then...
DH came home about a week later with a bigger model tractor and a new box scraper. Naturally I felt I was owed an upgrade of my own. I, therefore, upped my main flock limit to a range of 8-10 (chick math) and revised my chick order to 11 (the free extra chick doesn't count in the 'main flock'). I also negotiated for a larger coop going from 4x8 to 6x10.
And so, I'm starting out with a dozen chicks for now. DH gets to have fun with his new toys to prep a larger run and everyone gets what they want.. happiness in the country.
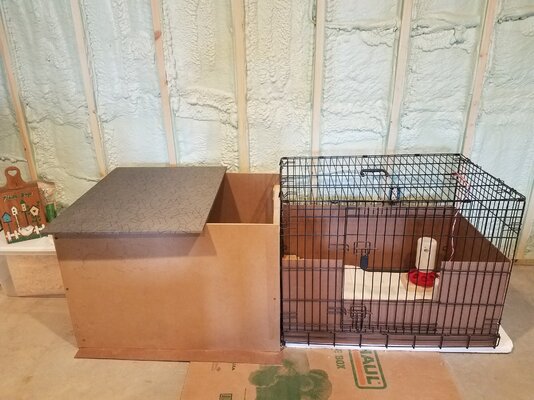
It was apparent that my original 2x3 dog crate brooder was not going to be sufficient space for 12 chicks beyond 1-2 weeks, so I decided to build and attach a 2x3 box to the crate. I had a vision for a chick apartment annexed to the crate that would keep the chicks free from drafts and make them feel secure in a cave-like area at night.

All materials were left over from our recent home build. The sides and floor of the annex is made of thick pressed wood form board that is typically used as concrete forms. The interior side of the panels is smooth and somewhat slick, so it should not absorb moisture. I used a pneumatic stapler to secure all of the panels. The top over the annex creates the cave effect blocking light and, with the brooder plate, may offer a little more heat retention in the cave to keep the chicks cozy. The top is simply a large 3x4 sound proofing board that can be arranged to provide full or partial cover.
There is plenty of ventilation to the brooder but if needed the top can be retracted and a screen placed over the opening to prevent flyaways. Even though my basement is heated I placed the entire brooder on a 2 inch styrofoam slab for extra insulation (not shown).
I removed the door on the short end of dog crate where the two units will connect. The hinges left behind caused a large gap between the two structures leaving space for chicks to become trapped or from which to escape.
Since the dog crate will later be used as an infirmary or brooder space in the coop it was essential to leave the hinges in order to later reattach the door. To fix the gap problem without destroying the crate, DH cut 2x4 pieces to secure the gap and to offered better support on the connecting ends. The two units were connected using screws and washers through the 2x4s mentioned above and through the slots in the crate without deforming the wires.
The vertical height of the threshold between the units ended up being nearly 4 inches high and had a 3/4 gap due to the bottom hinge point on the removed door. I felt the metal edges on the vertical threshold posed a danger to the chicks as they would have to jump over to get between the heat plates and water/food. I envisioned a bridge for the threshold but lacked any skill in executing something that cool, so DH made mini 'Rocky Balboa' stairs with 2x4 supports underneath.
I covered the metal crate edge with pex tube cut to length and slit down the long end. The stairs and pex were sanded to remove sharp or rough edges then the stairs were secured to the supports with pneumatic staples.
A chick waterer is suspended by a homemade sling made from an extra length of romex, stripped and twisted, simple because I was bored and needed to do something chick related one evening.
Finally, I created a temporary chick playpen by sectioning off around the brooder using leftover shelving material. Now, the only thing left to do is add chicks and live happily ever after.
My DH agreed to help me build a coop for six chickens. Once I explained chicken math to him he made me agree to no more than seven in the main flock (
). To keep me at my limit he threatened to buy a new tractor implement for each chick numbering over 7.."in the main flock", I reminded him (words matter). I set out making coop and brooder plans using BYC and affiliates as a resource. I planned to use a 2x3 wire dog crate for the brooder that would provide the chicks 1 sq ft each until about 4 weeks of age when they go to the coop permanently. The crate had two doors; one on the short end and the other on the long side. I made panels along the crate floor and bottom edges going up about 8-9 inches as a draft barrier and cut out for the side door.
DH came home about a week later with a bigger model tractor and a new box scraper. Naturally I felt I was owed an upgrade of my own. I, therefore, upped my main flock limit to a range of 8-10 (chick math) and revised my chick order to 11 (the free extra chick doesn't count in the 'main flock'). I also negotiated for a larger coop going from 4x8 to 6x10.
And so, I'm starting out with a dozen chicks for now. DH gets to have fun with his new toys to prep a larger run and everyone gets what they want.. happiness in the country.
It was apparent that my original 2x3 dog crate brooder was not going to be sufficient space for 12 chicks beyond 1-2 weeks, so I decided to build and attach a 2x3 box to the crate. I had a vision for a chick apartment annexed to the crate that would keep the chicks free from drafts and make them feel secure in a cave-like area at night.
All materials were left over from our recent home build. The sides and floor of the annex is made of thick pressed wood form board that is typically used as concrete forms. The interior side of the panels is smooth and somewhat slick, so it should not absorb moisture. I used a pneumatic stapler to secure all of the panels. The top over the annex creates the cave effect blocking light and, with the brooder plate, may offer a little more heat retention in the cave to keep the chicks cozy. The top is simply a large 3x4 sound proofing board that can be arranged to provide full or partial cover.
I removed the door on the short end of dog crate where the two units will connect. The hinges left behind caused a large gap between the two structures leaving space for chicks to become trapped or from which to escape.
A chick waterer is suspended by a homemade sling made from an extra length of romex, stripped and twisted, simple because I was bored and needed to do something chick related one evening.