After much deliberation and review of everything I could, I took the plunge and started a coop for the chicks that are on their way.
This coop was designed from a shipping crate and reclaimed lumber with 1 sheet of plywood and a few 2x4s
I tried to reconfigure and reuse the available materials to minimize effort and waste.
Here we go!

Started off with a standard shipping crate for a machine frame. First, made a base.
Then put the bottom pallet onto the frame. Next, put some scrap ply wood on it, cut a hole for a ramp and added ramp supports.
Next, repurposed some of the boards from the top of the crate (since it's going to have a roof) to use as the nesting box platform.
Took a few more from the front where the big clean out door will go.
The nesting boxes
Chicken wired one of the insides for hanging stuff
Rafters and ridge board
It's going to be a tractor, so everything is screwed together
Moving right along... sides and roof sheathing
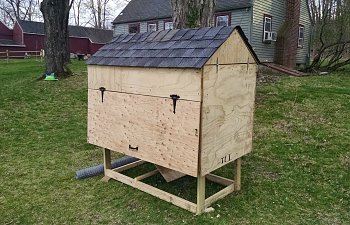
Flaps open all the way down for summer ventilation, both sides
Ramp and roost branch
Nesting box access
The roof took 1 square, plus 4 extra to complete the cap
Nesting box door
Clean out door
Inside
Open front
Open back
The run. Added some bracing so nothing twists when you lift the end of the run to move it.
So, I flipped the coop over to install the coarse wire bottom since we have all the predators. All of em. Spend 2 hours stapling, tacking and sewing the two halves of the mesh together since the local store only had 24" with stainless steel lock wire. I was tired and forgot a picture while it was upside down... The mesh is coated green, so you barely see it on the grass.
My plan will be to add a door to the front of the run to let them out after I finish the rest.
The quality passed approval, as I found my 3 yr old daughter inside clucking like a chicken when I went to the shed for more screws. She crawled right in up the ramp and was sitting inside... She's gonna love it
--------------
Alright, so I should have painted everything before the chicken wire was on. I didn't realize how much of a PITA it was to paint over it even when it was stapled a million times.
Either way, it's done except I have to put the wheels on!
So, there's also hardware cloth under the coop and I doubled up the chicken wire around the lower part to deter predators. I plan to hang some bells on the chicken wire to alert them to intruders...
Total costs are 2 solid 10" wheels from harbor freight: $10/ea with coupon, 1 sheet of 3/8" plywood from the depot, $15, 5x 2x3s @2.50/ea: 12.50, hinges, latches and handles, 25.00, 1 square of roofing shingles, $20 with coupon, 1 roll chicken wire, $25, 1 roll of coarse, coated wire, $15, 1 galvanized pipe for axle, $3.50, and everything else was reclaimed or extra = free, for a total of $136.00.
-Andy
This coop was designed from a shipping crate and reclaimed lumber with 1 sheet of plywood and a few 2x4s
I tried to reconfigure and reuse the available materials to minimize effort and waste.
Here we go!
Started off with a standard shipping crate for a machine frame. First, made a base.
Then put the bottom pallet onto the frame. Next, put some scrap ply wood on it, cut a hole for a ramp and added ramp supports.
Next, repurposed some of the boards from the top of the crate (since it's going to have a roof) to use as the nesting box platform.
Took a few more from the front where the big clean out door will go.
The nesting boxes
Chicken wired one of the insides for hanging stuff
Rafters and ridge board
It's going to be a tractor, so everything is screwed together
Moving right along... sides and roof sheathing
Flaps open all the way down for summer ventilation, both sides
Ramp and roost branch
Nesting box access
The roof took 1 square, plus 4 extra to complete the cap
Nesting box door
Clean out door
Inside
Open front
Open back
The run. Added some bracing so nothing twists when you lift the end of the run to move it.
So, I flipped the coop over to install the coarse wire bottom since we have all the predators. All of em. Spend 2 hours stapling, tacking and sewing the two halves of the mesh together since the local store only had 24" with stainless steel lock wire. I was tired and forgot a picture while it was upside down... The mesh is coated green, so you barely see it on the grass.
My plan will be to add a door to the front of the run to let them out after I finish the rest.
The quality passed approval, as I found my 3 yr old daughter inside clucking like a chicken when I went to the shed for more screws. She crawled right in up the ramp and was sitting inside... She's gonna love it
--------------
Alright, so I should have painted everything before the chicken wire was on. I didn't realize how much of a PITA it was to paint over it even when it was stapled a million times.
Either way, it's done except I have to put the wheels on!
So, there's also hardware cloth under the coop and I doubled up the chicken wire around the lower part to deter predators. I plan to hang some bells on the chicken wire to alert them to intruders...
Total costs are 2 solid 10" wheels from harbor freight: $10/ea with coupon, 1 sheet of 3/8" plywood from the depot, $15, 5x 2x3s @2.50/ea: 12.50, hinges, latches and handles, 25.00, 1 square of roofing shingles, $20 with coupon, 1 roll chicken wire, $25, 1 roll of coarse, coated wire, $15, 1 galvanized pipe for axle, $3.50, and everything else was reclaimed or extra = free, for a total of $136.00.
-Andy