February 2010 [FONT=comic sans ms,sand]Homemade Chickens!![/FONT]
[FONT=comic sans ms,sand]Well, here we go! We are going to incubate eggs in our homemade incubator! Last year we used a broody hen - a method I highly recommend. It was a great experience to watch our hen do her thing and raise the chicks. But that is another page... [/FONT]
[FONT=comic sans ms,sand]Feb. 6, 2010 So, we started with nothing. I tend to get rid of anything I am not currently using, so I didn't have any parts laying around. We went out to several stores and found all the ingredients:[/FONT][FONT=comic sans ms,sand]Well, here we go! We are going to incubate eggs in our homemade incubator! Last year we used a broody hen - a method I highly recommend. It was a great experience to watch our hen do her thing and raise the chicks. But that is another page... [/FONT]
[FONT=comic sans ms,sand]A styrofoam ice chest (difficult to find the day before super bowl Sunday)
a lamp kit
a light bulb
a thermometer/hygrometer
a picture frame that fit the top of the ice chest
water heater thermostat (which we took out cause it lets the temps vary too much)
hardware cloth (okay, we did have some of this in the garage)
After we put it together, we discovered we needed some other things:
a computer fan (I bought one. No old computers here)
a dimmer switch (idea from BYC member) to replace the thermostat
rocks (from the yard) to stabilize temp
So here it is.
[FONT=comic sans ms,sand][FONT=comic sans ms,sand]

It has a huge viewing window. That is because if it didn't, I would be opening it and messing with it all the time so I could SEE what was going on inside~! We cut away the dome part of the lid which turned out to be perfectly sized to the picture frame we got. I cut the back out of the picture frame with an exacto knife and there you have it.
Here is the view:
[FONT=comic sans ms,sand][FONT=comic sans ms,sand]Underneath the egg tray I have placed rocks to stabilize the temp. There is a small bowl of water on one side and the computer fan is suspended on the other side. It is just twisty tied to the hardware cloth and hangs there. The light is in the middle and I have it in a cage of hardware cloth for safety There is a folded piece of tin foil loosely draped over the light's cage to keep the heat above more even. It is actually cooler in the middle than on the sides, so that is working, maybe too well.
[FONT=comic sans ms,sand][FONT=comic sans ms,sand] On top, I have placed some soft drawer liner so the fuzzy butts have something soft to land on. It keeps the glare down, too. Hopefully it isn't altering the temps. We have 2 digital thermometers in there. They read differently, but I am fairly certain that it is just the uneven temps in different parts of the incubator. I also have the water wiggler with a meat thermometer in the center. Hubby calibrated that for me so it reads correctly. I guess that has to be done once in a while. I stole the egg turner idea. I have a piece of large wooden dowel (or pvc) glued to the egg carton so that it leans one way. I can simply roll it to turn the eggs thereby shortening the time I have to have the bator open.
[FONT=comic sans ms,sand][FONT=comic sans ms,sand] I do have tiny vent holes all around the outside of the ice chest, but the real vent hole is on top. I can just slide the picture frame side to side to create a smaller or larger space for air to get in.
[FONT=comic sans ms,sand]
[FONT=comic sans ms,sand]Note: for anyone who comes across this page looking to build one of these. There is some debate about whether it is safe to use a lamp dimmer for temp control. I did find a page where a gentleman altered his water heater thermostat and got it to work perfectly [/FONT][FONT=comic sans ms,sand][URL]https://www.backyardchickens.com/web/viewblog.php?id=26580-thermostat-modification[/FONT][/URL][FONT=comic sans ms,sand] So maybe that would be safer. For this hatch we are going to go with what is working for us because I am picking up the eggs in 1 hour. No more time for experiments. [/FONT]
Update: Feb 12, 2010
25 eggs are in and the bator is running. A few minor adjustments...
[FONT=comic sans ms,sand]
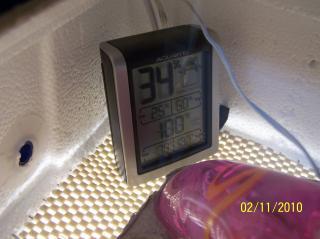
The temp is somewhere between 100* (according to one thermometer) and 98.2 (according to the other that I think reads a little cool). The water wiggler temp looks like it is just slightly lower than 100*, so I am hoping that they are close enough. We are going with the dry hatch method. Several BYC members testify to greatly increased hatch rates when they went with the dry hatch. Humidity will be kept between 25% and 35% until lock down on days 19-21. Hoping and praying!! Edited to add: that we discovered that the thermometers were working just fine, but that it was actually cooler on one side of the incubator. So we did vent the hot side and covered the cool side with a towel which seemed to do the trick.
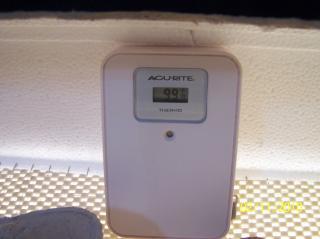
After the first week and finding it difficult to keep the humidity up to 30%, I started to suspect that my hygrometer was reading low. So on that hunch, I kept humidity between 20 and 25%. In the third week, we calibrated the hygrometer and found it to be reading a whopping 10% off!! So 20-25% was really 30-35%. Glad we did that. So for lockdown we will keep humidity between 50 and 55% per my hygrometer which will actually be 60-65%. Clear as mud? Directions for calibrating your hygrometer can be found by using your Google search line.
Disaster #1 Feb 19, 2010 So I was turning the eggs and candling a few, too. As I lifted the picture frame lid, it fell in the incubator and the corner landed on an egg!! EEk!! Yep, it cracked it. I felt so bad. That egg had been developing nicely, and now what?!?! So I went to BYC - of course, and found that someone else had already started a thread for what to do if you crack an egg. The advice given was to drip candle wax on the crack. Okay, so I did!! So far, so good!![/FONT][/FONT][/FONT][/FONT][/FONT][/FONT][/FONT][/FONT]
a lamp kit
a light bulb
a thermometer/hygrometer
a picture frame that fit the top of the ice chest
water heater thermostat (which we took out cause it lets the temps vary too much)
hardware cloth (okay, we did have some of this in the garage)
After we put it together, we discovered we needed some other things:
a computer fan (I bought one. No old computers here)
a dimmer switch (idea from BYC member) to replace the thermostat
rocks (from the yard) to stabilize temp
So here it is.
[FONT=comic sans ms,sand][FONT=comic sans ms,sand]
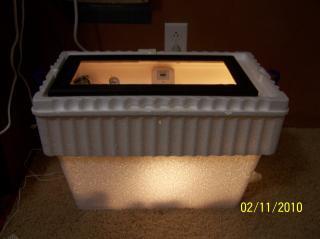
It has a huge viewing window. That is because if it didn't, I would be opening it and messing with it all the time so I could SEE what was going on inside~! We cut away the dome part of the lid which turned out to be perfectly sized to the picture frame we got. I cut the back out of the picture frame with an exacto knife and there you have it.
Here is the view:
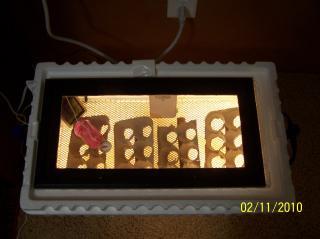
[FONT=comic sans ms,sand][FONT=comic sans ms,sand]Underneath the egg tray I have placed rocks to stabilize the temp. There is a small bowl of water on one side and the computer fan is suspended on the other side. It is just twisty tied to the hardware cloth and hangs there. The light is in the middle and I have it in a cage of hardware cloth for safety There is a folded piece of tin foil loosely draped over the light's cage to keep the heat above more even. It is actually cooler in the middle than on the sides, so that is working, maybe too well.
[FONT=comic sans ms,sand][FONT=comic sans ms,sand] On top, I have placed some soft drawer liner so the fuzzy butts have something soft to land on. It keeps the glare down, too. Hopefully it isn't altering the temps. We have 2 digital thermometers in there. They read differently, but I am fairly certain that it is just the uneven temps in different parts of the incubator. I also have the water wiggler with a meat thermometer in the center. Hubby calibrated that for me so it reads correctly. I guess that has to be done once in a while. I stole the egg turner idea. I have a piece of large wooden dowel (or pvc) glued to the egg carton so that it leans one way. I can simply roll it to turn the eggs thereby shortening the time I have to have the bator open.
[FONT=comic sans ms,sand][FONT=comic sans ms,sand] I do have tiny vent holes all around the outside of the ice chest, but the real vent hole is on top. I can just slide the picture frame side to side to create a smaller or larger space for air to get in.
[FONT=comic sans ms,sand]
[FONT=comic sans ms,sand]
We had a water heater thermostat attached, but it was allowing the temps to swing way too much. On the example of a BYC member we went with the dimmer switch idea. So, real quick we took off the thermostat and put on the dimmer switch. We were able to get the temperature to stabilize pretty quickly. Whew![/FONT]
[FONT=comic sans ms,sand][FONT=comic sans ms,sand][FONT=comic sans ms,sand] Will update when we get the eggs in there.![URL]](/proxy.php?image=http%3A%2F%2F%5BURL%5Dhttps%3A%2F%2Fwww.backyardchickens.com%2Fforum%2Fuploads%2F19636_100_9578.jpg%5B%2FURL%5D&hash=e567afc6ca0be1456ea4fdcf35409426)
![URL]](/proxy.php?image=http%3A%2F%2F%5BURL%5Dhttps%3A%2F%2Fwww.backyardchickens.com%2Fforum%2Fuploads%2F19636_100_9585.jpg%5B%2FURL%5D&hash=70e76db3de66a94356b9939dcf19725b)
We had a water heater thermostat attached, but it was allowing the temps to swing way too much. On the example of a BYC member we went with the dimmer switch idea. So, real quick we took off the thermostat and put on the dimmer switch. We were able to get the temperature to stabilize pretty quickly. Whew![/FONT]
[FONT=comic sans ms,sand]Note: for anyone who comes across this page looking to build one of these. There is some debate about whether it is safe to use a lamp dimmer for temp control. I did find a page where a gentleman altered his water heater thermostat and got it to work perfectly [/FONT][FONT=comic sans ms,sand][URL]https://www.backyardchickens.com/web/viewblog.php?id=26580-thermostat-modification[/FONT][/URL][FONT=comic sans ms,sand] So maybe that would be safer. For this hatch we are going to go with what is working for us because I am picking up the eggs in 1 hour. No more time for experiments. [/FONT]
Update: Feb 12, 2010
25 eggs are in and the bator is running. A few minor adjustments...
[FONT=comic sans ms,sand]
[FONT=comic sans ms,sand]
[/FONT]
[FONT=comic sans ms,sand][FONT=comic sans ms,sand][FONT=comic sans ms,sand]The vent in the top was not working. It was allowing one side of the bator to be cooler than the other, so we closed the top and drilled 2 holes in the bottom section that we can easily plug with wine bottle corks. ![URL]](/proxy.php?image=http%3A%2F%2F%5BURL%5Dhttps%3A%2F%2Fwww.backyardchickens.com%2Fforum%2Fuploads%2F19636_100_9582.jpg%5B%2FURL%5D&hash=c7a24af920fed4669ef1affe6b2c28fc)
![URL]](/proxy.php?image=http%3A%2F%2F%5BURL%5Dhttps%3A%2F%2Fwww.backyardchickens.com%2Fforum%2Fuploads%2F19636_100_9584.jpg%5B%2FURL%5D&hash=effccb34106aee0ec0e09bbd4ee533ae)
The temp is somewhere between 100* (according to one thermometer) and 98.2 (according to the other that I think reads a little cool). The water wiggler temp looks like it is just slightly lower than 100*, so I am hoping that they are close enough. We are going with the dry hatch method. Several BYC members testify to greatly increased hatch rates when they went with the dry hatch. Humidity will be kept between 25% and 35% until lock down on days 19-21. Hoping and praying!! Edited to add: that we discovered that the thermometers were working just fine, but that it was actually cooler on one side of the incubator. So we did vent the hot side and covered the cool side with a towel which seemed to do the trick.
![URL]](/proxy.php?image=http%3A%2F%2F%5BURL%5Dhttps%3A%2F%2Fwww.backyardchickens.com%2Fforum%2Fuploads%2F19636_100_9583.jpg%5B%2FURL%5D&hash=d984fe802cb0a66ff0f86ac8d5a7df69)
After the first week and finding it difficult to keep the humidity up to 30%, I started to suspect that my hygrometer was reading low. So on that hunch, I kept humidity between 20 and 25%. In the third week, we calibrated the hygrometer and found it to be reading a whopping 10% off!! So 20-25% was really 30-35%. Glad we did that. So for lockdown we will keep humidity between 50 and 55% per my hygrometer which will actually be 60-65%. Clear as mud? Directions for calibrating your hygrometer can be found by using your Google search line.
Disaster #1 Feb 19, 2010 So I was turning the eggs and candling a few, too. As I lifted the picture frame lid, it fell in the incubator and the corner landed on an egg!! EEk!! Yep, it cracked it. I felt so bad. That egg had been developing nicely, and now what?!?! So I went to BYC - of course, and found that someone else had already started a thread for what to do if you crack an egg. The advice given was to drip candle wax on the crack. Okay, so I did!! So far, so good!!
[FONT=comic sans ms,sand][FONT=comic sans ms,sand]
[/FONT][/FONT][/FONT][/FONT][/FONT][/FONT][/FONT][/FONT][/FONT]Lock Down!!
March 2, 2010
[/FONT][FONT=comic sans ms,sand]
[/FONT]Disaster #2, #3, and #4 So, this morning, I found myself dreaming about the hatch. I dreamed that we were heading in to put the eggs in lock down and found that 3 chicks had already hatched! They just kept hatching and hatching and we didn't have a brooder ready. It was chaos!! Little did I know that what I was having was a vision of what was to come! They didn't hatch, but the chaos!!
When I woke from the dream, I reached for the remote temp reader. It has been consistently bottoming out at 99.1 about the time I wake up and shortly thereafter, the heater comes on and it warms right back up. But this morning, for some completely illogical reason - 102.7* !! I scrambled out of bed and ran in to the room where the incubator is. I took the lid off and started fanning the eggs. I decided to go ahead and turn them and that is when disaster struck again! As I picked up a carton, an egg tumbled out and landed ker-splat on another egg. It shattered the side of that egg.
I tried not to panic. I dripped wax on it as best I could, but I decided that I better get them into lock down and up the humidity before that little egg dried out and died.
Well, as soon as I put extra water in there, the humidity shot up to like 85% and the temperature dropped to 97*. I was freaking out! I quickly made some minor adjustments and tried to be patient - knowing that it was the big changes that I made in a panic that caused this. Little changes, and wait, adjust, wait.
Anyway, they are in lock down and I am still getting the temps and humidity worked out. At this point I just want the little fuzzy butts to hatch so I don't have to worry anymore...
March 3, 2010!!! They will be here soon!!
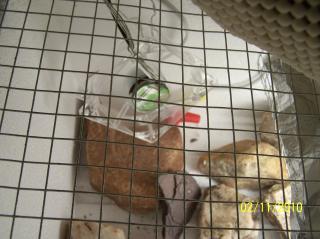
I have removed the eggs from the cartons and laid them on their sides so the little chickies can get all positioned to hatch. I didn't have to do this. I am assured they will hatch in the cartons, but I didn't want to do it that way.
The 5 eggs to the right are clear, but I left them in to stabilize temperatures on that side. It tends to be a little cooler over there.
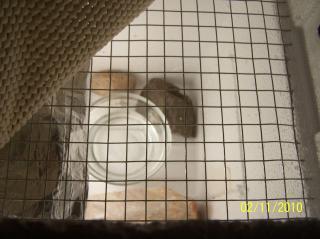
Here are the 15 that were alive and kicking at the time of Lockdown. The one I smashed is in there. I am so hoping I didn't kill that little chicken. Most are Wheaten Ameraucana or Wheaten/Blue Wheaten Ameraucana. There are 2 EEs (easter eggers). The brown egg is from a Delaware x W/BW Ameraucana, and the smallest egg is "Steve" (a referrence to the squirrel in Over the Hedge), a Polish x W/BW Ameraucana. We are so excited about that one!! We hope Steve makes it!!
Come on little chicks!! Hatch!
Here they are!!
We got 6 chicks out of this hatch. 7 hatched, but one had not absorbed all its yolk sac and died 2 days later. Here are their pics!
Unabsorbed yolk. This chick died 2 days later.
[/FONT]When I woke from the dream, I reached for the remote temp reader. It has been consistently bottoming out at 99.1 about the time I wake up and shortly thereafter, the heater comes on and it warms right back up. But this morning, for some completely illogical reason - 102.7* !! I scrambled out of bed and ran in to the room where the incubator is. I took the lid off and started fanning the eggs. I decided to go ahead and turn them and that is when disaster struck again! As I picked up a carton, an egg tumbled out and landed ker-splat on another egg. It shattered the side of that egg.
![URL]](/proxy.php?image=http%3A%2F%2F%5BURL%5Dhttps%3A%2F%2Fwww.backyardchickens.com%2Fweb%2Ftiny_mce%2Fplugins%2Femotions%2Fimages%2Fsmiley-surprised.gif%5B%2FURL%5D&hash=f0932d82f5292efbaa85f15e5c7fd871)
I tried not to panic. I dripped wax on it as best I could, but I decided that I better get them into lock down and up the humidity before that little egg dried out and died.
Well, as soon as I put extra water in there, the humidity shot up to like 85% and the temperature dropped to 97*. I was freaking out! I quickly made some minor adjustments and tried to be patient - knowing that it was the big changes that I made in a panic that caused this. Little changes, and wait, adjust, wait.
Anyway, they are in lock down and I am still getting the temps and humidity worked out. At this point I just want the little fuzzy butts to hatch so I don't have to worry anymore...
March 3, 2010!!! They will be here soon!!
I have removed the eggs from the cartons and laid them on their sides so the little chickies can get all positioned to hatch. I didn't have to do this. I am assured they will hatch in the cartons, but I didn't want to do it that way.
The 5 eggs to the right are clear, but I left them in to stabilize temperatures on that side. It tends to be a little cooler over there.
![URL]](/proxy.php?image=http%3A%2F%2F%5BURL%5Dhttps%3A%2F%2Fwww.backyardchickens.com%2Fforum%2Fuploads%2F19636_100_9739.jpg%5B%2FURL%5D&hash=93e625dbd87d2007fafdb74c1d68a0c7)
Here are the 15 that were alive and kicking at the time of Lockdown. The one I smashed is in there. I am so hoping I didn't kill that little chicken. Most are Wheaten Ameraucana or Wheaten/Blue Wheaten Ameraucana. There are 2 EEs (easter eggers). The brown egg is from a Delaware x W/BW Ameraucana, and the smallest egg is "Steve" (a referrence to the squirrel in Over the Hedge), a Polish x W/BW Ameraucana. We are so excited about that one!! We hope Steve makes it!!
![URL]](/proxy.php?image=http%3A%2F%2F%5BURL%5Dhttps%3A%2F%2Fwww.backyardchickens.com%2Fforum%2Fuploads%2F19636_100_9740.jpg%5B%2FURL%5D&hash=9c8640407f6ad99f565d70a3d63ab12d)
Come on little chicks!! Hatch!
Here they are!!
We got 6 chicks out of this hatch. 7 hatched, but one had not absorbed all its yolk sac and died 2 days later. Here are their pics!
![URL]](/proxy.php?image=http%3A%2F%2F%5BURL%5Dhttps%3A%2F%2Fwww.backyardchickens.com%2Fforum%2Fuploads%2F19636_100_9844.jpg%5B%2FURL%5D&hash=d400c17334d9f12537d8a47f6eaac231)
![URL]](/proxy.php?image=http%3A%2F%2F%5BURL%5Dhttps%3A%2F%2Fwww.backyardchickens.com%2Fforum%2Fuploads%2F19636_100_9850.jpg%5B%2FURL%5D&hash=ee0b8b0edf3d46d67653999b03f62232)
![URL]](/proxy.php?image=http%3A%2F%2F%5BURL%5Dhttps%3A%2F%2Fwww.backyardchickens.com%2Fforum%2Fuploads%2F19636_100_9856.jpg%5B%2FURL%5D&hash=ebe27a9f8aecc36a7b706dddb21d1ba3)
![URL]](/proxy.php?image=http%3A%2F%2F%5BURL%5Dhttps%3A%2F%2Fwww.backyardchickens.com%2Fforum%2Fuploads%2F19636_100_9830.jpg%5B%2FURL%5D&hash=640d2aa30c4b05a368451f15c0d92661)
![URL]](/proxy.php?image=http%3A%2F%2F%5BURL%5Dhttps%3A%2F%2Fwww.backyardchickens.com%2Fforum%2Fuploads%2F19636_100_9947.jpg%5B%2FURL%5D&hash=912c6afbb9a8085615bdcc7deadc6c84)