Hi!

My son and I just purchased several chicks from mypetchicken.com and will add more information about them once they arrive on July 18th.
Meanwhile, my son anxiously awaits their arrival, and I keep studying chicken care online.
I am debating buying a coop vs. building one. All that I have seen online are fairly expensive, and not many are advertised on craigslist. I'll keep looking and studying...
17JUN11:
OK, so I have become just as excited about this as my son. He wanted to try incubating some eggs as well. So... we have built an incubator from spare parts found around $1 stores, salvation army, Walmart, and given for free from Radioshack & a local computer store. I had to order the ReptiTemp 500r (for temp control) from amazon.com, they had the cheapest price and it was free shipping.
We pick up a dozen eggs from a local supplier on 25JUN11. They should hatch at around the same time the day old chicks from mypetchicken.com arrive.
I keep playing with the incubator to get things adjusted just right. Still need to work on it a bit but have included pictures.
I realized that I needed a couple of extra windows for the top (for possible temp viewing), and the water dish (from the side). I will have to add an extra liner so the chicks don't fall through the bars, but won't need to do this until close to hatch date.
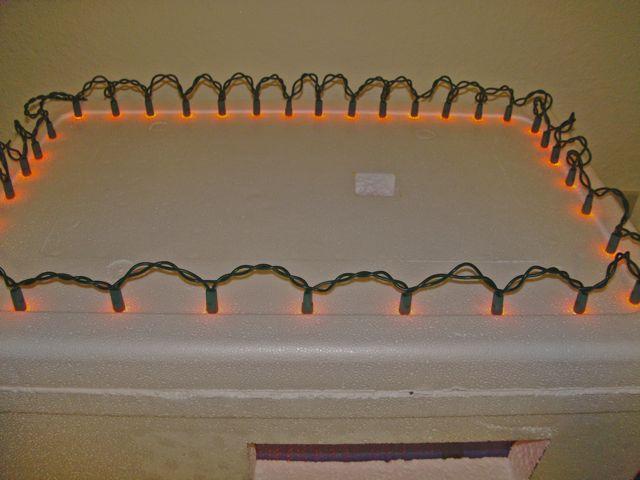
Top View. I added a small string of christmas lights that I had hanging around so that it would never be dark in the incubator. I used red lights as I read that white light causes the chicks to pick at one another once hatched. I just pushed them into the foam to hold them in place, and they shine through the foam just fine.
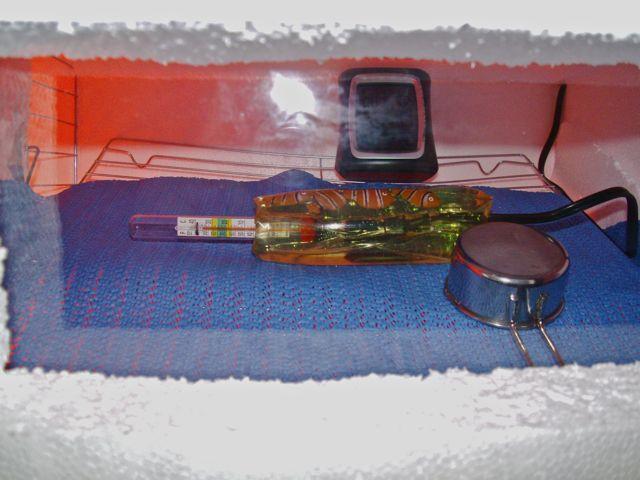
Below is a view through the window. I had the glass (for the large window) left over from purchasing a 2 pack (of glass tops) for a 2 gallon aquarium for $10. The other small windows are just cut plastic from a cheap picture frame bought from Michael's craft store with a 50% off coupon. I bought a large frame for $5 and have been using for multiple projects.
You can see the water wiggler with the ReptiTemp 500r probe and an aquarium thermometer sticking out. Also my Walmart hydrometer/thermometer in the back. The temp of the wiggler is low because I had it open and out for a while to do adjustments. Otherwise, once adjusted, the ReptiTemp has been holding right at 99.5 to 100 degrees perfectly. I used a black permanent marker to mark where 100 degrees is, to make for easier viewing.
The measuring cup is holding up the wiggler for now, but I will most likely add a few long pieces of wood later to hold eggs and wiggler in place, in rows. I read that a 45 degree angle (with large ends of egg upward) is best for hatch rates. I used a printable protractor (free online) to adjust for my shelf (part white sliding metal undershelf storage bin (mine was $1 at thrift store, but you can buy at Lowes), and part metal cooling tray (2 pack, Dollar General) to be at an approximate 45 degree angle, and will hand turn the eggs by rolling them first to the right, then back to the left. This way, they get the benefit of being hand turned, but also still get the benefit of the 45 degree angle that many people get by placing them in a carton and tipping it one way, then the other.
Next is a view with the top open. I will need to add an extra foam liner later to keep chicks from falling down the small half inch space on the sides of the top area, but for now will keep it open for extra circulation. The foam liner sticks once placed, so this should be sufficient to keep them out of the small crack. Don't make fun of my cheesy wiggler holder.
Top view, liner pulled back. I have multiple cheap water bottles ($1 at Dollar General) under the metal holder to help keep the temperature stable. This has been working really well for me. When I open the top, the temperature regulates very quickly due to the water bottles holding the heat. You can also see that the top metal rack sets on top of the bottom white metal rack (found mine at thrift, but it is similar to this one at Lowes):
http://www.lowes.com:80/pd_278417-7...oductId=3078151&N=0&catalogId=10051&langId=-1
I did it this way so that I can adjust the top rack downward and push down the bottom rack to a more even angle once chicks have hatched and are sitting for a period before being moved to brooder. The other metal cooling rack (from the 2 pack from dollar general) fits as a perfect sized divider from the lightbulb area. All I had to do was push it down in the foam a 1/4 inch. Perfect fit for the $8.88 Walmart cooler. There is also a little bit of aluminum foil between the lightbulb and the egg area to keep heat from coming directly off the lightbulb and forming a higher temp area in the egg area near the bulb.
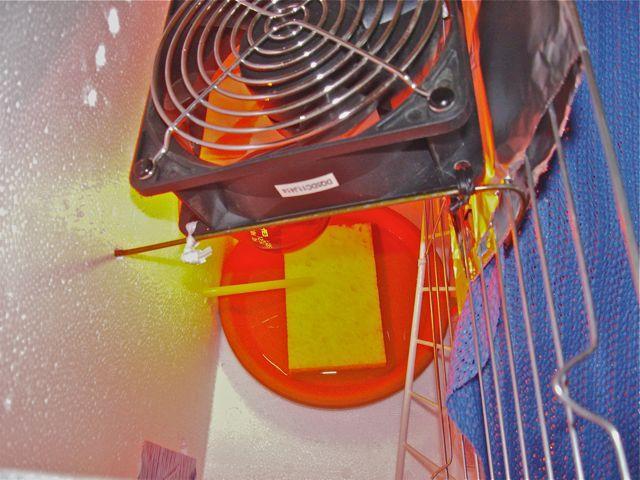
Last is my view of the fan (free from local computer store), wired with a 12 volt transformer with an adjustable voltage from 3 to 13 volts (free from Radioshack). I positioned it blowing from the top, down onto the lightbulb ($9.99 Petco 40 watt red basking bulb), and then onto the water dish (bottom of a clay pot $0.65 Walmart) with a sponge (3 pack $1 Dollar General) below. I cut a wire hanger into pieces, bent them over like hooks on one end (to hang on metal cooling rack), and stuck them into the foam at an angle on the other. Sturdy twisty ties hold the fan in four locations on each end.
Positioning the fan at an angle blowing onto the water dish allows me to control the humidity more precisely (though I am still getting the hang of how much water and when...
Also, keeping the fan at an angle blowing the heat onto the space below the eggs, and onto water bottles keeps the air circulating in a perfect round pattern throughout the whole area, and keeps the water bottles warmed up and holding heat.
You can see the straw that leads into the dish and comes out the other side. I use a large syringe (had left over from giving pet meds) to feed water through into the dish.
Will add more as adjustments are done. Any comments are appreciated! Thanks!

My son and I just purchased several chicks from mypetchicken.com and will add more information about them once they arrive on July 18th.
Meanwhile, my son anxiously awaits their arrival, and I keep studying chicken care online.
I am debating buying a coop vs. building one. All that I have seen online are fairly expensive, and not many are advertised on craigslist. I'll keep looking and studying...
17JUN11:
OK, so I have become just as excited about this as my son. He wanted to try incubating some eggs as well. So... we have built an incubator from spare parts found around $1 stores, salvation army, Walmart, and given for free from Radioshack & a local computer store. I had to order the ReptiTemp 500r (for temp control) from amazon.com, they had the cheapest price and it was free shipping.
We pick up a dozen eggs from a local supplier on 25JUN11. They should hatch at around the same time the day old chicks from mypetchicken.com arrive.
I keep playing with the incubator to get things adjusted just right. Still need to work on it a bit but have included pictures.
I realized that I needed a couple of extra windows for the top (for possible temp viewing), and the water dish (from the side). I will have to add an extra liner so the chicks don't fall through the bars, but won't need to do this until close to hatch date.

Top View. I added a small string of christmas lights that I had hanging around so that it would never be dark in the incubator. I used red lights as I read that white light causes the chicks to pick at one another once hatched. I just pushed them into the foam to hold them in place, and they shine through the foam just fine.
Below is a view through the window. I had the glass (for the large window) left over from purchasing a 2 pack (of glass tops) for a 2 gallon aquarium for $10. The other small windows are just cut plastic from a cheap picture frame bought from Michael's craft store with a 50% off coupon. I bought a large frame for $5 and have been using for multiple projects.
You can see the water wiggler with the ReptiTemp 500r probe and an aquarium thermometer sticking out. Also my Walmart hydrometer/thermometer in the back. The temp of the wiggler is low because I had it open and out for a while to do adjustments. Otherwise, once adjusted, the ReptiTemp has been holding right at 99.5 to 100 degrees perfectly. I used a black permanent marker to mark where 100 degrees is, to make for easier viewing.
The measuring cup is holding up the wiggler for now, but I will most likely add a few long pieces of wood later to hold eggs and wiggler in place, in rows. I read that a 45 degree angle (with large ends of egg upward) is best for hatch rates. I used a printable protractor (free online) to adjust for my shelf (part white sliding metal undershelf storage bin (mine was $1 at thrift store, but you can buy at Lowes), and part metal cooling tray (2 pack, Dollar General) to be at an approximate 45 degree angle, and will hand turn the eggs by rolling them first to the right, then back to the left. This way, they get the benefit of being hand turned, but also still get the benefit of the 45 degree angle that many people get by placing them in a carton and tipping it one way, then the other.
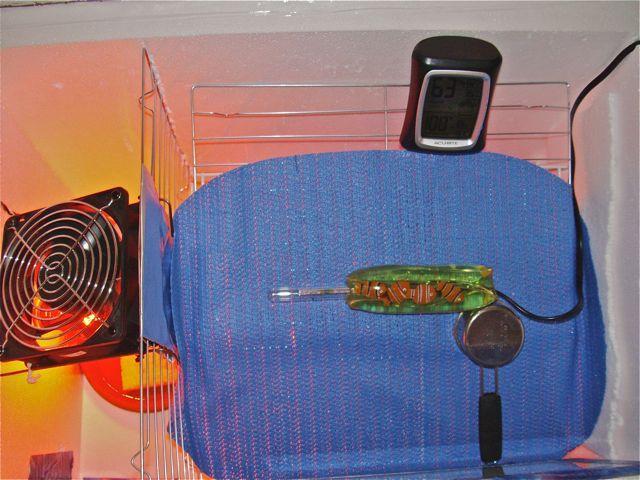
Next is a view with the top open. I will need to add an extra foam liner later to keep chicks from falling down the small half inch space on the sides of the top area, but for now will keep it open for extra circulation. The foam liner sticks once placed, so this should be sufficient to keep them out of the small crack. Don't make fun of my cheesy wiggler holder.

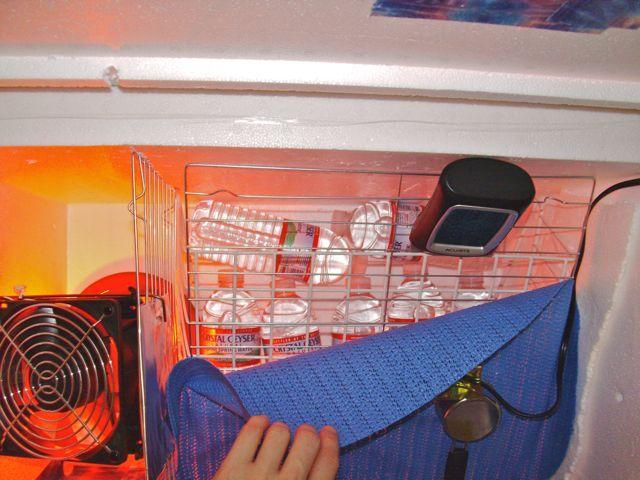
Top view, liner pulled back. I have multiple cheap water bottles ($1 at Dollar General) under the metal holder to help keep the temperature stable. This has been working really well for me. When I open the top, the temperature regulates very quickly due to the water bottles holding the heat. You can also see that the top metal rack sets on top of the bottom white metal rack (found mine at thrift, but it is similar to this one at Lowes):
http://www.lowes.com:80/pd_278417-7...oductId=3078151&N=0&catalogId=10051&langId=-1
I did it this way so that I can adjust the top rack downward and push down the bottom rack to a more even angle once chicks have hatched and are sitting for a period before being moved to brooder. The other metal cooling rack (from the 2 pack from dollar general) fits as a perfect sized divider from the lightbulb area. All I had to do was push it down in the foam a 1/4 inch. Perfect fit for the $8.88 Walmart cooler. There is also a little bit of aluminum foil between the lightbulb and the egg area to keep heat from coming directly off the lightbulb and forming a higher temp area in the egg area near the bulb.
Last is my view of the fan (free from local computer store), wired with a 12 volt transformer with an adjustable voltage from 3 to 13 volts (free from Radioshack). I positioned it blowing from the top, down onto the lightbulb ($9.99 Petco 40 watt red basking bulb), and then onto the water dish (bottom of a clay pot $0.65 Walmart) with a sponge (3 pack $1 Dollar General) below. I cut a wire hanger into pieces, bent them over like hooks on one end (to hang on metal cooling rack), and stuck them into the foam at an angle on the other. Sturdy twisty ties hold the fan in four locations on each end.
Positioning the fan at an angle blowing onto the water dish allows me to control the humidity more precisely (though I am still getting the hang of how much water and when...
Also, keeping the fan at an angle blowing the heat onto the space below the eggs, and onto water bottles keeps the air circulating in a perfect round pattern throughout the whole area, and keeps the water bottles warmed up and holding heat.
You can see the straw that leads into the dish and comes out the other side. I use a large syringe (had left over from giving pet meds) to feed water through into the dish.
Will add more as adjustments are done. Any comments are appreciated! Thanks!