Swedishfish's Amazingly Wonderful Chicken Page
2 Buff Brahmas, 5 Wyandottes
2 Buff Brahmas, 5 Wyandottes
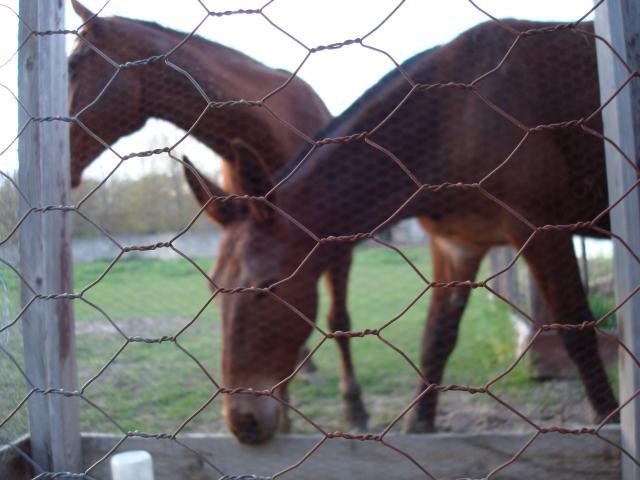
Thanks to these two, my brother's old pheasant/chukar/quail coop was falling apart and I was "forced" to build a new one. My mule thinks she's a chicken. It's really rather funny.
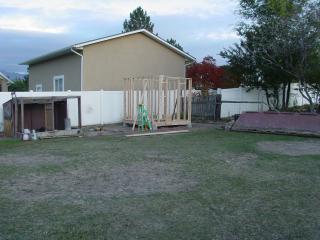
Unfortunately my mom wouldn't let me put the coop anywhere but in the exact spot the old one was in, which is the far corner of our pasture. I carry food sacks and water out there, and location would be the first thing I would change if I could. I originally planned on putting the coop next to our garden, but I was vetoed.
Unfortunately my mom wouldn't let me put the coop anywhere but in the exact spot the old one was in, which is the far corner of our pasture. I carry food sacks and water out there, and location would be the first thing I would change if I could. I originally planned on putting the coop next to our garden, but I was vetoed.
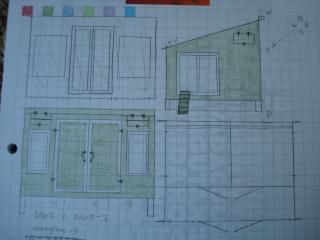
I have been planning my coop since before summer. I've drawn multiple designs and even this picture is not the final coop design, but it's the most similar to it. It took a long time to get around to my coop project, and we didn't start until the middle of autumn.
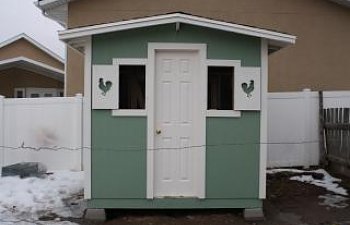
The coop that I actually built is 8x8, with a 3 foot area in the front of two 4x5 pens. The runs will come off the sides, and they will be tall so I can walk in, and to avoid any horse-stomped chickens. I have to wait until the snow melts and the mud dries up before I can put the runs up.
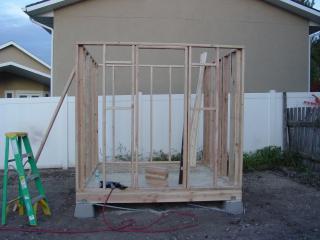
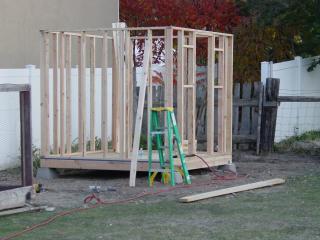
The first thing we did was take down the old coop and level the ground a bit. We set the four cement blocks (they have a metal part you hammer to the boards) in place and carried the framed floor out from our garage. After putting on the flooring plywood (it's thicker than usual plywood) we went back to the garage to frame the four sides. We used standard house-framing (1 board about every 2 feet from what I understand. My dad just had me hold boards) and then took the sides out with our truck. To put them up, we held one in place, made it plumb and level, then nailed it to the floor. We then took another and did the same thing, nailing the sides together as well.
The second part was framing the roof. My dad made a makeshift saddle for a long and tall board that sits in the middle to create the peak. We framed the roof like we did the sides, and nailed supports and braces onto everything. We put some roofing plywood on top (it's rougher and thicker), then nailed down some tar paper and shingled the roof with the extra supplies from our roofing project of the summer.
We put the siding up, cut out the windows and door with our jigsaw, painted the roof's trim white and the walls green, and then cut out all the trim and painted it inside the garage before putting it up all at once. Oh, and my dad even made the entire door frame. Once the outside was finished we moved to the inside. There are two walls, one that goes all the way across the front that contains both doors, and one small one that lies perpendicular to it, smack dab in the middle. These are framed less than the outside walls. The wall with the doors has just a simple door-frame-area, and the small wall has one board half-way up parallel to the ground. The walls do not go up all the way to the roof, but they haven't been problematic.
I made two roosts myself, and they are not attached to the walls. They resemble saw horses in a way, with a 2x4 on top supported by two pieces from a really thick cupboard door, and balanced by little 2x4's that make a base. I will make nest boxes soon, but since it has been winter and they haven't had runs to get enough sunlight, they haven't been laying much. When I make the nest boxes and get the inside how I imagine it I will post pictures.
I remember making a tally of all the wood and supplies we needed, but I don't have it anymore. Sorry. We also were not extremely strict with our list and used more than what was on it. I will say that you will need a ton of nails, a ton of wood, and an extra of everything pretty much.

The shack looking thing on the left is our very old temporary coop. The wood on the right is from the coop they used to live in. These photos are before we put the roof on, shingled, put the siding up, painted....and I did not get any photos of that stuff happening because I was helping!
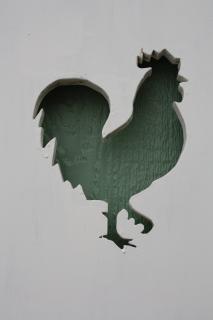
Here's a view of my finished coop. My mom claims the idea for the shutters, but it was really my dad, and I was the one who found the picture and cut them out. They are definitely my favorite part of my coop.
Nice things:
It's enclosed, unlike my old coop. I feel much better leaving them outside without a light or heat (too far away from any source of electricity) during winter.
I made it myself, and that's something to be proud of. Definitely something good to do with my dad too.
It's easy to clean (I sweep poop out the pop door into a bucket and carry it away once a week or so) and not as dusty, which helps my allergies.
It's safe, it doesn't have mice, and it's pretty.
I like that I can walk into my coop. I am not one to go reaching into a box to collect eggs or sweep out poo. I'd much rather be standing than leaning in.
Favorite parts: The parts where my mule chewed (the nice door frame even!) before we could get barbed wire around it. The runs will protect it when we build them. The shutters. The paint drip from painting the floor that looks like a big drippy bird poo leaking out the pop door. These things are definitely what give my coop character.
Not so nice things:
Location. I walk to collect eggs everyday, I carry the feed out there, and I carry water out there too. This can be very annoying at times.
The snow melt/rain drips right into where the run will be and makes everything muddy. I am going to put some sand in the runs for drainage and put some raingutters up in the spring, to collect the water or send out to water the pasture.
I don't have my weathervane yet. But I will get one.
Pretty much, I don't have any serious complaints about my coop. I love it!
Now I just need some classy name to call it.
The coop that I actually built is 8x8, with a 3 foot area in the front of two 4x5 pens. The runs will come off the sides, and they will be tall so I can walk in, and to avoid any horse-stomped chickens. I have to wait until the snow melts and the mud dries up before I can put the runs up.
The first thing we did was take down the old coop and level the ground a bit. We set the four cement blocks (they have a metal part you hammer to the boards) in place and carried the framed floor out from our garage. After putting on the flooring plywood (it's thicker than usual plywood) we went back to the garage to frame the four sides. We used standard house-framing (1 board about every 2 feet from what I understand. My dad just had me hold boards) and then took the sides out with our truck. To put them up, we held one in place, made it plumb and level, then nailed it to the floor. We then took another and did the same thing, nailing the sides together as well.
The second part was framing the roof. My dad made a makeshift saddle for a long and tall board that sits in the middle to create the peak. We framed the roof like we did the sides, and nailed supports and braces onto everything. We put some roofing plywood on top (it's rougher and thicker), then nailed down some tar paper and shingled the roof with the extra supplies from our roofing project of the summer.
We put the siding up, cut out the windows and door with our jigsaw, painted the roof's trim white and the walls green, and then cut out all the trim and painted it inside the garage before putting it up all at once. Oh, and my dad even made the entire door frame. Once the outside was finished we moved to the inside. There are two walls, one that goes all the way across the front that contains both doors, and one small one that lies perpendicular to it, smack dab in the middle. These are framed less than the outside walls. The wall with the doors has just a simple door-frame-area, and the small wall has one board half-way up parallel to the ground. The walls do not go up all the way to the roof, but they haven't been problematic.
I made two roosts myself, and they are not attached to the walls. They resemble saw horses in a way, with a 2x4 on top supported by two pieces from a really thick cupboard door, and balanced by little 2x4's that make a base. I will make nest boxes soon, but since it has been winter and they haven't had runs to get enough sunlight, they haven't been laying much. When I make the nest boxes and get the inside how I imagine it I will post pictures.
I remember making a tally of all the wood and supplies we needed, but I don't have it anymore. Sorry. We also were not extremely strict with our list and used more than what was on it. I will say that you will need a ton of nails, a ton of wood, and an extra of everything pretty much.
The shack looking thing on the left is our very old temporary coop. The wood on the right is from the coop they used to live in. These photos are before we put the roof on, shingled, put the siding up, painted....and I did not get any photos of that stuff happening because I was helping!

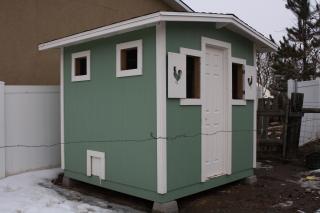
Here's a view of my finished coop. My mom claims the idea for the shutters, but it was really my dad, and I was the one who found the picture and cut them out. They are definitely my favorite part of my coop.
Nice things:
It's enclosed, unlike my old coop. I feel much better leaving them outside without a light or heat (too far away from any source of electricity) during winter.
I made it myself, and that's something to be proud of. Definitely something good to do with my dad too.
It's easy to clean (I sweep poop out the pop door into a bucket and carry it away once a week or so) and not as dusty, which helps my allergies.
It's safe, it doesn't have mice, and it's pretty.
I like that I can walk into my coop. I am not one to go reaching into a box to collect eggs or sweep out poo. I'd much rather be standing than leaning in.
Favorite parts: The parts where my mule chewed (the nice door frame even!) before we could get barbed wire around it. The runs will protect it when we build them. The shutters. The paint drip from painting the floor that looks like a big drippy bird poo leaking out the pop door. These things are definitely what give my coop character.
Not so nice things:
Location. I walk to collect eggs everyday, I carry the feed out there, and I carry water out there too. This can be very annoying at times.
The snow melt/rain drips right into where the run will be and makes everything muddy. I am going to put some sand in the runs for drainage and put some raingutters up in the spring, to collect the water or send out to water the pasture.
I don't have my weathervane yet. But I will get one.
Pretty much, I don't have any serious complaints about my coop. I love it!
Now I just need some classy name to call it.