The Birdello - a dog house sized mini coop that I'm using to house my 15 chicks from 2-3 weeks until about 8 weeks, when they'll be in the big house. After that, this will be recommissioned and used for storage in the big house by removing the roof and handles. I think this would work well for 2-3 hens if a little nest box was put inside, something as simple as a short box or plastic tub on one end.
All together, this cost me $39 to build, mind you that doesn't count lumber as I already had that lying around leftover from other projects. The most expensive part was the roof which cost $20, I wanted it light weight, and to let some light (warmth). I bought the plexiglass at a local recycle store, and the other lumber I had, except for 1 piece of 2x2. I learned that I can rip a 2x4 in half to make more! Half of the framing is 2x4, and the rest 2x2 to save the weight.
When I get this in operation, I will take more pictures, and write down what I would do differently. I am quite proud of my mini-coop, and am anxiously awaiting my chicks!

Finished Birdello, view from front side with flop down door on left. The run panels will attach at the back corners, on the high corners.
Flop down door, and the chick ramp. I used a piano hinge to keep it flat and solid. I thought I could maybe put a tray inside, and then just pull it out when I need to dump the litter from under the roosts.
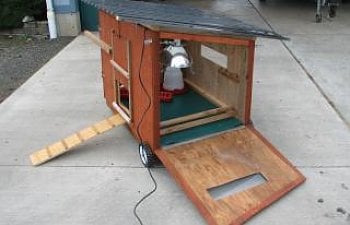
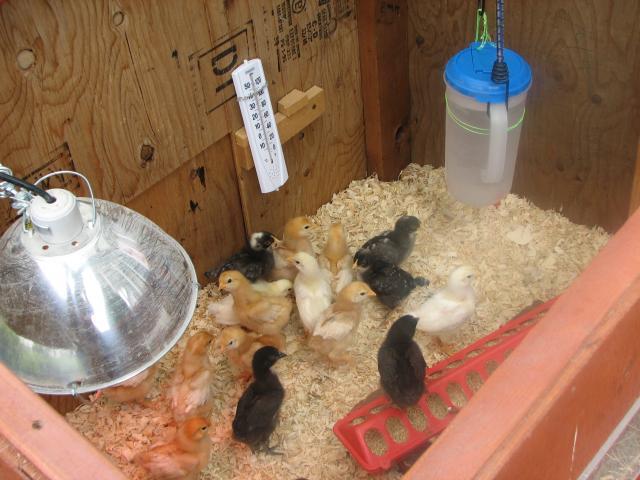
Roof hinged and open, access door on right side. From this side I can access the feeder and waterer, and not disturb the chicks under the lamp or roosts on the other end.
Suntuf panel to let light in, and ventilation across top. The wiggle board under the front edge can be removed for added ventilation (high point in the coop).
Plexiglass window and tackle box type latches for flop down cleanout door, this is on the side with the roosts and light. I wanted to be able to peep inside so when I open it I'm not scaring the chicks too much.
Chick ramp
p and guillotine door. Floor base and wall framing.
Making the Birdello house...walls and door.
>>>>>>>>>>>>>>>>>>Instructions<<<<<<<<<<<<<<<<<<<<<<<<
Here are the steps, I have to do some more editing, but this will get you started. Always wear eye protection, and measure twice, cut once!
Special tools used:
Cordless drill
Chop saw that will cut angles
Circular saw
Hardware used:
Medium sized T-hinge for roof ($4)
Strap hinge for door ($4)
2 1/2’ piano hinge for end flop down door
1 pair tackle box type latch ($4)
3 eyes, one hook
1 cord stop (found in sewing stores)
Miscellaneous 1” screws, 2 ½” screws, 1” finishing nails, wood glue, stain, 7 special screws for Suntuf panel (have rubber washer)
2 – 7” lawnmower wheels (these cost $5 at Harbor Freight Tools)
2 – ½” x 5” bolts, lock nuts, washers, and a spacer to keep the wheels away from the side of the coop. ($5 total)
rubberized floor (piece of linoleum would work). I found mine at a local recycle store. Maybe a piece of waterproof house wrap would work...
plexiglass windows 2, 6"x18"
1 6"x18" screened vent
Wood used:
2x2x8 - 3 or 4
2x4x8 -2
2x4x10 pressure treated for the floor base
½” plywood, 2 sheets for the sides
5/8” plywood, 1/2 sheet, for the floor
4x8 sheet Suntuf ($20)
8’ Suntuf wiggle board
16’ Suntuf rounded 1x2 board (for vertical support, and then extra for roosts)
(My cost: $39 (big hardware, plexiglass windows + Suntuf), everything else I had sitting around waiting for just such a project)
What’s special about my mini-coop:
Sloped and hinged roof made from charcoal Suntuf panels to allow some light in, rain drainage and protection (overhangs approx 9”) and ventilation holes across the top as needed.
Door on one side to access feeder and waterer.
Flop down door on the other end to access cleaning under the roosts easier, with tackle box type latches to hold the door snug, and possibly add locks for security.
Windows (6” x 18”) plexiglass windows to see inside, and let more light in.
Wheels and handles for moving it around in the yard.
Rubberized floor to protect the floor.
UPDATES:
I ended up using a piece of 4"x 30" plywood to keep the chicks from escaping UNDER the coop. They were small enough when I opened the door at first, but after 2 weeks, they were too big already. I also removed the ramp after 2 weeks, they were big enough to simply jump up and down to go in and out.
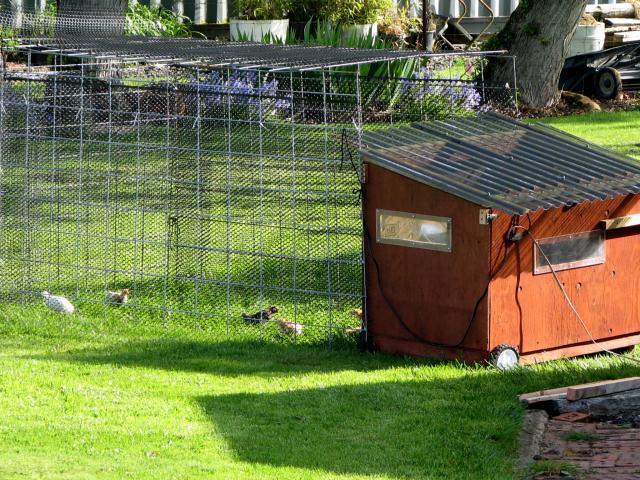
This worked well during it's first season of use. It housed 17 chicks from 2 weeks old up to 15 weeks old. I put some plastic chicken netting on some cattle panels that I had cut in half, and created a pen for daylight hours, covered on all sides including the top. When the rains came, I put a piece of plywood on top, and a tarp. I moved it around every 2-3 days, to keep fresh access to growing grass, and to give the grass a break. As the chickens got older, we expanded their run and widened it to tie up to a large fenced pen for them to explore while we finished the build on the main chicken coop. They quickly learned about trees, and wanted to roost in the trees at night instead of the Birdello, and by then, the coop roost was just getting finished. Next time, I wouldn't keep quite as many of them in this sized Grower house, I think 10 pullets would fit nicely until they get old enough to be introduced to the main flock (16 weeks, just before they start laying eggs). (Year 2: kept 21 chicks in here until week 13. When they got big enough and didn't need the heat, I moved out the feeder and waterer, and made sure to open and close the pop door right at dark, so it was there bedroom only. It worked.)
Having both ends be able to open isn't important, but nice. I mainly used the top to clean things out, and access the chickies water and feeder. The chickies liked the little windows, and so did I. I had to manage the heat build up in there during the day, and would prop open the top with a small chunk of wood. I did use a nipple water connected to a 2 qt. pitcher for inside water for the chicks when they were young. That worked well, and didn't make a mess. When they got older, I set up a regular water outside, and they enjoyed that, but it was much messier than the nipple water as they liked to sit on top, and dirt, grass and poo would get in it, making me change it daily.
After the pullets moved into the big coop, I decommissioned this one, blew it out, sprayed with a bleach solution, scrubbed, and air dryed. I then took off the handles and roof to store and use for storage inside the coop. Come Spring, I will take it out and get ready for more chicks. This time, I'm not a beginner.
All together, this cost me $39 to build, mind you that doesn't count lumber as I already had that lying around leftover from other projects. The most expensive part was the roof which cost $20, I wanted it light weight, and to let some light (warmth). I bought the plexiglass at a local recycle store, and the other lumber I had, except for 1 piece of 2x2. I learned that I can rip a 2x4 in half to make more! Half of the framing is 2x4, and the rest 2x2 to save the weight.
When I get this in operation, I will take more pictures, and write down what I would do differently. I am quite proud of my mini-coop, and am anxiously awaiting my chicks!

Finished Birdello, view from front side with flop down door on left. The run panels will attach at the back corners, on the high corners.
Flop down door, and the chick ramp. I used a piano hinge to keep it flat and solid. I thought I could maybe put a tray inside, and then just pull it out when I need to dump the litter from under the roosts.
Roof hinged and open, access door on right side. From this side I can access the feeder and waterer, and not disturb the chicks under the lamp or roosts on the other end.
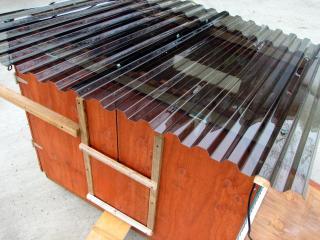
Suntuf panel to let light in, and ventilation across top. The wiggle board under the front edge can be removed for added ventilation (high point in the coop).
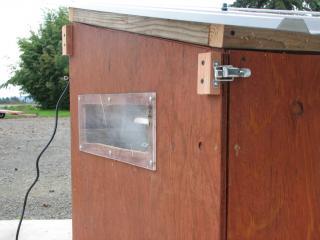
Plexiglass window and tackle box type latches for flop down cleanout door, this is on the side with the roosts and light. I wanted to be able to peep inside so when I open it I'm not scaring the chicks too much.
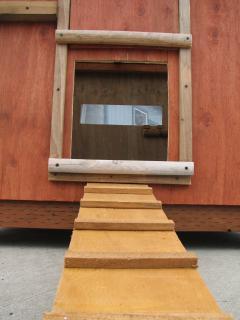
Chick ramp
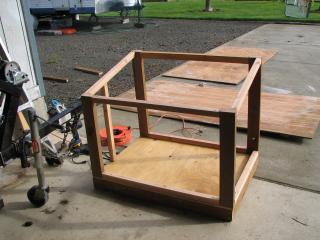
p and guillotine door. Floor base and wall framing.
Making the Birdello house...walls and door.
>>>>>>>>>>>>>>>>>>Instructions<<<<<<<<<<<<<<<<<<<<<<<<
Here are the steps, I have to do some more editing, but this will get you started. Always wear eye protection, and measure twice, cut once!
- Coop Design – many nights pondering the ease with which I wanted to 1) see the chicks, and 2) clean out and take care of them.
- Gather supplies: 2 sheets ½” plywood (walls) + ½ sheet ¾” plywood (floor), 1 sheet Suntuf Charcoal, 8’ piece of squiggle board for blocking Suntuf, 2 8’ pieces rounded 1x2 for Suntuf (leftovers for use as chick roost. Assorted 2x4, 2x2, 2x4x8 pressure treated for base
- Floor: Assemble base frame for floor using pressure treated, basically one rectangle.
- Place base frame on plywood for floor and draw around edges, hopefully they are square, but this takes some of the guesswork out of it. Cut and attach on top of frame.
- Drill 1/2” holes on one end of the base frame for installing the lawnmower wheels later, approx 6” in from the end.
- Sidewalls: Making the sidewalls: I figured out my angle for the roof: 10 degrees, which made the front of the house approx. 24” tall, and the back 30” tall. Out of 2x4’s cut the short front boards to 24”angling up, and the tall back boards 30” angling down to the front. Predrilled holes in sides, to toenail in to the floor in two places on each 2x4.
- Used 2x2 to brace the bottom on three sides, leaving one end open for the flop down door/cleanout). Measured between the upright corners at the base, and cut 1 of each size, for along the floor. (cut 2 each of the size for the front and back). Predrilled, and screwed in. I preferred to use screws as I was building this by myself and wanted to unscrew if necessary!
- The horizontal boards along the top for the sides were trickier, they needed to be cut on an angle. The angles are the same as you used for cutting the uprights. Cut one, hold it up to it’s eventual place, and use a pencil to draw the line for the next cut. These will end up being cut and looking like really long slanty rectangles. /_____________/ (<<
- Predrill, and screw in from the outside of the upright 2x4’s, just a single screw for each.
- Lay out the ½” plywood for the front and back (1 sheet). Tip the frame over and adjust it to use up the least amount of space on the plywood. Use a pencil to trace the plywood to be cut. Repeat for the front and back. Attach the cut front and back pieces to the frame.
- Repeat for the end pieces. Lay the sheet of plywood flat, and tip the coop on it’s end to trace the end pieces of plywood. These pieces will overlap the corners of the front and back pieces of plywood. The end with the small door needs to be 1/8” inch wider to accommodate the saw blade cut.
- Doors: Measure where you need the middle support piece for the door. I put mine in 11” in from the smaller end, so the door is hinged on the corner, and is approx 2/3 of the side in size. Hold up a piece of 2x2 to the base, and draw a line for the angle needed for the top. Cut, and attach, predrilled, and toenailed in for the bottom, and predrilled, screwed in from the top.
- Cut the end plywood to make the door edge match up with the center support.
- Screw or nail the door end piece on, the non-door portion, and attach the door with the hinge. Attach the door latch. (My eye hook latch did not hold it very snug, so I just used a piece of 1x2 that I screwed in the middle, and attached so it could spin and be used as a firm latch on the door. It works well.)
- Cut the piano hinge if needed (I used a hacksaw). Attach using 1/2” (#6 size) screws in each hole. Make sure the hinge pin is on the outside, so the flat portion of the hinge is on the inside. This will make a smooth pullout should you put a cleanout tray in the base of the coop.
- Stain the coop, allow to dry 24 hours+.
- Windows: Cut holes for the windows 1” smaller than the dimensions of the plexiglass. Keep the cut out plywood for the flop down door, to put in place when cleaning out lots of bedding. Predrill the plexiglass, and attach. I put the windows on the front, and on the flop down door.
- Wheels: Attach the lawnmower wheels. Cut scrap pieces of 2x4 pressure treated to make little feet on the other end of the coop. These will attach to the inside back side of the floor base.
- Roof: Cut the Suntuf in half. Place 2x4 boards on ground, lay panel across, measure, use permanent marker to mark cut-line, place scrap piece of plywood across top to hold down the plywood, and cut. Wear goggles!)
- Place Suntuf on top of coop to see if the grooves on the sides line up with the top sides of the coop. Optimally, you will build the frame for the roof to fit both the grooves, and the coop. I lucked out, it fit perfectly.
- Cut 2x2’s to fit the top dimensions of the house (2 pieces lengthwise, 3 pieces widthwise minus 3”). Screw together to make a frame with a single board down the middle, making sure that board’s placement is in line with one of the grooves in the panel. You want space above the center board and end boards to attach a piece of rounded 1x2 for support.
- Cut the rounded 1x2’s 48” lengths (2 pieces) Attach to the sides of the roof frame. Cut one more piece of rounded 1x2 to fit inside the frame, along the center rail. Screw or nail.
- Place Suntuf panels on top, overlapping 1 groove. Predrill the holes, drill three on each end piece, and just one in the very center of the center rail. Attach with Suntuf screws, not too tight!
- Ventilation: Cut wiggle board to fit the grooves under the Suntuf panel across the top and bottom pieces of the frame. Slide into place, do not attach! These you will remove as needed for extra ventilation.
- Cut hole for ventilation panel 1” smaller than size of ventilation panel in the small door. The one I bought has downward sloping anti-rain shield pieces and is approx 6”x 18”. Attach vent on outside. If needed, attach piece of contracter’s mesh on the inside for more protection.
- Handles: Attach 2x2 handles on end opposite wheels, these hang out approx 3’ for more leverage. Use Screws so you can remove them later if needed. I am using this as a storage bin in the Big Coop once the chicks have moved out of it, after removing handles and roof.
- Chicken Door: Guillotine style...Cut 10” x 12” door out of back of coop approx 3” from bottom of plywood. Cut 12” x 14” piece of plywood out of separate scrap piece of plywood. Stain. Drill 3/8” hole in top center of door. Cut two pieces of side moulding (3/4” x 1” cedar trim) that will run vertically from 1” beyond the bottom of the door to ¾ up the backwall. Fit the door over the doorway, mark, and attach the siderails. Cut 3 pieces of cedar trim to fit one over the bottom of the door frame, plus one attached horizontally across the side pieces (to hold the door in place when it is lowered), and one more across the bottom on top of the side rails to hold the bottom of the door in place when closed. See picture.
- Attach 1 eye hook at the top of the backwall above the door, and angle the hole diagonally. Attach 1 eye hook on the left (or right) corner of the backwall. Run a piece of shoe lace or skinny rope from the door, attach 1 cord stop on the far side of the corner eye hook. Use this to hold the door open during the day.
Special tools used:
Cordless drill
Chop saw that will cut angles
Circular saw
Hardware used:
Medium sized T-hinge for roof ($4)
Strap hinge for door ($4)
2 1/2’ piano hinge for end flop down door
1 pair tackle box type latch ($4)
3 eyes, one hook
1 cord stop (found in sewing stores)
Miscellaneous 1” screws, 2 ½” screws, 1” finishing nails, wood glue, stain, 7 special screws for Suntuf panel (have rubber washer)
2 – 7” lawnmower wheels (these cost $5 at Harbor Freight Tools)
2 – ½” x 5” bolts, lock nuts, washers, and a spacer to keep the wheels away from the side of the coop. ($5 total)
rubberized floor (piece of linoleum would work). I found mine at a local recycle store. Maybe a piece of waterproof house wrap would work...
plexiglass windows 2, 6"x18"
1 6"x18" screened vent
Wood used:
2x2x8 - 3 or 4
2x4x8 -2
2x4x10 pressure treated for the floor base
½” plywood, 2 sheets for the sides
5/8” plywood, 1/2 sheet, for the floor
4x8 sheet Suntuf ($20)
8’ Suntuf wiggle board
16’ Suntuf rounded 1x2 board (for vertical support, and then extra for roosts)
(My cost: $39 (big hardware, plexiglass windows + Suntuf), everything else I had sitting around waiting for just such a project)
What’s special about my mini-coop:
Sloped and hinged roof made from charcoal Suntuf panels to allow some light in, rain drainage and protection (overhangs approx 9”) and ventilation holes across the top as needed.
Door on one side to access feeder and waterer.
Flop down door on the other end to access cleaning under the roosts easier, with tackle box type latches to hold the door snug, and possibly add locks for security.
Windows (6” x 18”) plexiglass windows to see inside, and let more light in.
Wheels and handles for moving it around in the yard.
Rubberized floor to protect the floor.
UPDATES:
I ended up using a piece of 4"x 30" plywood to keep the chicks from escaping UNDER the coop. They were small enough when I opened the door at first, but after 2 weeks, they were too big already. I also removed the ramp after 2 weeks, they were big enough to simply jump up and down to go in and out.
This worked well during it's first season of use. It housed 17 chicks from 2 weeks old up to 15 weeks old. I put some plastic chicken netting on some cattle panels that I had cut in half, and created a pen for daylight hours, covered on all sides including the top. When the rains came, I put a piece of plywood on top, and a tarp. I moved it around every 2-3 days, to keep fresh access to growing grass, and to give the grass a break. As the chickens got older, we expanded their run and widened it to tie up to a large fenced pen for them to explore while we finished the build on the main chicken coop. They quickly learned about trees, and wanted to roost in the trees at night instead of the Birdello, and by then, the coop roost was just getting finished. Next time, I wouldn't keep quite as many of them in this sized Grower house, I think 10 pullets would fit nicely until they get old enough to be introduced to the main flock (16 weeks, just before they start laying eggs). (Year 2: kept 21 chicks in here until week 13. When they got big enough and didn't need the heat, I moved out the feeder and waterer, and made sure to open and close the pop door right at dark, so it was there bedroom only. It worked.)
Having both ends be able to open isn't important, but nice. I mainly used the top to clean things out, and access the chickies water and feeder. The chickies liked the little windows, and so did I. I had to manage the heat build up in there during the day, and would prop open the top with a small chunk of wood. I did use a nipple water connected to a 2 qt. pitcher for inside water for the chicks when they were young. That worked well, and didn't make a mess. When they got older, I set up a regular water outside, and they enjoyed that, but it was much messier than the nipple water as they liked to sit on top, and dirt, grass and poo would get in it, making me change it daily.
After the pullets moved into the big coop, I decommissioned this one, blew it out, sprayed with a bleach solution, scrubbed, and air dryed. I then took off the handles and roof to store and use for storage inside the coop. Come Spring, I will take it out and get ready for more chicks. This time, I'm not a beginner.