Well, here is my humble "urban" coop/run. I started out by building the run as my chickens needed someplace bigger to be, outside of their brooder. I was lucky enough to have a near endless supply of 2"x4"'s as we have torn down some walls at a pole barn recently. I also found some 1"x10" boards that I was able to use for the exterior siding. This helped me keep to my goal of spending as little as possible on this project. It should house my three hens no problem, with room for one, maybe two, more.
I started by just building a box on the ground out of pressure treated 2"x10"x8'. I just got three of them and cut the third one in half.

I screwed the bottom frame together and used some "L" brackets in each corner to add more strength.
I then added the corner posts. I measured so that one side would have an elevation of 7.5' and the other would be at 6.5' as I was planning on putting it against my garage and didn't need it pitching both ways.
I then added a strip of 2"x4" along the top and middle to which I could attach the hardware cloth.
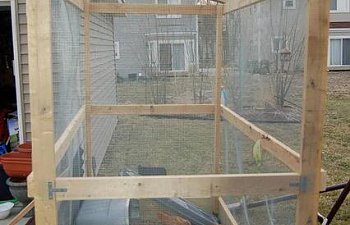
I then attached the hardware cloth using a pneumatic stapler. The stapler made this go pretty quickly, although I didn't do the greatest job of making sure there were no ripples, it is functional if not pretty.
I then framed up a simple door using face "L" brackets and face "T" brackets. I also attached the hinges and clasps. The clasps at the top and bottom are just sliding pins and the one in the middle is lockable.
After being satisfied with myself for a few weeks I got started on the coop portion of my project. I started by framing in the floor.
I then used some 1"x10" boards to start enclosing the sides.
Before getting the third side enclosed, which required me to move the whole structure, I framed my door and installed the window.
I added a top plate to create a rectangular opening for the door and chiseled out a space for the hinges.
I started by just building a box on the ground out of pressure treated 2"x10"x8'. I just got three of them and cut the third one in half.

I screwed the bottom frame together and used some "L" brackets in each corner to add more strength.
I then added the corner posts. I measured so that one side would have an elevation of 7.5' and the other would be at 6.5' as I was planning on putting it against my garage and didn't need it pitching both ways.

I then added a strip of 2"x4" along the top and middle to which I could attach the hardware cloth.


I then attached the hardware cloth using a pneumatic stapler. The stapler made this go pretty quickly, although I didn't do the greatest job of making sure there were no ripples, it is functional if not pretty.


I then framed up a simple door using face "L" brackets and face "T" brackets. I also attached the hinges and clasps. The clasps at the top and bottom are just sliding pins and the one in the middle is lockable.


After being satisfied with myself for a few weeks I got started on the coop portion of my project. I started by framing in the floor.


I then used some 1"x10" boards to start enclosing the sides.


Before getting the third side enclosed, which required me to move the whole structure, I framed my door and installed the window.


I added a top plate to create a rectangular opening for the door and chiseled out a space for the hinges.