

When, how, and why. The questions behind assisted hatching, the reasons for doing it, and when to just wait. Being patient is not easy, especially when you are worried for the precious little life awaiting inside of that egg. You want to keep checking on it, talking to it, you start to pace, you stay up at night. You've waited 21 days, turned that egg multiple times a day (or watched the hen do it) and now it is finally time. You crossed off that third week on your calendar and now you are stuck with the thought that the little chick you have long awaited for will somehow not be able to make it out of the shell.
Whether the egg is a mix breed from your own farm or a costly rare breed shipped to you from across the country, you want every egg to hatch. However, not every chick is able to, for various reasons. Perhaps the humidity or temperature is wrong, perhaps the chick is positioned wrong with-in the shell. Perhaps the chick is weak or malformed or perhaps the egg shell is too thick for it to break through. Whatever the reasons may be, I believe helping a chick hatch is one of the most amazing things you can do. Now, a chick that is too weak to hatch is likely genetically weak and should not be bred, but it can still be given a chance at life.
I hope this helps in some ways to explain when to assist a chick out of its shell, how to do it, and the complications that may be involved. Please feel free to offer your own input into this as well, as I've learned through years of trial and error and certainly have more to learn.
When to assist in a hatch: This is the most important question and one very difficult to answer. When does a chick need assistance and when do you wait and let it take its time? I suggest never helping a chick hatch until after day 21 has passed. The only reason it may be necessary is if the egg is damaged in any way or if something dangerous has gotten onto the shell. However, assisting a chick too early is one of the main reasons that chick will die, as it is still absorbing the blood vessels and yolk-sac and will become too weak and likely bleed to death. Also, a chick that does not work to hatch will not have built up its strength.
Candle an egg first to see if there is movement, veins, or the sign of a beak breaking through the airsac. These are all good signs that the chick is just doing its thing. Remember, not all chicks hatch on day 21, some are late, others early (particularly bantams, which hatch around day 19-20 in some cases, depending on the breed). Some chicks may have gone dormant if they were allowed to cool too long during incubation and may hatch days after the scheduled hatch, in which case assisting would only harm them and not help.
Listen for the sound of peeping. A peeping chick is communicating with its siblings and mother and talking back to it with friendly cheeps (don't do the scared ones if you can help it), making the sound of a broody hen, or playing a recording of a hatching chick can speed up the process by a lot, as chicks like to hatch all at the same time.
Opening the incubator a lot is not good for the humidity with-in, which should be high, so try not to do this if possible. Let the eggs be. If you do open it, try to do it for as short a time as possible. It is better to remove the egg then leave the incubator open. When you lift the egg, keep it in the same position if possible, even when candling, as a chick positions its self accordingly. Cheep to it and place it to your ear to see if you can hear the scaring of a chicks beak on the shell. Look for a crack nearer to the round end (lower then that and the chick may be malpositioned). If the chick begins to open the shell and seems to be having trouble breaking through the membrane, reach in and carefully pick a small hole in the shell near its beak and tear a bit of the membrane to allow breathing. Then leave the chick be. Again, chicks are meant to do their thing, and some can take 24 hours or even more to do so. However, if you hear cheeping and the hatching does not begin with-in 24 hours, then trouble may be eminent, and a chick that begins hatching but takes more then a day to finish should be assisted.
A chick that opens a breathing hole often rests a few hours before finishing, so let it do so without worrying. Once is starts to work at its shell it usually moves pretty fast after that, though it depends on the individual, the shells toughness, ect.
Be patient and vigilant. Know your breed, your incubator, that individual egg. If the chick is malpoitioned, the shell too thick, or the airsac at the wrong end, be prepared to help on day 21. Do so with care and make sure you are opening either near the beak or at the airsac first to avoid injury to the chick or causing bleeding of the membrane (which is connected to the chick until after hatching).
Assisted hatching is the same for chickens as it is for ducks, geese, guineas and turkeys. However, smaller eggs must be handled with far more care and larger eggs may need a stronger, thicker needle.
Remember, when using the needle, scrape at the shell in a sideways motion until you can pry a piece of the shell up, don't poke at it. You don't want to force the shell inwards, you want to pry it outwards like the chick is doing with its beak.
The first step to make can be on day 21, however. If you are concerned about a chick not getting oxygen, find where you think its beak is located and very, very carefully break a tiny hole there. Do not break the membrane if at all possible, just peel some of the shell away. The chick will break the membrane when it is ready to breath and you can more easily see what is happening inside of the shell. However, opening the shell risks the membrane drying out and becoming too tough for the chick to break, so there is risk in doing this.
The second step to assisted hatching is breaking the membrane. Now, to open the shell the best method is to use a needle. It may seem dangerous, but if you scrape at the shell you should be able to pry a small piece up without poking the chick. It is a delicate process but it can be done with some care.
To open the membrane first get a drop of warm water on your finger and touch it to the membrane. You can now see through it and see where the veins are located. Avoid all veins if possible and use the needle (it may be best to have dipped it in boiling water to sterilize it) to carefully peel a tiny opening in the membrane. If it begins to bleed, stop and put gentle pressure on it, then place the egg back in the incubator to rest.
This photo shows us with one of the first eggs we helped (not the first but one of the first). Honestly we could have left it be, but this was early in our learning process. The heat pad set under it keeps it warm and moist, the opening is positioned upwards as is often seen in hatching eggs. The mother had been moved with her seven other chicks to a new nest site that was not so dangerous as her first. This egg was still hatching so we kept it until the chick had hatched and could be returned to its mother. Placing it among the others, she excepted it quite quickly. You can see in the picture it is slightly dirty. Eggs sat on by a broody may have gotten soiled and may even smell. A badly soiled egg can be scraped clean slightly to try to open pores and a breathing hole my help the chick inside. However, too much air all at once I read is not good for a hatching chick.

While a predator did get some of the chicks later in life, it was not because of the assisted hatching that it had any trouble and all the chicks were strong and healthy bantams.

After an hour or more of waiting, you can again peel some of the shell with care being taken not to tear the membrane. Leave as much of the membrane in tact as possible and search through it (using water or perhaps some oil) to see where the beak is. Open up a breathing hole and once again let the egg rest. If the chick is strong enough to hatch on its own this is all that is needed. In the above example we were impatient and assisted by breaking the ring for it and letting the chick push free. However, letting the egg rest in the incubator is probably a better choice.
Assisting a hatch too early can end in disaster.
These eggs were dirty and not yet hatched so we wanted to help them. Excited to show our friends, we opened it too early and returned the chick to its mother too early.

In the end, while it may have survived, the mother apparently ate her chick whole likely trying to pick the shell free from it (the shell was still partially attached). All we know was they were in an escape proof cage and the chick was completely gone.

This is one of our Banshees, Libby. She too showed that care must be taken with hatching chicks. We opened an egg to see if the chick was still alive but left it only partially open before slipping it under her, an adoptive mother. She heard the chick, stood up, and began to eat its yolksac from it.

We tried sewing the little baby closer and brushing it dry (a tooth brush helps brush a wet chick dry to keep it warmer), but the chick ended up passing that night, along with its sibling. It was very sad, as I held them until this took place. We were only trying to help by opening them up to see if they were indeed still alive, but sometimes waiting is better. However, just as often we have waited a few hours too long and the chick, peeping inside and trying to break free, will suffocate. This is a delicate balance.

The next step to assisted hatching is, if the chick is not breaking its self free after a few hours, to begin to create that ring for it. break the shell around where its beak would do so but leave the membrane. Wait again for 20-60 minutes before beginning to peel back the membrane from the chicks face and head. This is a slow process. Many of the photos below will show an egg with a hole in the top and not the side. This is because the least damage can be done if opening the egg from the top, from the airsac. We always open eggs this way to see if they are dead or not and often times they were infertile, but we like to check all the same. When opening an egg from the top, it often does not allow the chick the leverage needed to get out on its own and the slow process of peeling away the membrane will become necessary. Make sure you don't have any chemicals or bacteria on your hands and handle with care. Keep the chick warm and try not to handle roughly or move the egg too fast. Inside of the incubator place some damp cloths or paper towels to place the eggs on to keep the humidity up.
This is a chick in the beginning process of assisted hatching.

We were sure this chick was dead, but as you can see it is alive. The red veins can barely be see through the shrink-wrapped membrane. This chick is Precious, a silkie that survived and thrived upon assisted hatching.

Precious once more. She bled some, but the membrane was slowly pulled away from around her face to allow her to breath. My goal was to get her head free so I could see if she had absorbed her egg sac or not. Pulling a chick free that has not will likely kill it. Again, chicks can bleed quite a bit, and this weakens them, but it often does not kill them if you stop what you are doing and let them finish absorbing their veins. You will see the veins begin to shrink and deflate as this happens, so be patient. As long as the chick is breathing and cheeping it is holding on. The paper towels were to keep her moist. You can see she opened her eyes.
A chick naturally hatching with-in the incubator, showing the patterning it makes while zipping.

This chick was yet to open its eye but the membrane was making good process. I could almost see the yolk sac. Handle the head and limbs with care, as the bones are soft and delicate. You do not want to injure them. In some chicks the neck may be swollen from the tight space, but this should go away with-in a day or so. I did loose one chick with a badly swollen face, but it was already weak to begin with.

Here is a chick still with-in its membrane but with half the shell broken away. This way she does not bleed but you can easily tell how she is doing and keep her moist. She is an adult now and laying eggs that are green, like her mother's before her. Her mother tended have thick shelled eggs, and we had lost chicks to that before, which is why we assisted her this time.

Another green egg that was assisted, this chick also survived and thrived. It was kept under its mother. When working with an egg under a mother hen, you can take it out and assist in indoors before returning it or you can place it back under its mother after each step of the process. The later prevents the mother attacking any introduced chicks but can risk the chick being stepped on before it is strengthened, something that has happened to us before.
Peeling away the membrane. It is quite slimy and likes to return to its former shape, but sometimes stretching it is better then tearing it. Again, work around major veins if at all possible.

Two chicks basically hatched. One still in the egg but with its head pulled free and the other completely free of her shell. Both survived. There are two other eggs with-in, one which bled to death and another that survived. Again, these are the four we had thought had died because they had been over-heated during incubation. We were opening them and preparing to throw them away when we saw they were in fact still alive.
The next step is to pull the head free. As stated, do this carefully. To pull the head free the the top must be removed and the membrane should be free of the chicks head and shoulders. Carefully straighten the head. The head will likely curl once more, but this is okay. Place the chick back in the incubator or, if you do not have an incubator, hold the chick under your shirt to keep it warm and comfortable. Let the chick rest
This chick was the first we helped hatch to my knowledge and actually burst free on its own. You can see how its neck is still wobbly and its feet are still curled.

Precious when she got her head and shoulders free. At this point, the blood should be absorbed from the top and the chick should only have the "diaper" still on it. This is what is attacked to the yolk sac and is more dangerous then the veins even. At this point, do not force the egg-shell off, let the chick rest with it. When the chick begins to struggle you can look and see how the connection is between the two, gently pulling back the egg-shell to see if the cord is drying and the yolk-sac is completely inside of the chicks stomach. If the yolk-sac is not it will be very obvious, especially if there is an issue. A chick may have needed assistance because it had an infection of the yolk-sac, in which case it likely won't survive.
Keep the chick warm, secure, and talk to it with the sounds of a mother hen or place it under its mother at this point. A strong chick will do fine, a chick that needed assistance because of weakness or if it bled a lot will need to be given special care, which I will discuss in a moment.

These two chicks hatched naturally and were still connected to the shell (but only for a moment, they pulled free with-in seconds of being removed from the incubator). Both were placed back under their mothers and excepted quickly. They were taken in because of the worry that the mother would abandoned her last egg since she had other chicks or because she already had left her egg or else she had been moved to a broody crate (a place that allows her to keep them safe from predators, drowning in the water buckets, safe from the attacks of other chickens, and allow them to get chick food without the other adults eating it all for themselves. All of these things have been problems in the past for us).


After a chick hatches or is assisted it can be placed back under its mother, placed back into the incubator (preferably in a dish with paper towels to allow soft bedding and a surface easy to grip) or held until it is dry. I have found chicks to be very lonely and to cheep a lot when left in the incubator, so I take them out and hold them under my shirt, letting them hear my heart, feel my breathing, and gain warmth. They fall right asleep and are very happy and it is very cute. Over the day I introduce them to their brooder and they get use to spending time away from me.


Chicks to be placed back under their mother can be held until they are strong enough they can survive her investigations or returned right away. This is Baby Cakes, the chick from the green egg. We let her dry off and got her lifting her head and walking so that when she was introduced she could follow her mother. If they are too weak to follow their mother they are sometimes stepped on, abandoned, or get caught on their back out in the cold. Baby Cakes was readily excepted.

The assisted hatching process has ended and now the care afterwards can begin.
Whether the egg is a mix breed from your own farm or a costly rare breed shipped to you from across the country, you want every egg to hatch. However, not every chick is able to, for various reasons. Perhaps the humidity or temperature is wrong, perhaps the chick is positioned wrong with-in the shell. Perhaps the chick is weak or malformed or perhaps the egg shell is too thick for it to break through. Whatever the reasons may be, I believe helping a chick hatch is one of the most amazing things you can do. Now, a chick that is too weak to hatch is likely genetically weak and should not be bred, but it can still be given a chance at life.
I hope this helps in some ways to explain when to assist a chick out of its shell, how to do it, and the complications that may be involved. Please feel free to offer your own input into this as well, as I've learned through years of trial and error and certainly have more to learn.
When to assist in a hatch: This is the most important question and one very difficult to answer. When does a chick need assistance and when do you wait and let it take its time? I suggest never helping a chick hatch until after day 21 has passed. The only reason it may be necessary is if the egg is damaged in any way or if something dangerous has gotten onto the shell. However, assisting a chick too early is one of the main reasons that chick will die, as it is still absorbing the blood vessels and yolk-sac and will become too weak and likely bleed to death. Also, a chick that does not work to hatch will not have built up its strength.
Candle an egg first to see if there is movement, veins, or the sign of a beak breaking through the airsac. These are all good signs that the chick is just doing its thing. Remember, not all chicks hatch on day 21, some are late, others early (particularly bantams, which hatch around day 19-20 in some cases, depending on the breed). Some chicks may have gone dormant if they were allowed to cool too long during incubation and may hatch days after the scheduled hatch, in which case assisting would only harm them and not help.
Listen for the sound of peeping. A peeping chick is communicating with its siblings and mother and talking back to it with friendly cheeps (don't do the scared ones if you can help it), making the sound of a broody hen, or playing a recording of a hatching chick can speed up the process by a lot, as chicks like to hatch all at the same time.
Opening the incubator a lot is not good for the humidity with-in, which should be high, so try not to do this if possible. Let the eggs be. If you do open it, try to do it for as short a time as possible. It is better to remove the egg then leave the incubator open. When you lift the egg, keep it in the same position if possible, even when candling, as a chick positions its self accordingly. Cheep to it and place it to your ear to see if you can hear the scaring of a chicks beak on the shell. Look for a crack nearer to the round end (lower then that and the chick may be malpositioned). If the chick begins to open the shell and seems to be having trouble breaking through the membrane, reach in and carefully pick a small hole in the shell near its beak and tear a bit of the membrane to allow breathing. Then leave the chick be. Again, chicks are meant to do their thing, and some can take 24 hours or even more to do so. However, if you hear cheeping and the hatching does not begin with-in 24 hours, then trouble may be eminent, and a chick that begins hatching but takes more then a day to finish should be assisted.
A chick that opens a breathing hole often rests a few hours before finishing, so let it do so without worrying. Once is starts to work at its shell it usually moves pretty fast after that, though it depends on the individual, the shells toughness, ect.
Be patient and vigilant. Know your breed, your incubator, that individual egg. If the chick is malpoitioned, the shell too thick, or the airsac at the wrong end, be prepared to help on day 21. Do so with care and make sure you are opening either near the beak or at the airsac first to avoid injury to the chick or causing bleeding of the membrane (which is connected to the chick until after hatching).
Assisted hatching is the same for chickens as it is for ducks, geese, guineas and turkeys. However, smaller eggs must be handled with far more care and larger eggs may need a stronger, thicker needle.
Remember, when using the needle, scrape at the shell in a sideways motion until you can pry a piece of the shell up, don't poke at it. You don't want to force the shell inwards, you want to pry it outwards like the chick is doing with its beak.
The first step to make can be on day 21, however. If you are concerned about a chick not getting oxygen, find where you think its beak is located and very, very carefully break a tiny hole there. Do not break the membrane if at all possible, just peel some of the shell away. The chick will break the membrane when it is ready to breath and you can more easily see what is happening inside of the shell. However, opening the shell risks the membrane drying out and becoming too tough for the chick to break, so there is risk in doing this.
The second step to assisted hatching is breaking the membrane. Now, to open the shell the best method is to use a needle. It may seem dangerous, but if you scrape at the shell you should be able to pry a small piece up without poking the chick. It is a delicate process but it can be done with some care.
To open the membrane first get a drop of warm water on your finger and touch it to the membrane. You can now see through it and see where the veins are located. Avoid all veins if possible and use the needle (it may be best to have dipped it in boiling water to sterilize it) to carefully peel a tiny opening in the membrane. If it begins to bleed, stop and put gentle pressure on it, then place the egg back in the incubator to rest.
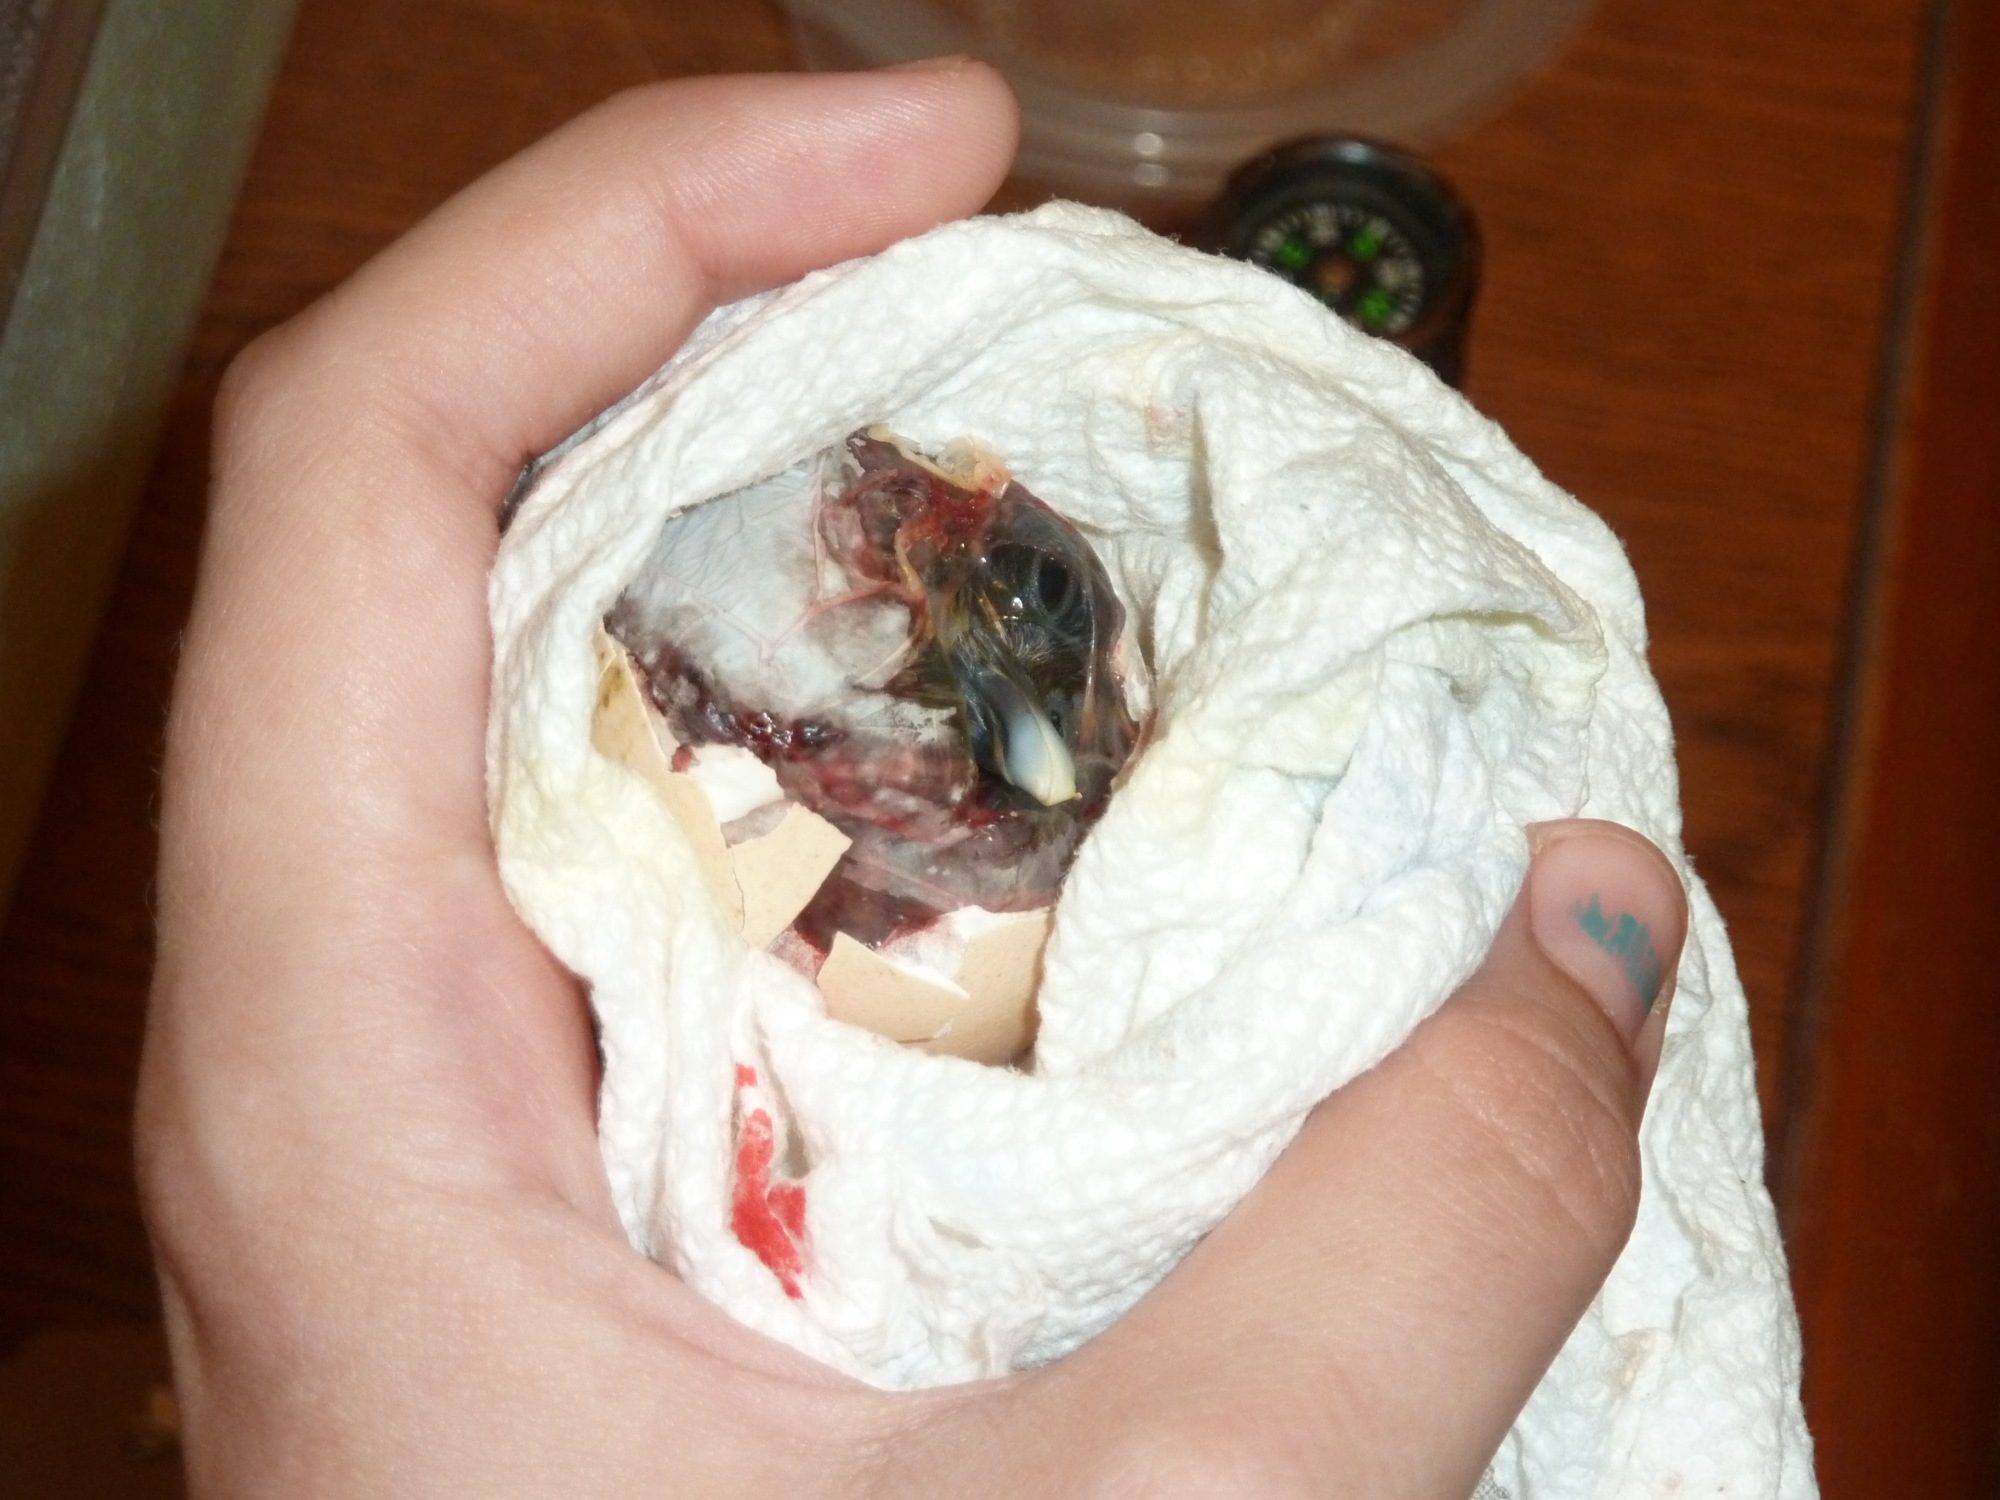
This photo shows us with one of the first eggs we helped (not the first but one of the first). Honestly we could have left it be, but this was early in our learning process. The heat pad set under it keeps it warm and moist, the opening is positioned upwards as is often seen in hatching eggs. The mother had been moved with her seven other chicks to a new nest site that was not so dangerous as her first. This egg was still hatching so we kept it until the chick had hatched and could be returned to its mother. Placing it among the others, she excepted it quite quickly. You can see in the picture it is slightly dirty. Eggs sat on by a broody may have gotten soiled and may even smell. A badly soiled egg can be scraped clean slightly to try to open pores and a breathing hole my help the chick inside. However, too much air all at once I read is not good for a hatching chick.
While a predator did get some of the chicks later in life, it was not because of the assisted hatching that it had any trouble and all the chicks were strong and healthy bantams.
After an hour or more of waiting, you can again peel some of the shell with care being taken not to tear the membrane. Leave as much of the membrane in tact as possible and search through it (using water or perhaps some oil) to see where the beak is. Open up a breathing hole and once again let the egg rest. If the chick is strong enough to hatch on its own this is all that is needed. In the above example we were impatient and assisted by breaking the ring for it and letting the chick push free. However, letting the egg rest in the incubator is probably a better choice.
Assisting a hatch too early can end in disaster.
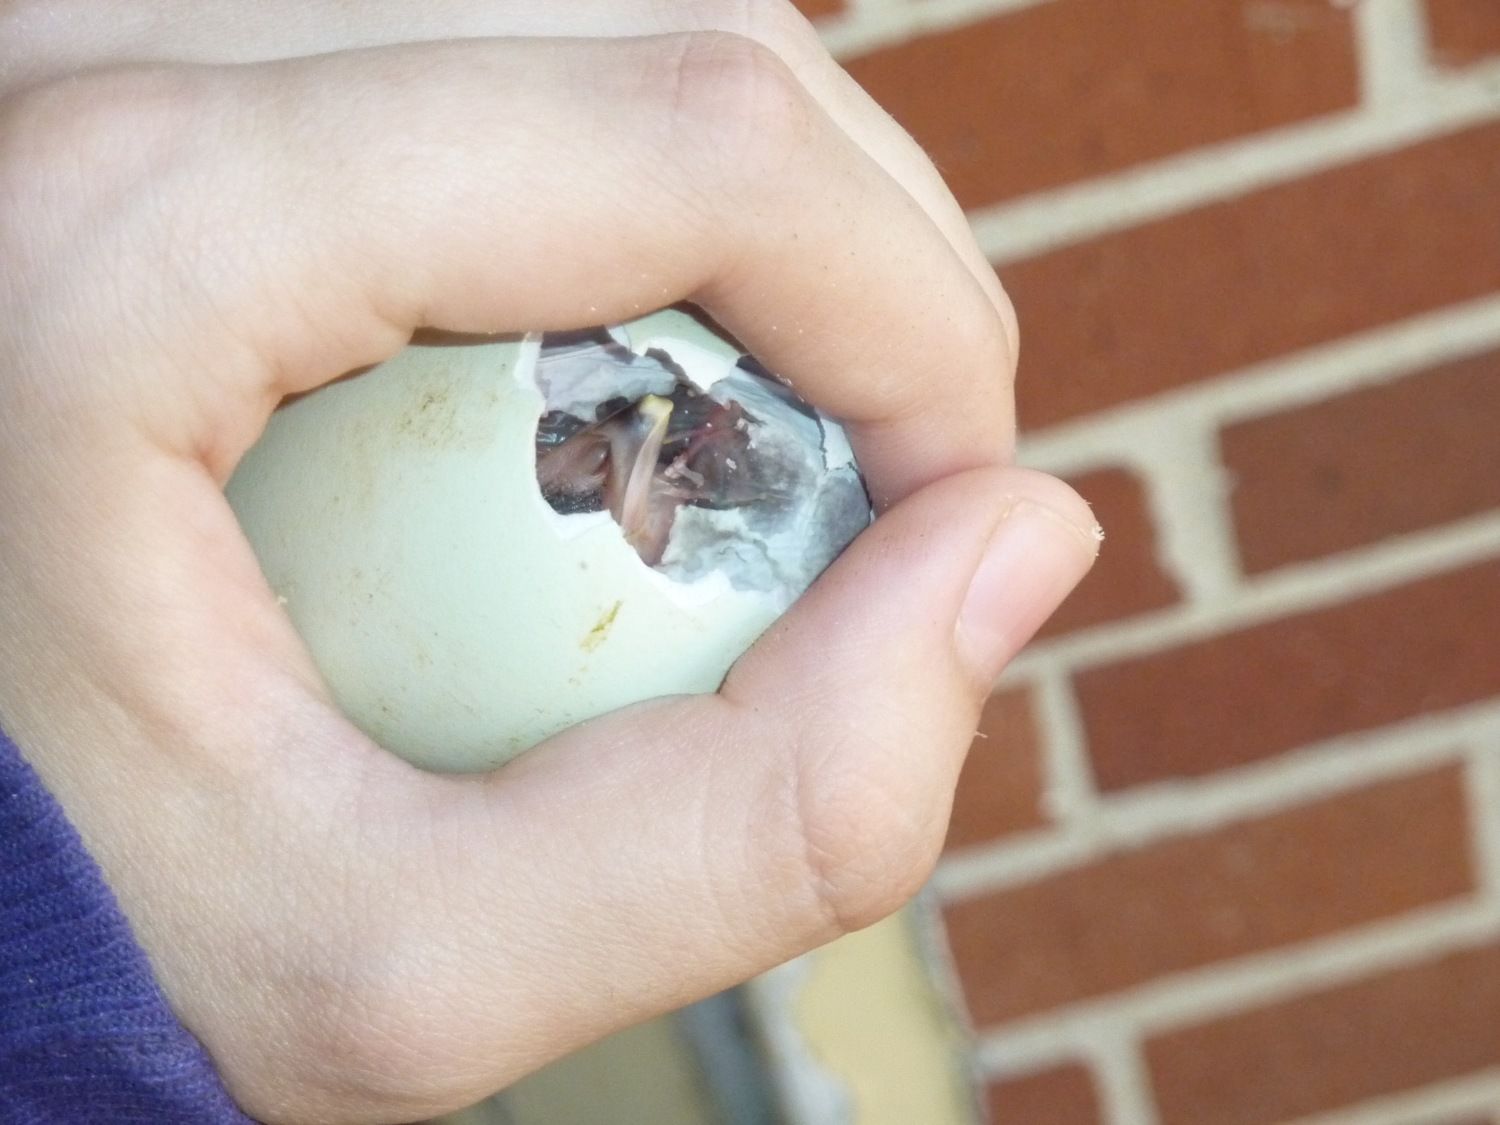
These eggs were dirty and not yet hatched so we wanted to help them. Excited to show our friends, we opened it too early and returned the chick to its mother too early.
In the end, while it may have survived, the mother apparently ate her chick whole likely trying to pick the shell free from it (the shell was still partially attached). All we know was they were in an escape proof cage and the chick was completely gone.
This is one of our Banshees, Libby. She too showed that care must be taken with hatching chicks. We opened an egg to see if the chick was still alive but left it only partially open before slipping it under her, an adoptive mother. She heard the chick, stood up, and began to eat its yolksac from it.
We tried sewing the little baby closer and brushing it dry (a tooth brush helps brush a wet chick dry to keep it warmer), but the chick ended up passing that night, along with its sibling. It was very sad, as I held them until this took place. We were only trying to help by opening them up to see if they were indeed still alive, but sometimes waiting is better. However, just as often we have waited a few hours too long and the chick, peeping inside and trying to break free, will suffocate. This is a delicate balance.
The next step to assisted hatching is, if the chick is not breaking its self free after a few hours, to begin to create that ring for it. break the shell around where its beak would do so but leave the membrane. Wait again for 20-60 minutes before beginning to peel back the membrane from the chicks face and head. This is a slow process. Many of the photos below will show an egg with a hole in the top and not the side. This is because the least damage can be done if opening the egg from the top, from the airsac. We always open eggs this way to see if they are dead or not and often times they were infertile, but we like to check all the same. When opening an egg from the top, it often does not allow the chick the leverage needed to get out on its own and the slow process of peeling away the membrane will become necessary. Make sure you don't have any chemicals or bacteria on your hands and handle with care. Keep the chick warm and try not to handle roughly or move the egg too fast. Inside of the incubator place some damp cloths or paper towels to place the eggs on to keep the humidity up.
This is a chick in the beginning process of assisted hatching.
We were sure this chick was dead, but as you can see it is alive. The red veins can barely be see through the shrink-wrapped membrane. This chick is Precious, a silkie that survived and thrived upon assisted hatching.
Precious once more. She bled some, but the membrane was slowly pulled away from around her face to allow her to breath. My goal was to get her head free so I could see if she had absorbed her egg sac or not. Pulling a chick free that has not will likely kill it. Again, chicks can bleed quite a bit, and this weakens them, but it often does not kill them if you stop what you are doing and let them finish absorbing their veins. You will see the veins begin to shrink and deflate as this happens, so be patient. As long as the chick is breathing and cheeping it is holding on. The paper towels were to keep her moist. You can see she opened her eyes.
A chick naturally hatching with-in the incubator, showing the patterning it makes while zipping.
This chick was yet to open its eye but the membrane was making good process. I could almost see the yolk sac. Handle the head and limbs with care, as the bones are soft and delicate. You do not want to injure them. In some chicks the neck may be swollen from the tight space, but this should go away with-in a day or so. I did loose one chick with a badly swollen face, but it was already weak to begin with.
Here is a chick still with-in its membrane but with half the shell broken away. This way she does not bleed but you can easily tell how she is doing and keep her moist. She is an adult now and laying eggs that are green, like her mother's before her. Her mother tended have thick shelled eggs, and we had lost chicks to that before, which is why we assisted her this time.
Another green egg that was assisted, this chick also survived and thrived. It was kept under its mother. When working with an egg under a mother hen, you can take it out and assist in indoors before returning it or you can place it back under its mother after each step of the process. The later prevents the mother attacking any introduced chicks but can risk the chick being stepped on before it is strengthened, something that has happened to us before.
Peeling away the membrane. It is quite slimy and likes to return to its former shape, but sometimes stretching it is better then tearing it. Again, work around major veins if at all possible.
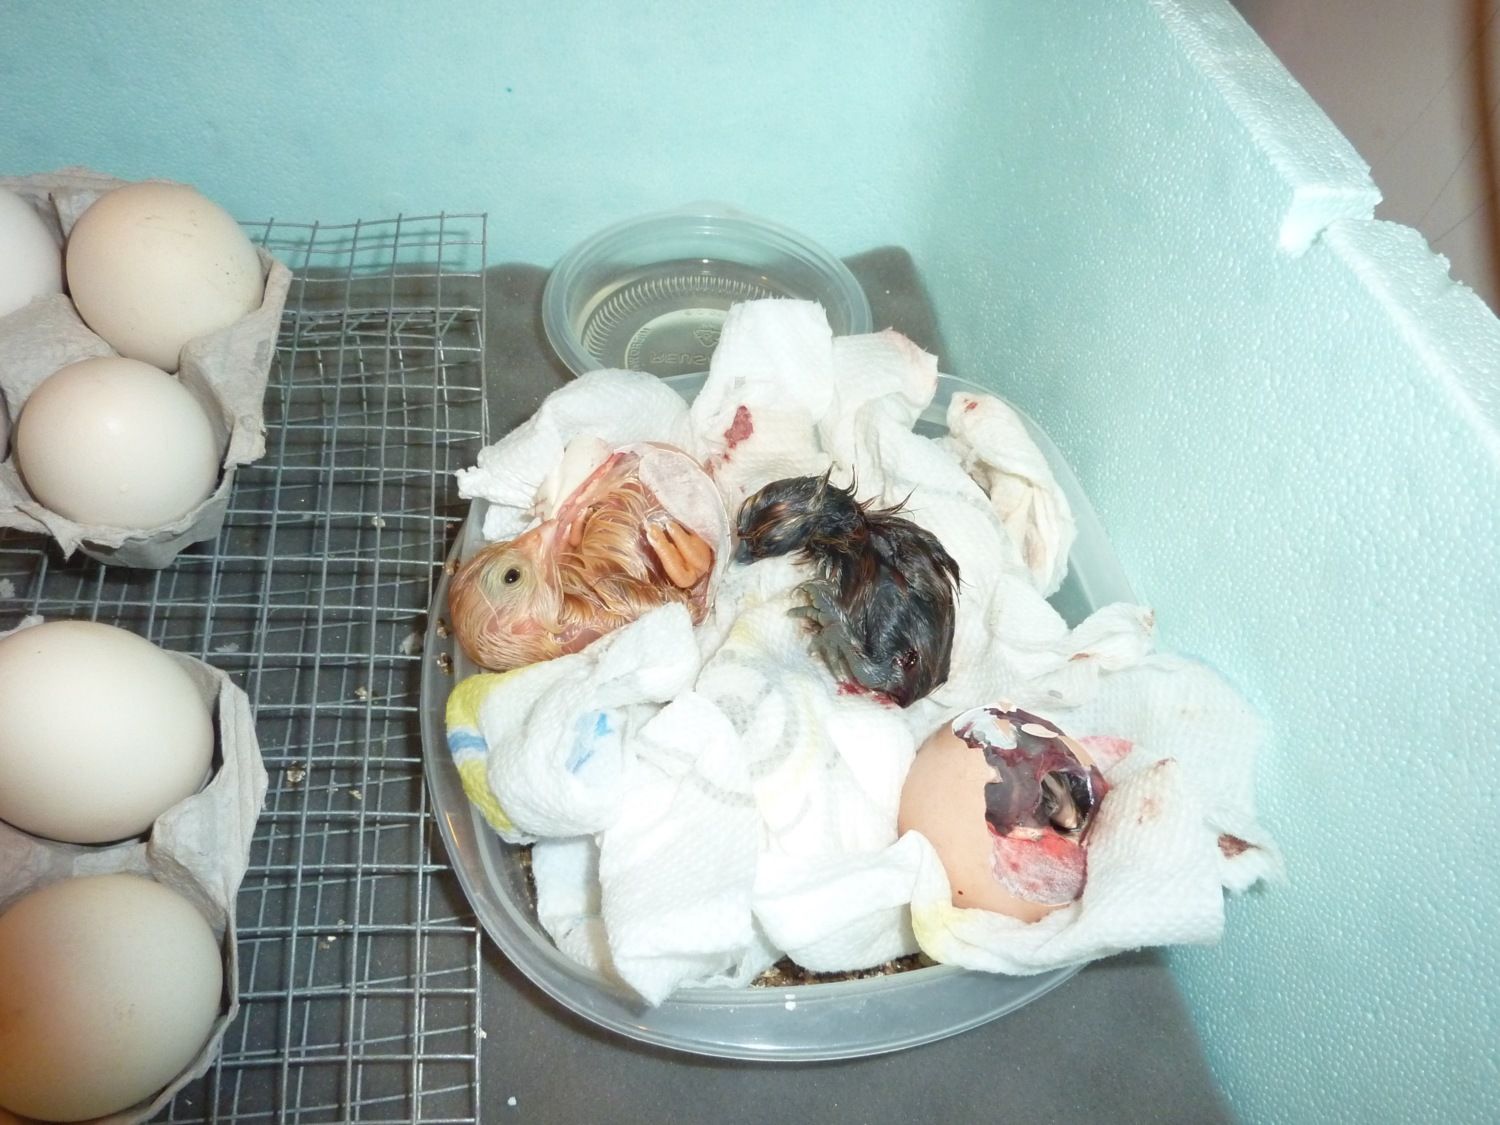
Two chicks basically hatched. One still in the egg but with its head pulled free and the other completely free of her shell. Both survived. There are two other eggs with-in, one which bled to death and another that survived. Again, these are the four we had thought had died because they had been over-heated during incubation. We were opening them and preparing to throw them away when we saw they were in fact still alive.
The next step is to pull the head free. As stated, do this carefully. To pull the head free the the top must be removed and the membrane should be free of the chicks head and shoulders. Carefully straighten the head. The head will likely curl once more, but this is okay. Place the chick back in the incubator or, if you do not have an incubator, hold the chick under your shirt to keep it warm and comfortable. Let the chick rest
This chick was the first we helped hatch to my knowledge and actually burst free on its own. You can see how its neck is still wobbly and its feet are still curled.
Precious when she got her head and shoulders free. At this point, the blood should be absorbed from the top and the chick should only have the "diaper" still on it. This is what is attacked to the yolk sac and is more dangerous then the veins even. At this point, do not force the egg-shell off, let the chick rest with it. When the chick begins to struggle you can look and see how the connection is between the two, gently pulling back the egg-shell to see if the cord is drying and the yolk-sac is completely inside of the chicks stomach. If the yolk-sac is not it will be very obvious, especially if there is an issue. A chick may have needed assistance because it had an infection of the yolk-sac, in which case it likely won't survive.
Keep the chick warm, secure, and talk to it with the sounds of a mother hen or place it under its mother at this point. A strong chick will do fine, a chick that needed assistance because of weakness or if it bled a lot will need to be given special care, which I will discuss in a moment.
These two chicks hatched naturally and were still connected to the shell (but only for a moment, they pulled free with-in seconds of being removed from the incubator). Both were placed back under their mothers and excepted quickly. They were taken in because of the worry that the mother would abandoned her last egg since she had other chicks or because she already had left her egg or else she had been moved to a broody crate (a place that allows her to keep them safe from predators, drowning in the water buckets, safe from the attacks of other chickens, and allow them to get chick food without the other adults eating it all for themselves. All of these things have been problems in the past for us).
After a chick hatches or is assisted it can be placed back under its mother, placed back into the incubator (preferably in a dish with paper towels to allow soft bedding and a surface easy to grip) or held until it is dry. I have found chicks to be very lonely and to cheep a lot when left in the incubator, so I take them out and hold them under my shirt, letting them hear my heart, feel my breathing, and gain warmth. They fall right asleep and are very happy and it is very cute. Over the day I introduce them to their brooder and they get use to spending time away from me.
Chicks to be placed back under their mother can be held until they are strong enough they can survive her investigations or returned right away. This is Baby Cakes, the chick from the green egg. We let her dry off and got her lifting her head and walking so that when she was introduced she could follow her mother. If they are too weak to follow their mother they are sometimes stepped on, abandoned, or get caught on their back out in the cold. Baby Cakes was readily excepted.
The assisted hatching process has ended and now the care afterwards can begin.
Last edited:


