Show me your insulation pictures

animalover

Chirping
9 Years
Jul 30, 2010
154
0
99
Harrisburg, PA
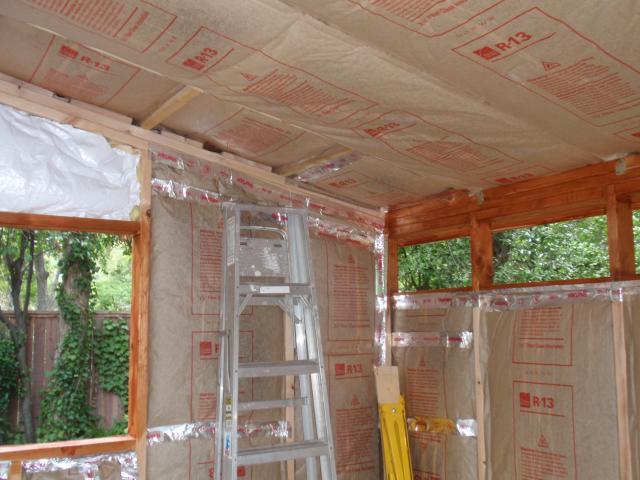
As of today, the basic coop construction is complete. Now I just need to do the finishing up - painting and adding hardware, etc. While it's a sweltering 90 degrees in PA today, I am thinking ahead to winter. For those of you who insulated, I'd love to see pictures of the various ways it has been done.
 
I live in Kansas and ordered my chicken house from a company in MO and it's not insulated in the sides, only in the ceiling to prevent condensation. A friend had one of these first and she said her flock has did fine last winter because they create quite a bit of heat themselves. My hubby says their hen houses were never insulated when he was growing up on the farm. My building is sheet metal siding with a thick wood floor. Only thing I'm really concerned about during winter is their water freezing.
 
There will be a lot of people that disagree with me but I have good luck with what I do. I think that insulation implies that you will have a house without a lot of ventilation. What is the good of insualtion of you are going to vent the house? I live in colorado where we had plenty of negative 10 degrees last year. I have a small window quite high up in the coop and a very large opening to the south. I did not have any trouble with frozen combs or any compliaton from the cold. I think a better reason to insulate the roof is to protect the birds from t he heat of the summer.

this is just my opinion.
 
A good discussion of the value of insulation even in a properly ventilated coop:

https://www.backyardchickens.com/web/viewblog.php?id=1642-VENTILATION

I just finished insulating my new coop. I used fiberglass batting between the studs in the roof, and because I had some left over, some of the walls. It's R-13, and you install it by stapling the paper cover to the inside of the studs. It goes up easily except when you have to cut a piece to fit, then it's very dusty with all the little bits of fiberglass. You should wear a mask over your nose, long sleeves, gloves, etc. when working with the stuff.

When I ran out of the fiberglass batt, I used the pink foamboard to finish the job. This is very easy to work with. You just use a craft knife to mark the cut, then bend the board and it snaps neatly. Then you just press it into place between the studs. I used the 1 inch thick board, R-5, and because I had extra to use up, I doubled it in several places.

With any kind of insulation like this, you do need to cover it up or the chickens will peck at it. I bought the very thin plywood and will be nailing it up to finish the job in the next few days.

My coop does have four windows, so what I'm planning to do this winter is get some bubble wrap and staple it over the windows to insulate them for the winter.
 
I agree with greathorse and elmo. Insulation in the roof of your coop can help moderate temperatures inside. It rarely freezes where I live but gets brutally hot. I insulated the roof of my coop and it dramatically reduces the amount of heat emanating into the coop. That was probably one of the best steps I took while building the coop. So, while it seems contraindicated, insulation in hot environments can be a very good thing. In cold environments, insulation will allow you to have better ventilation for air exchange, while not loosing all of the heat produced inside the coop.
 
Quote:
Ok, here's one:

32217_insulation.jpg


Not too much to see...was there something in particular you were wondering about?
 
I know nothing about construction, so I didn't know how it looked when insulation was put in. What keeps it in place? Thanks for the picture. I finished priming the outside today, and part of the inside. Tonight I will go pick my paint color. I am hoping the girls can move in by Monday, and then I will post pictures.
 
Quote:
There's a paper flange on the sides of the fiberglass batting: you staple that to the studs, either on the face or the insides. Honestly, though, it fits pretty tightly so that it almost holds itself up in there (it's quite light, too). Just buy the right width for your studs (either 24" or 16") and it's very easy to put in.

For the foam stuff, you just cut it to fit the space tightly and wedge it in there. You don't have to use anything to attach it, although you certainly can use screws in a couple of places if you want to.

You don't have to put the foam board between the studs, either. You can put it over the studs in a single piece to cover your whole wall. In that case you probably would want to tack it in a couple of places with screws to hold it in place before you cover it with whatever you're going to use to cover up the insulation.
 

New posts New threads Active threads

Back
Top Bottom