
I really enjoy following building progress threads and learning from all your experiences. So I decided to create one for my own coop as well! Do let me know if you see any red flags 
I haven't built a coop before and don't have professional skills, but I love building things in general, and love power tools, so this is a very exciting project for me. I'm building a 5x7 walk-in coop with a slanted roof, sloping from 8 feet to 7 feet (with room for deep bedding). I'm building it out of pressure treated 2x4's and OSB boards. It will be raised on cinder blocks and will have an insulated floor and roof, but no insulation in the walls. The roof will have rib steel panels on top of OSB boards (with tar paper on the boards). I'm painting all wooden surfaces with waterproofing wood stain. Everything - walls, floor, roof boards, nest boxes, inside, outside, etc. - I don't want to see any exposed wood except for the tree branches that will serve as roosts (our weather is humid AF in the summer and I just don't trust exposed wood, even if it's pressure treated). I'm also building a 12x18-ish run, which will have an irregular shape because I have a tree in the way... The whole setup will be in a sheltered, shady, tree-lined part of the yard, and under a giant maple tree, which should give the chickens plenty of shade in the summer and a good supply of leaves and twigs to scratch around. I'm aiming for 3-5 chickens total.
Part 1: The Plans
The grid is 1'x1'.


Part 2: The Location
Here's the location. Nice and sheltered. The shade is very deep and only gets direct sun briefly in the morning, and again in the very late afternoon, and even then it's still part shade. I've been out there to check it out on 90+ degree days and it feels really nice in the shade!

Projected boundaries. The retaining wall is to the West. The coop will be 1 foot away from the wall and 1 foot away from the chain link fence on the North. I'm going to put my biggest vent, spanning the whole 7 feet, in the eaves along the West side wall, and the roof overhang will be above the retaining wall, so that vent will be very sheltered from weather. There will be another 7-foot-long vent on the run-facing side as well, with a flap to close it if necessary. I'm considering leaving vents like that along the tops of all the walls actually...
The run will be partly covered on top with clear polycarbonate panels, from the coop extending out to the forsythia. This will give them year-round shelter from rain (the big maple tree also shields from rain). And in the winter, I'll cover the whole run with plastic, greenhouse-style. The run will have a slanted top, so snow can slide off. The idea is to have the run predator-proofed and sheltered from weather, so I can leave the pop door open year round, day and night.

I may need to cut the forsythia back some more. Although I want to have enough of it to make a little chicken cave. I took advantage of its arching branches that root themselves when they touch the ground, so I let them anchor themselves and form a cave shape. I trimmed the underside so it's hollowed out. The pictures don't do it justice - it really looks like a cozy deep cool cave with two entrances! I hope the chickens enjoy chilling out in there on hot days and don't destroy the shrub instead. Do chickens eat forsythia leaves?

Here's the foundation. I didn't feel comfortable putting blocks just in the corners, like I've seen a lot of people do, and risk having the middle sag, so I gave it a nice border all around, with a cross section just in case. I had a bunch of cinder blocks lying around from the raised garden bed project, so why not. You can see my baby linden tree standing in the way of everything. When I planted it last year, I wasn't thinking about chickens yet... and now I don't feel like moving it, so gotta deal with the placement now. I love this location for the coop though, so I'd rather make this work than try to put the coop somewhere else.

Right next to the coop there's the compost pile and compost bin (for a two batch process). Hidden behind some bushes so it's not an eyesore. At floor level in the corner facing the compost, the coop will have a low and wide "poop door" which I'll open once a year for the deep clean, and just push all the bedding out into the compost area. The roosts will also be in that corner, right above the poop door, so if things get too bad, I can push just the worst of it out from under the roosts. I'll be doing deep bedding (not deep litter), no poop boards.

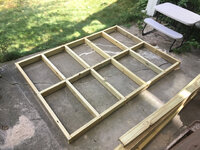
Part 3: The Floor
The floor frame. I'm building all the frames with half lap joints. I LOVE half lap joints!!! They are fairly easy to make, and so much sturdier than plain old butt joints.

Some half lap joints, up close and personal:


The size of the coop is 5x7 because that's the space I have to work with - constrained on all sides by things. Which is inconvenient, given that boards are sold as 4x8. So I had to join boards together for the 8 foot dimension. The walls might be fine without any extra help, but my husband didn't feel comfortable walking around on that floor without reinforcing the board joints first, so he gave me the idea of using these nifty little things called biscuits. I hadn't heard of them, but now I love them! So much fun to put in, and such a great and effective idea for joining boards edge to edge.


I gave each half lap joint a ton of wood glue and a 3"-long deck screw. I wood-glued the biscuits in place, and put another ton of wood glue everywhere that wood was touching wood (learned that from a carpenter) - in the board edge joints, in the half lap joints, and everywhere the OSB was touching the frame. I then attached the OSB to the frame with a nail gun.

All boarded up on one side and painted with a waterproofing solid color wood stain. I read somewhere that waterproofing wood stain is more effective than paint, because it penetrates into the wood, while paint sits on top of it and can thus chip and peel. Also, to repaint, you need to scrape the old paint off, while with stain, you just paint the new coat right on top of the faded old stain. So now I'm in love with this wood stain! Especially because it comes in solid colors, not just semi-opaque "wood colors". I got a dark blue color to match our house for the exterior of the coop, and a lighter one for the interior.

For insulation, I used a whole bunch of crap from around the house. I'd been saving polystyrene sheets and peanuts from packaging, thinking I might need them some day... I also had a bunch of soft foam padding left over from another project, and some pink insulation from who knows what. I stuffed it all in. Probably not the most effective insulation, but it's a snug fit so it's probably better than nothing. Not that I particularly need floor insulation, given that I'll be doing deep bedding, but I mostly did this to get rid of all that crap without sending it to the landfill, and maybe benefiting the chickens in the process

After I closed it up with the OSB and glued/nailed everything in place, it felt really sturdy and nice to walk on. Before the insulation, it felt very hollow and echo-y with every step. Now it feels like a real floor!
I haven't built a coop before and don't have professional skills, but I love building things in general, and love power tools, so this is a very exciting project for me. I'm building a 5x7 walk-in coop with a slanted roof, sloping from 8 feet to 7 feet (with room for deep bedding). I'm building it out of pressure treated 2x4's and OSB boards. It will be raised on cinder blocks and will have an insulated floor and roof, but no insulation in the walls. The roof will have rib steel panels on top of OSB boards (with tar paper on the boards). I'm painting all wooden surfaces with waterproofing wood stain. Everything - walls, floor, roof boards, nest boxes, inside, outside, etc. - I don't want to see any exposed wood except for the tree branches that will serve as roosts
(our weather is humid AF in the summer and I just don't trust exposed wood, even if it's pressure treated). I'm also building a 12x18-ish run, which will have an irregular shape because I have a tree in the way... The whole setup will be in a sheltered, shady, tree-lined part of the yard, and under a giant maple tree, which should give the chickens plenty of shade in the summer and a good supply of leaves and twigs to scratch around. I'm aiming for 3-5 chickens total.Part 1: The Plans
The grid is 1'x1'.
Part 2: The Location
Here's the location. Nice and sheltered. The shade is very deep and only gets direct sun briefly in the morning, and again in the very late afternoon, and even then it's still part shade. I've been out there to check it out on 90+ degree days and it feels really nice in the shade!
Projected boundaries. The retaining wall is to the West. The coop will be 1 foot away from the wall and 1 foot away from the chain link fence on the North. I'm going to put my biggest vent, spanning the whole 7 feet, in the eaves along the West side wall, and the roof overhang will be above the retaining wall, so that vent will be very sheltered from weather. There will be another 7-foot-long vent on the run-facing side as well, with a flap to close it if necessary. I'm considering leaving vents like that along the tops of all the walls actually...
The run will be partly covered on top with clear polycarbonate panels, from the coop extending out to the forsythia. This will give them year-round shelter from rain (the big maple tree also shields from rain). And in the winter, I'll cover the whole run with plastic, greenhouse-style. The run will have a slanted top, so snow can slide off. The idea is to have the run predator-proofed and sheltered from weather, so I can leave the pop door open year round, day and night.
I may need to cut the forsythia back some more. Although I want to have enough of it to make a little chicken cave. I took advantage of its arching branches that root themselves when they touch the ground, so I let them anchor themselves and form a cave shape. I trimmed the underside so it's hollowed out. The pictures don't do it justice - it really looks like a cozy deep cool cave with two entrances! I hope the chickens enjoy chilling out in there on hot days and don't destroy the shrub instead. Do chickens eat forsythia leaves?
Here's the foundation. I didn't feel comfortable putting blocks just in the corners, like I've seen a lot of people do, and risk having the middle sag, so I gave it a nice border all around, with a cross section just in case. I had a bunch of cinder blocks lying around from the raised garden bed project, so why not. You can see my baby linden tree standing in the way of everything. When I planted it last year, I wasn't thinking about chickens yet... and now I don't feel like moving it, so gotta deal with the placement now. I love this location for the coop though, so I'd rather make this work than try to put the coop somewhere else.
Right next to the coop there's the compost pile and compost bin (for a two batch process). Hidden behind some bushes so it's not an eyesore. At floor level in the corner facing the compost, the coop will have a low and wide "poop door" which I'll open once a year for the deep clean, and just push all the bedding out into the compost area. The roosts will also be in that corner, right above the poop door, so if things get too bad, I can push just the worst of it out from under the roosts. I'll be doing deep bedding (not deep litter), no poop boards.
Part 3: The Floor
The floor frame. I'm building all the frames with half lap joints. I LOVE half lap joints!!! They are fairly easy to make, and so much sturdier than plain old butt joints.
Some half lap joints, up close and personal:
The size of the coop is 5x7 because that's the space I have to work with - constrained on all sides by things. Which is inconvenient, given that boards are sold as 4x8. So I had to join boards together for the 8 foot dimension. The walls might be fine without any extra help, but my husband didn't feel comfortable walking around on that floor without reinforcing the board joints first, so he gave me the idea of using these nifty little things called biscuits. I hadn't heard of them, but now I love them! So much fun to put in, and such a great and effective idea for joining boards edge to edge.
I gave each half lap joint a ton of wood glue and a 3"-long deck screw. I wood-glued the biscuits in place, and put another ton of wood glue everywhere that wood was touching wood (learned that from a carpenter) - in the board edge joints, in the half lap joints, and everywhere the OSB was touching the frame. I then attached the OSB to the frame with a nail gun.
All boarded up on one side and painted with a waterproofing solid color wood stain. I read somewhere that waterproofing wood stain is more effective than paint, because it penetrates into the wood, while paint sits on top of it and can thus chip and peel. Also, to repaint, you need to scrape the old paint off, while with stain, you just paint the new coat right on top of the faded old stain. So now I'm in love with this wood stain! Especially because it comes in solid colors, not just semi-opaque "wood colors". I got a dark blue color to match our house for the exterior of the coop, and a lighter one for the interior.
For insulation, I used a whole bunch of crap from around the house. I'd been saving polystyrene sheets and peanuts from packaging, thinking I might need them some day... I also had a bunch of soft foam padding left over from another project, and some pink insulation from who knows what. I stuffed it all in. Probably not the most effective insulation, but it's a snug fit so it's probably better than nothing. Not that I particularly need floor insulation, given that I'll be doing deep bedding, but I mostly did this to get rid of all that crap without sending it to the landfill, and maybe benefiting the chickens in the process
After I closed it up with the OSB and glued/nailed everything in place, it felt really sturdy and nice to walk on. Before the insulation, it felt very hollow and echo-y with every step. Now it feels like a real floor!
Attachments


Last edited:


