Echo and Pans Innangard
In the Brooder
Welcome to Our Build Blog!
Just fair Warning, We've never been known to not add a bunch of pictures, so this might take awhile to load on slower connections. I'm Sorry!
Echo has a new 'S23' that she is enjoying taking all sorts of videos and pictures with, I rarely get it out of her hands!
It seems We've jumped into the deep end without a life jacket and no Life Guard 'On Duty', when it comes to owning Chickens.
At least we chose to swim in the right pond! "Backyard Chickens Website"
Most of the People that I talk to at our Local Feed Store only have 3-5 birds, yet here we sit with 40 currently tucked away in our Tool-Shed until the Coop is finished, with another 10 layers coming in 8 weeks!

 Why do we have so many birds? Heck if I know! In all honesty that is Pans fault. We had thought we would lose a few to any number of issues, but that hasn't happened yet, granted we haven't had them long. We also expect to be culling the roosters for meat, as our Small Town doesn't allow us to keep them, when they reach the proper age, so that would lessen our population some, but we really don't know how to tell which from which yet, and that is okay!
 ") We really don't know anything about Chickens, but we expect that this Website's Collection of Community Members, as well as the already well documented content that is available to peruse at a click of a button, should be able to adequately prepare us for near any circumstance that presents itself.
We really don't know anything about Chickens, but we expect that this Website's Collection of Community Members, as well as the already well documented content that is available to peruse at a click of a button, should be able to adequately prepare us for near any circumstance that presents itself.
When we first got the chicks, they were in a 2' x 3' trough, and at 2 am I saw 5 of them fighting over roosting space on top of the water and food.


I was NOT happy about how much sawdust got in their food, and how dirty their water kept getting. I just knew it had to be because they just didn't have space to move around.
So at midnight I head out to the Tool-Shed, and 2 hours later the birds are moved. Most the time was spent moving things around. I feel sorry for my neighbors having to hear all the cussing and swearing that was coming out of that dark shed that night.
Basically for this 'Brooding Space', all I did was throw down two sheets of 4'x8' hardboard (hard cardboard from a previous project) as a floor to protect the sheds floor, and then boxed together some sheets of 4'x8' 1/2" plywood that I hadn't used yet.
I added a couple extra 1"x4" cut-off trim scraps to hold the roof on, but its put together so as to not damage the reuse of the plywood if possible.
Deep Litter Method for now, just for this project, but we plan on doing a couple different things with the coop in the long-run.
 Overkill? You betcha!
The chicks now spend time on their roosting bar, which is just some scrap wood, and a branch that was laying around. Couple different sizes/shapes so they can have their choice.
When we decided we were going to get Chickens, it was more a request by 'The Old Man'.
When he says he wants something, we rush to make it happen, as every day we have with him is a blessing.
He's been in Hospice (End of Life) care twice, and now we all just take it one day at a time.
We all make the joke that Vietnam couldn't kill him, but Agent Orange sure is trying.
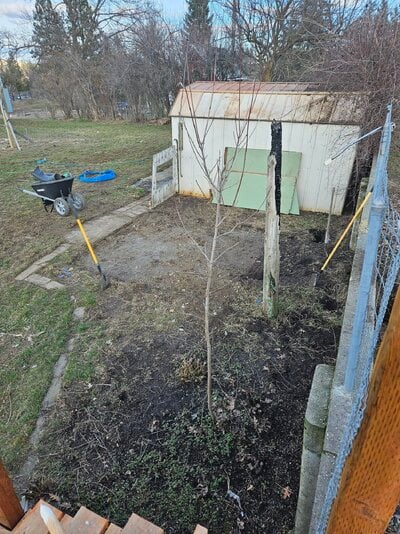
After looking around the property, and knowing the type of weather we get here in Eastern Washington, we decided on putting the new Coop where the previous shed had been. It had been seriously damaged in the Babb Rd Wildfire of Sept/2020 and recently removed, leaving us with a broken 2" concrete pad that needed removing first.


I decided to start our Chicken Coop out as a 8'x12' shed, since the shed that was removed was a 10'x10' and had left a decent bed of gravel, and it was one of the most level, out of the way areas on our property. I wanted space between the retaining wall and the Chicken Coop, so that I could make a Duck Enclosure in the future, thankfully we own both sides of the wall and don't have set-back restrictions.
I've always known Local Codes where I've lived before to have a thing about requiring permits for structures that are considered Permanent Structures. I'm not 100% locked down on our local Codes and such, but then again, no one in our Town is, it's being Rebuilt basically from the ground up, so we'll cross that bridge when we get to it. This is why most of the things I've ever built in my life would be considered 'Portable'.


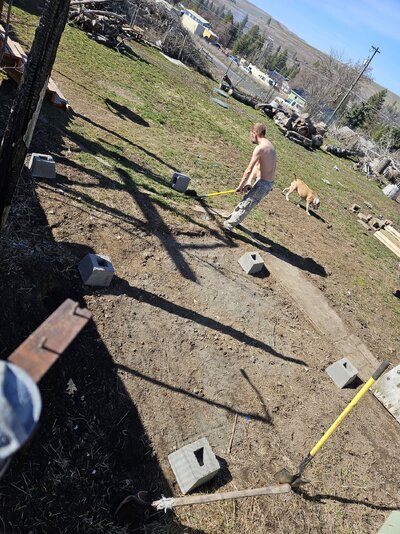
Everything is on PT 4"x6" Beams/Skids, nothing in concrete in the ground, and can be broken down for Highway Transport, in my mind anyways. This has allowed me to avoid getting permits on most what I build, and usually leads to overbuilding everything I build at the same time. I don't suggest others do this as my projects usually go over budget, but I'm pretty confident in what I'm doing here.

(Anyone who's built with 4'x8' sheets will see the extra strip in the center, yes we're new at this, yes we made a mistake and didn't cut the floor joists at the proper length leading to an extra 3" in the floor. No I wasn't planning for it, but we worked it into the build as you'll see later. To fix it would have meant taking it all apart at this point and we didn't want to do that. Yes that is 3/4" ply for the floor, it was left over from another project long ago)
 (One wall is 5'6", the other is 7'6". This was done so when the PT Beams were placed, they would be exactly 6' and 8'. We used PT Beams on this portion just because they would be exposed on the 2' and 6' overhangs. They will outlive the roof. You can see that 3" extra lip on the edge of the floor here) Also of note is the fact that Washington State requires that you use Engineer Stamped Trusses for Roofs. This is why we went with a Lean-To Roof, no Truss, no fuss.
I do make an attempt to not appear in the photos that Echo takes, she does capture me from time to time though.


I will have to cut the siding a bit before I put the roof on this apparently, there is a piece of metal flashing that needs to go between the siding and the studs, that overlaps the plywood of the nesting boxes roof, to prevent leaks... ugh more work.
I didn't have much of an idea as to what I needed for a Chicken Coop other than I needed Nesting Boxes and I had a extra 3" on the floor of the shed that wasn't originally planned for, this became the attachment point for the Nesting Boxes. I think it turned out pretty good. I don't expect there to ever be enough weight in this portion to actually be of concern that it doesn't have much support, but if I do notice sagging in the future, it can easily be supported by adding some support arms.
 There is still so much work left to be done, yet today we woke up to a backyard full of white stuff. Yup, it Snowed on April 5th. Quite a bit actually. Can't work on the shed today, will update in the future!
 Everything is 2"x4" standard lumber framed on 16" centers. Yes this is very much overkill for a chicken coop. The idea behind this is that if we ever decide to not have chickens, the structure is still usable as a garden shed, and should, if taken care of, last 50+ years.
There will be poop-boards in place that will be counter-top height/depth, covered in lino flooring to aid in protecting the wood, and ease of cleaning. The Roosting Bars will be removable, so if in the future we decide on no chickens, we at least have countertop workspace in the shed.
I will be implementing a Brooding Space into the Coop somehow, haven't quite figured out where yet, but it'll be on the floor under one of the boards we place.
The Roof will be vented at the base and the peak through the soffit vents, and will probably get an electric fan at one point or another depending on temps inside.
As I said, it is a work in progress and we'll update as we go! Thanks for looking!
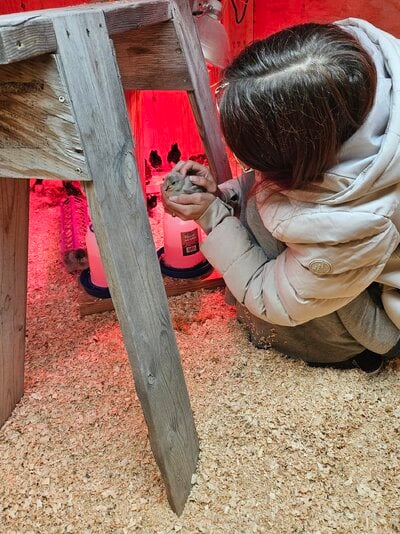
Have a couple pictures of Echo playing with the chicks as a bonus!


Just fair Warning, We've never been known to not add a bunch of pictures, so this might take awhile to load on slower connections. I'm Sorry!
Echo has a new 'S23' that she is enjoying taking all sorts of videos and pictures with, I rarely get it out of her hands!
It seems We've jumped into the deep end without a life jacket and no Life Guard 'On Duty', when it comes to owning Chickens.
At least we chose to swim in the right pond! "Backyard Chickens Website"
Most of the People that I talk to at our Local Feed Store only have 3-5 birds, yet here we sit with 40 currently tucked away in our Tool-Shed until the Coop is finished, with another 10 layers coming in 8 weeks!
We really don't know anything about Chickens, but we expect that this Website's Collection of Community Members, as well as the already well documented content that is available to peruse at a click of a button, should be able to adequately prepare us for near any circumstance that presents itself. When we first got the chicks, they were in a 2' x 3' trough, and at 2 am I saw 5 of them fighting over roosting space on top of the water and food.
I was NOT happy about how much sawdust got in their food, and how dirty their water kept getting. I just knew it had to be because they just didn't have space to move around.
So at midnight I head out to the Tool-Shed, and 2 hours later the birds are moved. Most the time was spent moving things around. I feel sorry for my neighbors having to hear all the cussing and swearing that was coming out of that dark shed that night.
Basically for this 'Brooding Space', all I did was throw down two sheets of 4'x8' hardboard (hard cardboard from a previous project) as a floor to protect the sheds floor, and then boxed together some sheets of 4'x8' 1/2" plywood that I hadn't used yet.
I added a couple extra 1"x4" cut-off trim scraps to hold the roof on, but its put together so as to not damage the reuse of the plywood if possible.
Deep Litter Method for now, just for this project, but we plan on doing a couple different things with the coop in the long-run.
The chicks now spend time on their roosting bar, which is just some scrap wood, and a branch that was laying around. Couple different sizes/shapes so they can have their choice.
When we decided we were going to get Chickens, it was more a request by 'The Old Man'.
When he says he wants something, we rush to make it happen, as every day we have with him is a blessing.
He's been in Hospice (End of Life) care twice, and now we all just take it one day at a time.
We all make the joke that Vietnam couldn't kill him, but Agent Orange sure is trying.
After looking around the property, and knowing the type of weather we get here in Eastern Washington, we decided on putting the new Coop where the previous shed had been. It had been seriously damaged in the Babb Rd Wildfire of Sept/2020 and recently removed, leaving us with a broken 2" concrete pad that needed removing first.
I decided to start our Chicken Coop out as a 8'x12' shed, since the shed that was removed was a 10'x10' and had left a decent bed of gravel, and it was one of the most level, out of the way areas on our property. I wanted space between the retaining wall and the Chicken Coop, so that I could make a Duck Enclosure in the future, thankfully we own both sides of the wall and don't have set-back restrictions.
I've always known Local Codes where I've lived before to have a thing about requiring permits for structures that are considered Permanent Structures. I'm not 100% locked down on our local Codes and such, but then again, no one in our Town is, it's being Rebuilt basically from the ground up, so we'll cross that bridge when we get to it. This is why most of the things I've ever built in my life would be considered 'Portable'.
Everything is on PT 4"x6" Beams/Skids, nothing in concrete in the ground, and can be broken down for Highway Transport, in my mind anyways. This has allowed me to avoid getting permits on most what I build, and usually leads to overbuilding everything I build at the same time. I don't suggest others do this as my projects usually go over budget, but I'm pretty confident in what I'm doing here.
(Anyone who's built with 4'x8' sheets will see the extra strip in the center, yes we're new at this, yes we made a mistake and didn't cut the floor joists at the proper length leading to an extra 3" in the floor. No I wasn't planning for it, but we worked it into the build as you'll see later. To fix it would have meant taking it all apart at this point and we didn't want to do that. Yes that is 3/4" ply for the floor, it was left over from another project long ago)
I do make an attempt to not appear in the photos that Echo takes, she does capture me from time to time though.
I will have to cut the siding a bit before I put the roof on this apparently, there is a piece of metal flashing that needs to go between the siding and the studs, that overlaps the plywood of the nesting boxes roof, to prevent leaks... ugh more work.
I didn't have much of an idea as to what I needed for a Chicken Coop other than I needed Nesting Boxes and I had a extra 3" on the floor of the shed that wasn't originally planned for, this became the attachment point for the Nesting Boxes. I think it turned out pretty good. I don't expect there to ever be enough weight in this portion to actually be of concern that it doesn't have much support, but if I do notice sagging in the future, it can easily be supported by adding some support arms.
There will be poop-boards in place that will be counter-top height/depth, covered in lino flooring to aid in protecting the wood, and ease of cleaning. The Roosting Bars will be removable, so if in the future we decide on no chickens, we at least have countertop workspace in the shed.
I will be implementing a Brooding Space into the Coop somehow, haven't quite figured out where yet, but it'll be on the floor under one of the boards we place.
The Roof will be vented at the base and the peak through the soffit vents, and will probably get an electric fan at one point or another depending on temps inside.
As I said, it is a work in progress and we'll update as we go! Thanks for looking!
Have a couple pictures of Echo playing with the chicks as a bonus!


 and thank him for his service.

 Love your thread. Hope to see and hear more about it in the future. Signing on to the thread and hope BYC gives me notice on any updates.
