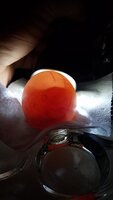
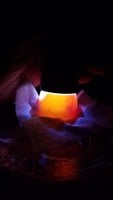
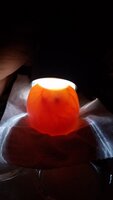
Mandarin Duck eggs in the incubator... My first time trying this.

Sgt_P

Songster
Nov 11, 2018
90
77
101
Conway, SC
I've wanted Mandarin's for a while.

Out of boredom the other day, I found myself on ebay, and bid on a couple of egg auctions.
I didn't think I was even in the ballpark, but I won both auctions.

I ran to TSC and got an incubator. Good thing, 'cause the eggs showed up two days later (13 in total).

Tomorrow is day 7, and I'm excited to do the first "official" candling!
 
Hi there this is just a tip that I tell people because it is sometimes very important...I put another thermometer ( that is calibrated ) in the bator because the incubator thermometer isn’t always right
 
Great point! I got a kitchen meat thermometer that I stick through the vent holes occasionally. And it matches the readout exactly.

But I also got an Accurite weather station that tells me temp and humidity. The temp on the Accurite-temperature is about 4 degrees lower (accurite-sensor is on the inside edge of the egg turner). And the Accurite-humidity reading is two points higher than the readout.

So I'm going with 2 out of 3 on the temp (the F.I.4250 and meat-therm that match), and splitting the difference on the Hygrometer. Assuming the Lowe's bought Accurite is probably suspect.

Any input is welcomed!
 
I'll document my journey here, and hope it all works out well!

Let me back up to receiving the Mandarin eggs...

I was all prepared (for a first timer). I studied up on this site, and youtube for quite a while.
The packages arrived about noon, and both sellers packaged them well (although different methods). I unpacked each box and kept them separate while they "rested". And I marked each egg with colored pencils (blue from one seller and red from the other). I also guessed at the gender based on egg shape to test the wives-tale. So each egg has a Number, an "O" & "X" on opposing sides, and a "m" or "f" representing my shape guess.

I'll discuss today's candling in a minute, but I should have used another colored pencil besides red (potential false positives, as the red pencil mark is the same color as candled veins).

I found varying opinions on how long to rest shipped eggs. So I put them in the incubator later that day (points down), but didn't turn on the egg turner until the next day. Again there were mixed discussions on when to start turning and misting eggs, etc. So I hope nature is stronger than any of my mistakes...

The count at the beginning:
RED: (5) M's and (2) F's
BLUE: (4) F's and (2) M's (and one of the M's has a surface crack which I gently covered with candle wax).
13 total eggs to start...

I started with the humidity on the high-side (65%-ish), assuming the shipping was taxing on the moisture content.
I've had a hard time getting the humidity to go below 50%. The incubator seems to like 55%. So some input on if I should dry out my reservoir a little more would be helpful. But my plan is to let the humidity drop through evaporation of the reservoir until it hits about 45%, and try to maintain that until just before lockdown.

I have been cooling and misting the eggs each day, but not for very long. I use 99.5-degree water in the mister. And after the day 10 candling, I plan on cooling for about 30 minutes each day then misting and back into the incubator. Again, any input is welcomed...

As for today's candling (day 7). Mixed news...

#7-Blue(m) had crack ring around the pointy end of the egg. Fortunately only a tiny bit leaked onto the egg turner and clean up was quick and easy. So I'm now down to 12 eggs.

I've got three eggs that don't look very promising (the waxed crack is in this group). There is either no visible yolk and/or the insides seem "splashy" (is that a word?) (#6-Blue(m), #1-Blue(m), and #6-Red(f))

Two are questionable. Good yolk, but no veins yet. (#5-Red(m), #2-Red(m))

And seven that have veins/growth showing! (#2-Blue(f), #3-Blue(f), #4-Blue(f), #5-Blue(f), #1-Red(f), #3-Red(m), #4-Red(m))
(However, one of the seven has the veins higher up than all the others (#4-Blue(f). Almost in the air pocket. So I'm a little worried about that one.)

Next candling is scheduled for day 10 (Saturday)...
 
Last edited:
I'll document my journey here, and hope it all works out well!

Let me back up to receiving the Mandarin eggs...

I was all prepared (for a first timer). I studied up on this site, and youtube for quite a while.
The packages arrived about noon, and both sellers packaged them well (although different methods). I unpacked each box and kept them separate while they "rested". And I marked each egg with colored pencils (blue from one seller and red from the other). I also guessed at the gender based on egg shape to test the wives-tale. So each egg has a Number, an "O" & "X" on opposing sides, and a "m" or "f" representing my shape guess.

I'll discuss today's candling in a minute, but I should have used another colored pencil besides red (potential false positives, as the red pencil mark is the same color as candled veins).

I found varying opinions on how long to rest shipped eggs. So I put them in the incubator later that day (points down), but didn't turn on the egg turner until the next day. Again there were mixed discussions on when to start turning and misting eggs, etc. So I hope nature is stronger than any of my mistakes...

The count at the beginning:
RED: (5) M's and (2) F's
BLUE: (4) F's and (2) M's (and one of the M's has a surface crack which I gently covered with candle wax).
13 total eggs to start...

I started with the humidity on the high-side (65%-ish), assuming the shipping was taxing on the moisture content.
I've had a hard time getting the humidity to go below 50%. The incubator seems to like 55%. So some input on if I should dry out my reservoir a little more would be helpful. But my plan is to let the humidity drop through evaporation of the reservoir until it hits about 45%, and try to maintain that until just before lockdown.

I have been cooling and misting the eggs each day, but not for very long. I use 99.5-degree water in the mister. And after the day 10 candling, I plan on cooling for about 30 minutes each day then misting and back into the incubator. Again, any input is welcomed...

As for today's candling (day 7). Mixed news...

#7-Blue(m) had crack ring around the pointy end of the egg. Fortunately only a tiny bit leaked onto the egg turner and clean up was quick and easy. So I'm now down to 12 eggs.

I've got three eggs that don't look very promising (the waxed crack is in this group). There is either no visible yolk and/or the insides seem "splashy" (is that a word?) (#6-Blue(m), #1-Blue(m), and #6-Red(f))

Two are questionable. Good yolk, but no veins yet. (#5-Red(m), #2-Red(m))

And seven that have veins/growth showing! (#2-Blue(f), #3-Blue(f), #4-Blue(f), #5-Blue(f), #1-Red(f), #3-Red(m), #4-Red(m))
(However, one of the seven has the veins higher up than all the others (#4-Blue(f). Almost in the air pocket. So I'm a little worried about that one.)

Next candling is scheduled for day 10 (Saturday)...
The veins on #4 Blue, is a good sign...its developing very well.
 
Thanks for that 007Sean ! That is outstanding news!!

Quick update... I candled the questionable eggs again this morning. No changes, and I decided to pull #6-Blue(m). It is the one with the small side crack from the beginning (and has the drop of wax as a repair). The air and liquid inside roll around like water throughout the egg. So it's been pulled.

It's sad to throw away such an expensive egg. Not that it's all about the money. I'm just so encouraged by the eggs that are developing. And losing one seems like a loss of potential. But in starting this, I thought having a 50% hatch rate would be a good success for me being a first timer. Looks like I'm hovering just above that so far. Fingers crossed!
 
So, yesterday was day 10...

The 7 eggs with veins continue to do well (although I think the air sack is a little small??)

No progress on the rest, so I've culled them.

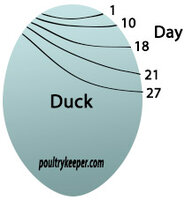
I've dropped the humidity to 35%, and will measure the airsacks with a pencil from here on.

I think I had the humidity too high to begin with. The airsacks (on day 10) look closer to the the day-1 in the diagram I go by. Hopefully keeping it a 35% for a while will get me back on track...?...

Duck-Egg-Air-Sac-Actual-Size.jpg
 
Day12: I'm a little anxious about my humidity. I've been keeping it around 35-40% lately.
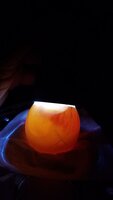
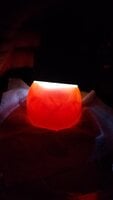
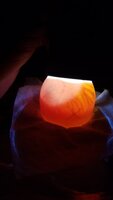
So I decided to candle today and use a green pencil to mark the air sacks.

It's a little hard to tell the progress (or lack there of), due to every egg being a different size and shape, and the growth/veins being different too. But all seem to be progressing, and I'm really hoping to see marked differences in airsacks by day 18.

Here are some pictures (if you haven't read above: red-pencil # was from one seller and blue-pencil # from another)

Also, I put the eggs upright in a holder (cushioned with tissue paper) for the pictures. Each egg is different, so I either shined the light from the top or slightly to the side. A few eggs have pronounced saddling, but the airsack were seen with the light. Any suggestions here would be great!! 200420 - Blue#2 - day12.jpg 200420 - Blue#3 - day12.jpg 200420 - Blue#4 - day12.jpg 200420 - Blue#5 - day12.jpg 200420 - Red#1 - day12.jpg 200420 - Red#3 - day12.jpg 200420 - Red#4 - day12.jpg
 
I don't want to jinx anything, but...

With two weeks to go, I'm starting to prepare the brooder.

I've got a warming plate on the way. And decided to get a seed warmer as well.

I've got to study up on foods and protein content (I think that is a sticky in the duck section). And build a feed/water station screen...

Bagged pine shavings seems convenient, but there are some horror stories out there. Maybe straw would be better??
 

New posts New threads Active threads

Back
Top Bottom