Pixelsaurus
Songster
- Apr 24, 2020
- 43
- 55
- 109
Part 2 of my Coop DeVille project….securing the chicken run, roost and poop board V 3.0 and 4.0, new hens, nesting boxes, ventilation, a spa and more.


May 4 & 5. Now that the girls have moved into the coop, the clock is ticking on securing the chicken run. I was able to get hardware cloth installed along the long side of the run and DH helped me get the door mounted using hinges we found in the garage. I wasn’t able to finish wrapping the run with hardware cloth, so I used the dog pen fencing and some bungee cords as a temporary solution.


May 6. Since we moved the girls out of the house, I started missing my little visits to the sunroom to watch the chicks. DH set up one of the security cameras in the coop. Now I can look in on the girls right from Apple TV. This is also an example of our Roost V1.0 - the milk crate with 2x2.


May 8. With the run somewhat secure, we were ready to cut a hole in the side of the coop and build a ramp. It was a little tricky to build the ramp – it still might be a little steep – but they all seemed to get the idea. We used some old paneling and scrap wood from the garage and indoor/outdoor carpet and adhesive left over from another project. DH modified a couple joist hangers to attach the ramp to the coop. For the past week we were catching the girls and carrying them into the coop one at a time. After we built the ramp, we went out around sunset and they had already figured out how to go in at night. We were surprised because we are so new to this. Amazed they just “knew” to go inside at night.

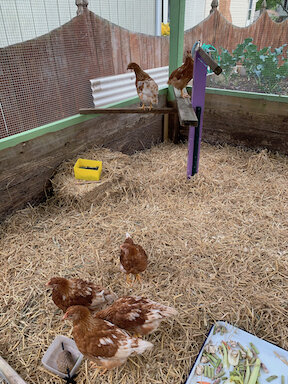
May 11-12. The run is coming along. I used straw in the part of the run with the roof. Not sure if this is how to do DLM, but thought it would be better to have the straw dry as possible. The area between the covered run and the coop was layered with sand to cut down on the mud – at least that is my thinking. I cobbled together some perches – again from scraps from the garage. (DH is happy to see all this scrap wood that was collecting in the rafters of the garage to finally find a home).

May 13. Slowly but surely, we secured the final space between the covered run and the coop (except overhead). There was some discussion about a permanent or removable panel. I thought it would be best to have the option to have a wide 4-foot opening to the run for a wheelbarrow, cart, or any other reason to need access larger than the 24” door. We are still working though scrap wood in the garage.

May 15. This is actually my third roost concept – and first one with the poop board. The first roost was just milk crates and temporary, the second was a 3-tiered stair-step design, but it was a monstrosity and didn’t work (so bad I didn’t even grab a photo of it). As I researched roosts, I really liked the concept of the poop board – just scrap everything into a bucket. I had some closet shelving brackets squirreled away under our porch and an old IKEA shelf with a slick surface I thought would be good for scraping. This works for now, but I’ll need some more roost space as the girls get bigger.

I also added screens to the two windows that open. I found scrap wood and a roll of screen in the garage rafters. I used hinges salvaged from the old playhouse windows and found two barrel locks in a drawer of misc hardware. I still don’t have a good solution for keeping the windows propped open. For now I just used a clamp attached to the handle on the window.


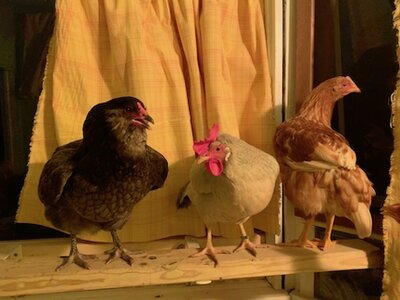
May 16. Well, I am getting a little impatient. From my calculations, it won’t be until August (late July at the earliest) for our girls to give us eggs. Plus, when I started this, I had always wanted some unique chickens like a Silkie. I started monitoring Craigslist for possible candidates. I came across a post that had a few different options. I ended up and Ameracuana (“Smokey”) and an Opal Legbar (“Bandit”) who were 19 months old. Plus, a 4-week old Frizzle something (“Gray Goose”). We set up two dog pens stacked on top of each other. It divided the coop well and allowed enough height for a roost. All the chickens can see each other, but remain separated. Ok – it isn’t a complete quarantine, but we really didn’t want to set up another chicken pen in the house.

I cobbled together some DIY nest boxes from milk crates and propped them up on a metal shelf rack.


May 18. I was having a bit of anxiety. We have a few sections of fence isn’t high enough and there is no covering between the covered run and the coop. After I found myself running around the neighborhood chasing a chicken – I felt I made a huge mistake getting these older hens too soon. Dropping a ton of money on new fencing immediately was not in our plans. My DH was amazing and talked me off the ledge. He helped me extend our fence with stakes and bird netting. It is July as I write this and the solution has worked well. We are now planning on upgrading sections of the fence in September. We also stapled netting between the run roof and coop which kept the chickens in, but not the squirrels – more on that later.


May 23-24. While it has only been a week since the new girls arrived, they are doing well. We started letting them interact with the Brownie Troop out in the yard. We broke down the separation cage in the coop. Gray Goose is still a bit small and tends to get picked on. So we setup a large dog crate with an opening just large enough for her. I also added a mirror. To this day, she spends a lot of time sitting next to the mirror. (more on that in another post).

May 25. My DH built a DIY feeder out of PVC. It worked for a bit but the feed would back up in the 90-degree elbow. It would also help to have a larger 4” pipe so the holes for the chickens can be a bit larger.

May 31. After two months of work, Coop DeVille is operating well with relatively low maintenance.

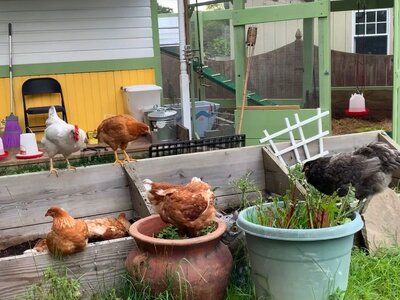
June 4. Our cold frame has become the Salad Bar at the Coop DeVille. As the plants were eaten, the girls settled in to taking dust baths.


Jun 12. We had to replace our laundry wash sink back in January and has been outside the basement door waiting for a sledgehammer - this concrete sink is stupid heavy. (Good thing we made that panel on the run removable) For drainage, I filled about 4 inches of rock before adding sand, dirt, and ash. Coop DeVille needed a spa upgrade, so now they have perfect dust bath in the run. I think I might add some towel bars for perches. DH also used a piece of roofing leftover from the run to make an awning for the coop door.


June 14 - 20. The run is looking good so I made some upgrades to the coop. I needed to make a larger roost area and poop board and raise the nesting boxes a little. First, I took the old poop board – the IKEA shelf – and mounted it on the wall to raise the nest boxes off the floor -- Nest Boxes V 2.0. I think Smokey appreciated being a little higher off the ground.


I made some curtains from a bolt of fabric I’ve had for years (originally bought for kitchen curtains until DH let me know he hated the color). I didn’t bother sewing anything, just cut and added cheap clip on rings. With a few cup hooks and more scraps and hardware from the garage -- we have curtains. Later I upgraded the rods clip on rings from IKEA ($25)

Finally, I created roost and poop board V 4.0. I expanded the roosts to go in front of all three windows. I used more of the old shelving brackets and a $20 piece of vinyl planking from the hardware store to make the poop board --Still relatively slick and easy to scrape. I found a hanging metal bin at the thrift store and hung on the wall over the nest boxes for nesting herbs. I throw a pinch or two in each box every few days.


June 21. Ventilation. I was a bit concerned about ventilation. While two of the bay windows pop open, the front windows are just Plexiglas. I came up with an idea to build louvers out of corrugated plastic (coroplast). DH had built window frames years ago but we never finished the project. I installed strips of the plastic anchored near the top of each with finish nails in one of the window frames. The nails allow the louvers to pivot. String tied to the edges of the louvers allows them to open and close when pulled. It worked, but the louvers started to warp in the sun and I wasn’t too keen on the look. Plus, I still had to add screen or wire to secure the opening and keep creatures out.
To be continued....new roost and poop board V 5.0, Squirrels, and more.
For more, see my Coop DeVille Part 1 and Coop DeVille Part 3 posts
May 4 & 5. Now that the girls have moved into the coop, the clock is ticking on securing the chicken run. I was able to get hardware cloth installed along the long side of the run and DH helped me get the door mounted using hinges we found in the garage. I wasn’t able to finish wrapping the run with hardware cloth, so I used the dog pen fencing and some bungee cords as a temporary solution.
May 6. Since we moved the girls out of the house, I started missing my little visits to the sunroom to watch the chicks. DH set up one of the security cameras in the coop. Now I can look in on the girls right from Apple TV. This is also an example of our Roost V1.0 - the milk crate with 2x2.
May 8. With the run somewhat secure, we were ready to cut a hole in the side of the coop and build a ramp. It was a little tricky to build the ramp – it still might be a little steep – but they all seemed to get the idea. We used some old paneling and scrap wood from the garage and indoor/outdoor carpet and adhesive left over from another project. DH modified a couple joist hangers to attach the ramp to the coop. For the past week we were catching the girls and carrying them into the coop one at a time. After we built the ramp, we went out around sunset and they had already figured out how to go in at night. We were surprised because we are so new to this. Amazed they just “knew” to go inside at night.
May 11-12. The run is coming along. I used straw in the part of the run with the roof. Not sure if this is how to do DLM, but thought it would be better to have the straw dry as possible. The area between the covered run and the coop was layered with sand to cut down on the mud – at least that is my thinking. I cobbled together some perches – again from scraps from the garage. (DH is happy to see all this scrap wood that was collecting in the rafters of the garage to finally find a home).
May 13. Slowly but surely, we secured the final space between the covered run and the coop (except overhead). There was some discussion about a permanent or removable panel. I thought it would be best to have the option to have a wide 4-foot opening to the run for a wheelbarrow, cart, or any other reason to need access larger than the 24” door. We are still working though scrap wood in the garage.
May 15. This is actually my third roost concept – and first one with the poop board. The first roost was just milk crates and temporary, the second was a 3-tiered stair-step design, but it was a monstrosity and didn’t work (so bad I didn’t even grab a photo of it). As I researched roosts, I really liked the concept of the poop board – just scrap everything into a bucket. I had some closet shelving brackets squirreled away under our porch and an old IKEA shelf with a slick surface I thought would be good for scraping. This works for now, but I’ll need some more roost space as the girls get bigger.
I also added screens to the two windows that open. I found scrap wood and a roll of screen in the garage rafters. I used hinges salvaged from the old playhouse windows and found two barrel locks in a drawer of misc hardware. I still don’t have a good solution for keeping the windows propped open. For now I just used a clamp attached to the handle on the window.
May 16. Well, I am getting a little impatient. From my calculations, it won’t be until August (late July at the earliest) for our girls to give us eggs. Plus, when I started this, I had always wanted some unique chickens like a Silkie. I started monitoring Craigslist for possible candidates. I came across a post that had a few different options. I ended up and Ameracuana (“Smokey”) and an Opal Legbar (“Bandit”) who were 19 months old. Plus, a 4-week old Frizzle something (“Gray Goose”). We set up two dog pens stacked on top of each other. It divided the coop well and allowed enough height for a roost. All the chickens can see each other, but remain separated. Ok – it isn’t a complete quarantine, but we really didn’t want to set up another chicken pen in the house.
I cobbled together some DIY nest boxes from milk crates and propped them up on a metal shelf rack.
May 18. I was having a bit of anxiety. We have a few sections of fence isn’t high enough and there is no covering between the covered run and the coop. After I found myself running around the neighborhood chasing a chicken – I felt I made a huge mistake getting these older hens too soon. Dropping a ton of money on new fencing immediately was not in our plans. My DH was amazing and talked me off the ledge. He helped me extend our fence with stakes and bird netting. It is July as I write this and the solution has worked well. We are now planning on upgrading sections of the fence in September. We also stapled netting between the run roof and coop which kept the chickens in, but not the squirrels – more on that later.
May 23-24. While it has only been a week since the new girls arrived, they are doing well. We started letting them interact with the Brownie Troop out in the yard. We broke down the separation cage in the coop. Gray Goose is still a bit small and tends to get picked on. So we setup a large dog crate with an opening just large enough for her. I also added a mirror. To this day, she spends a lot of time sitting next to the mirror. (more on that in another post).
May 25. My DH built a DIY feeder out of PVC. It worked for a bit but the feed would back up in the 90-degree elbow. It would also help to have a larger 4” pipe so the holes for the chickens can be a bit larger.
May 31. After two months of work, Coop DeVille is operating well with relatively low maintenance.
June 4. Our cold frame has become the Salad Bar at the Coop DeVille. As the plants were eaten, the girls settled in to taking dust baths.
Jun 12. We had to replace our laundry wash sink back in January and has been outside the basement door waiting for a sledgehammer - this concrete sink is stupid heavy. (Good thing we made that panel on the run removable) For drainage, I filled about 4 inches of rock before adding sand, dirt, and ash. Coop DeVille needed a spa upgrade, so now they have perfect dust bath in the run. I think I might add some towel bars for perches. DH also used a piece of roofing leftover from the run to make an awning for the coop door.
June 14 - 20. The run is looking good so I made some upgrades to the coop. I needed to make a larger roost area and poop board and raise the nesting boxes a little. First, I took the old poop board – the IKEA shelf – and mounted it on the wall to raise the nest boxes off the floor -- Nest Boxes V 2.0. I think Smokey appreciated being a little higher off the ground.
I made some curtains from a bolt of fabric I’ve had for years (originally bought for kitchen curtains until DH let me know he hated the color). I didn’t bother sewing anything, just cut and added cheap clip on rings. With a few cup hooks and more scraps and hardware from the garage -- we have curtains. Later I upgraded the rods clip on rings from IKEA ($25)
Finally, I created roost and poop board V 4.0. I expanded the roosts to go in front of all three windows. I used more of the old shelving brackets and a $20 piece of vinyl planking from the hardware store to make the poop board --Still relatively slick and easy to scrape. I found a hanging metal bin at the thrift store and hung on the wall over the nest boxes for nesting herbs. I throw a pinch or two in each box every few days.
June 21. Ventilation. I was a bit concerned about ventilation. While two of the bay windows pop open, the front windows are just Plexiglas. I came up with an idea to build louvers out of corrugated plastic (coroplast). DH had built window frames years ago but we never finished the project. I installed strips of the plastic anchored near the top of each with finish nails in one of the window frames. The nails allow the louvers to pivot. String tied to the edges of the louvers allows them to open and close when pulled. It worked, but the louvers started to warp in the sun and I wasn’t too keen on the look. Plus, I still had to add screen or wire to secure the opening and keep creatures out.
To be continued....new roost and poop board V 5.0, Squirrels, and more.
For more, see my Coop DeVille Part 1 and Coop DeVille Part 3 posts
Attachments
Last edited:


