Mystique175
Chirping
- Dec 29, 2019
- 35
- 132
- 89
See my coop build here and read my insanely long story below complete with pictures and jokes that were funny in my head!
Time lapse of Me building 8x8 coop- Instagram @cottonpickinchickens
Every day there is a post on chicken groups asking : “Should I build or buy a coop?”
The answer is actually more questions:
TIME:
Our first coop was prefab. We lived in town and my husband decided chickens would be awesome!! We bought chicks and suddenly the clock was ticking before they would need a coop. We ordered a prefabricated “4-6 chicken” coop from TSC for about $300. When we started putting it together, the prefab coop was smaller than expected but we were new and now committed.


MATERIAL QUALITY:
Prefabricated coops are made for convenience. They are built with ultra thin sheets of pressed board that will spilt and separate over a couple of years in the weather. The floor boards of the nesting boxes are thin and begin to warp and the walls start to separate where they are tacked together.
When you build from ground up, you can choose solid wood with 2x4’s and 4x4’s and plywood. The best part is you get to build the size and shape you want to fit your needs! (And then you get to build another one because your Chicken Math is out of control at this point)
SPACE:
Our house in town had a one car garage full of who’s it’s and what’s it’s. Sure we could do small projects but nothing long term with 2 motorcycles surrounded by “this’s and thats”.
After three years and an unruly neighbor’s dog , we decided to move out of the city to a house with a 2600 sq’ shop.
  Country fresh air causes this sudden phenomenon called Chicken Math.
  No one knows how it happens but you start with 4-6 chickens and the next day you need to build a new coop!
 AAANDDD then a couple of years later you need to build an 8x8 chicken HOUSE you call a Henitentiary.
EQUIPMENT/TOOLS:
I forgot to mention a lot of the who’s it’s and what’s it’s in our single car garage were actually tools and tool boxes. After my hubs retired he went to school to learn how to fix those 2 Harleys so he has tools that fix tools sitting on top of tools that plug into other tools...
The more projects I decided to do, the more tools I bought myself
 like a nail gun, staple gun... my own tape measure
SKILLS:
We are far from carpenters but I grew up hanging out with my daddy in his garage helping him build things. “Measure twice, cut once!”
My favorite memory was how he would pop that blue chalk line on plywood perfectly the first time to get that dark straight line. He built our house so there were so many projects from wood working to drywall to painting.
HELP:
I’m very lucky to have a husband that knows his way around tools and is supportive of my insanity. I’m also lucky he has friends with skills willing to help and a we have neighbor that will jump right in.
SO let the projects begin!!!
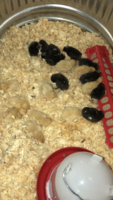
Our first coop build needed to house the 10 new Chicken Math Gold Stars and White Leghorns when the fresh country air had a few months to do its magic.


I searched groups and sites and finally found free coop plans on Home Depot.
In the middle of building the red barn coop, our new chicks were moved outside getting aquatinted with the old hens via chicken wire fence dividing the run area living in a makeshift doghouse coop

A huge winter storm was coming with insane wind and below freezing temperatures
Our now juvenile pullets took a ride on a little red wagon back into the garage.

The red barn coop served as a makeshift juvenile brooder during the winter storm with some chicken wire stapled around the bottom

Winter storm passed and we could go back to our regularly scheduled programming in the shop.


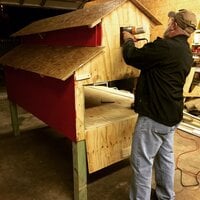
Hubs did most of the cutting and putting together and I did the painting and caulk and trim.

Plan for where your coop will end up if you don’t have the means to move something huge once it’s built!!
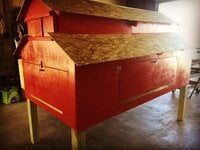
It took 3 men and a Kabota to move this red beast out of our garage into the chicken run!!
Moving the Red Barn Coop to the run! Instagram: @cottonpickinchickens
Now fast forward three years and the country Chicken Math fresh air is in full force. We need a few more chickens. We bought the house so we can build whatever we want. What better thing to build than... a chicken coop?! Time for more research on building subfloors and joists and framing walls and roof pitch/slope.
I CAN DO THIS!
What is the first thing I do? Go to TSC to buy 5-8 more pullets. What did I leave with?
Some mathing in the moment tells me I would be paying the same price for 10 fluffy balls of happiness as I would for 20 fluffy nuggets of love. (I’m pretty quick like that
 )
)

Buff Orpington and Barred Rocks it is!! And so begins the declaration to the hubs that “I’m gonna build a chicken coop”.
September 2019- Trip to Lowe’s to buy the first load of lumber!

Earlier I mentioned two of the questions was about equipment and space. Not only do you need enough room to build but you need space for the materials and a way to haul them.
Now for the build location:
The best bet was tilling the hard ground to somewhat level the area. We just bought a tiller the previous season so now it does more than garden work!
The first attempt on the subfloor was quickly changed when considering how long I expected the building to last... and termites. Originally I dug trenches in the soil for three 4x6 pressure treated beams.

The newly tilled ground was rich and you could smell the moisture. More research. Even pressure treated wood will rot in dirt over time so another trip to Lowe’s we go.
Six concrete deck blocks made it happen. This will raise the building 7” which added more questions to the build: Do I enclose the bottom so the new chickens can’t get under and lay or do I leave it open for more shade? Do I block it in the winter but open in the summer for temperature control?

(Side note on TOOLS- It took 3 purchases and 2 returns before I ended up with this Dewalt finishing nail gun. I originally bought the Paslode but the first two didn’t work. The online reviews were great, but I guess I got duds. This Dewalt is a’ight however when you get down to the last 3 nails on the string it won’t continue nailing causing a lot of wasted nails. It still got the job done but I needed therapy on my shoulder in December )
)
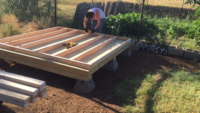
Once the 2x4’s were in place and the plywood floor nailed down, confidence about the decision to build pushed the project forward.

Next we’re framing walls! Again more search results on building information about proper 2x4 spacing for wall studs. I don’t need a permit to build so this isn’t a structure that required specific building codes but I tried to go by those standards for my own safety and the building’s integrity. Homes are built with 16” or 24“ wall stud spacing. 24” is more cost effective but 16” is sturdier. I went with sturdier because I like to do things the hard way

Next to consider was a door, window, and nesting boxes...
The plan was external nesting boxes and a window for our 100+ degree summers. Building out those wall frames was FUN I also wanted to build the door. Later you will see that didn’t happen.

The large opening on the left is for the window and the half size is for nesting boxes. Now looking back, it would have been a lot better design spacing the window and nesting box frame apart with at least one wall stud between. Too late now.
HELP:
Now I need that help. Hubs was awesome and helped hold the framed walls up to nail them together.

Next is the roof. The roof was a situation. The roof was a challenge. The roof is way more roof than I expected to build The roof was almost the end of this project.
Pitch and slope and angles and numbers and the only subject I ever failed in school was GEOMETRY! Ok that was mostly because I was lazy and boy crazy but still... This roof ended up insanely taller than I expected. I think I got a nosebleed putting on some shingles. Luckily my hubs friend did 90% of the roof for me

Now it was time to “skin” the shed. (Put the plywood on the walls) Hubs to the rescue again! Although I would have preferred to put the plywood vertical for a better caulk seal, he insisted on horizontal. He was kindly helping so I went with it.

Back to this roof that will be the death of me. At this point plywood was running out. I wouldn’t be able to push a full piece of plywood on that evil pitched roof by myself if I tried so I started using left over plywood pieces. JUST DON’T
Hubs friend came to the rescue and another trip to Lowe’s for more plywood. Not only did he help hubs put the plywood up but he made some minor building adjustments on the death trap roof to stabilize the rafters. Once they were stabilized, the building didn’t shift or ‘twist again like you did last summer.’ Then up went the full sheets of plywood, roofing felt and SHINGLES!


The door. What material can I use to build this door? Ok- just look for a door at Lowe’s instead. Do you know how much a solid wood exterior door costs?
On an Lowe’s trip I grabbed an interior door to replace the one in our bedroom. Hubs suggested using that door for the coop. It was smaller than the opening allowed but exhaustion was setting in and the coop needed a door. A bit more framing and up went the interior door. (It will be replaced in the future but it’s painted now and holding up to the elements)

This fuzzy “I think I can do it” idea has turned into a solid building!
Next is the nesting box. I wanted it external so I didn’t have to walk in the coop to collect. Guess what! Chickens can’t read design plans and lay where they want to. But, these nesting boxes were framed out and they are going in! I may not be able to Geometry but I sure made that box fit like a glove
One long piano hinge and that door swings like a dream. Future addition will be a 3” board along the floor of the nest box flush with the opening so the nesting material doesn’t jump out when opened. It tends to get stuck in the hinge and makes it difficult to close. Minor adjustments!

The first chicken door opening was a sliding door. It worked for a bit until it snowed and froze shut

A few pieces of wood and screws and a new door with a better seal!

Later, the swinging door was replaced with an automatic coop door that will be in every future coop design! (There will be more?! )
)

Next to figure out what to do for the exterior walls. Siding sounded like a solid idea but more expensive than expected. The amount you have to buy would have leave too much excess to justify the purchase.
Searching coop ideas, one had beautiful cedar shingle siding that looked like a little cottage. Lowe’s had cedar shingles! (Yes, there are concerns with cedar and bird respiratory issues. The shingles are going outside, not inside. There have been comments on other sites so let’s just leave that right there.) There was plenty of roofing felt left over to use on the exterior walls for more insulation and weather protection.


With winter coming it didn’t allow time for the window install. That will have to wait but installing before all the shingles would have been optimal!

There is ventilation above the door which still needs some type of shudders. The eaves also provide ventilation at the ceiling level.
A touch of barn red paint and some metal signs and the outside looks somewhat finished until this summer for some more modifications!

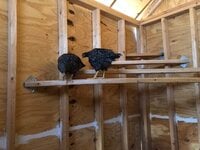
Chickens need roosts! There is still a lot to do inside but roosts were installed and empty feed bags are free insulation! (The chickens weren’t too excited about the deer corn bags when they first saw Bambi hanging upside down staring at them that first night.


I hope you enjoyed my journey. My mistakes were included so maybe it will help someone not make them!! Always remember to check for any building code requirements in your area before your start a build! Be safe while building and take your time!
Time lapse of Me building 8x8 coop- Instagram @cottonpickinchickens
Every day there is a post on chicken groups asking
: “Should I build or buy a coop?”The answer is actually more questions:
- Do you have the time to build?
- Does material quality matter to you?
- Do you have the space to build?
- Do you have the equipment/tools to build?
- Do you have the skills to build?
- Do you have help?
TIME:
Our first coop was prefab. We lived in town and my husband decided chickens would be awesome!! We bought chicks
and suddenly the clock was ticking before they would need a coop. We ordered a prefabricated “4-6 chicken” coop from TSC for about $300. When we started putting it together, the prefab coop was smaller than expected but we were new and now committed.MATERIAL QUALITY:
Prefabricated coops are made for convenience. They are built with ultra thin sheets of pressed board that will spilt and separate over a couple of years in the weather. The floor boards of the nesting boxes are thin and begin to warp and the walls start to separate where they are tacked together.
When you build from ground up, you can choose solid wood with 2x4’s and 4x4’s and plywood. The best part is you get to build the size and shape you want to fit your needs! (And then you get to build another one because your Chicken Math is out of control at this point)
SPACE:
Our house in town had a one car garage full of who’s it’s and what’s it’s. Sure we could do small projects but nothing long term with 2 motorcycles surrounded by “this’s and thats”.
After three years and an unruly neighbor’s dog
, we decided to move out of the city to a house with a 2600 sq’ shop. Country fresh air causes this sudden phenomenon called Chicken Math. No one knows how it happens but you start with 4-6 chickens and the next day you need to build a new coop!AAANDDD then a couple of years later you need to build an 8x8 chicken HOUSE you call a Henitentiary.EQUIPMENT/TOOLS:
I forgot to mention a lot of the who’s it’s and what’s it’s in our single car garage were actually tools and tool boxes. After my hubs retired he went to school to learn how to fix those 2 Harleys so he has tools that fix tools sitting on top of tools that plug into other tools...
The more projects I decided to do, the more tools I bought myself
like a nail gun, staple gun... my own tape measure SKILLS:
We are far from carpenters but I grew up hanging out with my daddy in his garage helping him build things. “Measure twice, cut once!”
My favorite memory was how he would pop that blue chalk line on plywood perfectly the first time to get that dark straight line. He built our house so there were so many projects from wood working to drywall to painting.
HELP:
I’m very lucky to have a husband that knows his way around tools and is supportive of my insanity.
I’m also lucky he has friends with skills willing to help and a we have neighbor that will jump right in.SO let the projects begin!!!
Our first coop build needed to house the 10 new Chicken Math Gold Stars and White Leghorns when the fresh country air had a few months to do its magic.
I searched groups and sites and finally found free coop plans on Home Depot.
In the middle of building the red barn coop, our new chicks were moved outside getting aquatinted with the old hens via chicken wire fence dividing the run area living in a makeshift doghouse coop
A huge winter storm was coming with insane wind and below freezing temperatures
Our now juvenile pullets took a ride on a little red wagon back into the garage.
The red barn coop served as a makeshift juvenile brooder during the winter storm with some chicken wire stapled around the bottom
Winter storm passed and we could go back to our regularly scheduled programming in the shop.
Hubs did most of the cutting and putting together and I did the painting and caulk and trim.
Plan for where your coop will end up if you don’t have the means to move something huge once it’s built!!
It took 3 men and a Kabota to move this red beast out of our garage into the chicken run!!
Moving the Red Barn Coop to the run! Instagram: @cottonpickinchickens
Now fast forward three years and the country Chicken Math fresh air is in full force. We need a few more chickens. We bought the house so we can build whatever we want. What better thing to build than... a chicken coop?!
Time for more research on building subfloors and joists and framing walls and roof pitch/slope.I CAN DO THIS!
What is the first thing I do? Go to TSC to buy 5-8 more pullets. What did I leave with?
“Ma’am, if you buy 20 or more I’ll sell them to you for half price.”
Some mathing in the moment tells me I would be paying the same price for 10 fluffy balls of happiness as I would for 20 fluffy nuggets of love. (I’m pretty quick like that
)Buff Orpington and Barred Rocks it is!! And so begins the declaration to the hubs that “I’m gonna build a chicken coop”.
September 2019- Trip to Lowe’s to buy the first load of lumber!
Earlier I mentioned two of the questions was about equipment and space. Not only do you need enough room to build but you need space for the materials and a way to haul them.
Now for the build location:
The best bet was tilling the hard ground to somewhat level the area. We just bought a tiller the previous season so now it does more than garden work!
The first attempt on the subfloor was quickly changed when considering how long I expected the building to last... and termites. Originally I dug trenches in the soil for three 4x6 pressure treated beams.
The newly tilled ground was rich and you could smell the moisture. More research. Even pressure treated wood will rot in dirt over time so another trip to Lowe’s we go.
Six concrete deck blocks made it happen. This will raise the building 7” which added more questions to the build: Do I enclose the bottom so the new chickens can’t get under and lay or do I leave it open for more shade? Do I block it in the winter but open in the summer for temperature control?
(Side note on TOOLS- It took 3 purchases and 2 returns before I ended up with this Dewalt finishing nail gun. I originally bought the Paslode but the first two didn’t work. The online reviews were great, but I guess I got duds. This Dewalt is a’ight however when you get down to the last 3 nails on the string it won’t continue nailing causing a lot of wasted nails. It still got the job done but I needed therapy on my shoulder in December
)Once the 2x4’s were in place and the plywood floor nailed down, confidence about the decision to build pushed the project forward.
Next we’re framing walls! Again more search results on building information about proper 2x4 spacing for wall studs. I don’t need a permit to build so this isn’t a structure that required specific building codes but I tried to go by those standards for my own safety and the building’s integrity. Homes are built with 16” or 24“ wall stud spacing. 24” is more cost effective but 16” is sturdier. I went with sturdier because I like to do things the hard way
Next to consider was a door, window, and nesting boxes...
The plan was external nesting boxes and a window for our 100+ degree summers. Building out those wall frames was FUN
I also wanted to build the door. Later you will see that didn’t happen.The large opening on the left is for the window and the half size is for nesting boxes. Now looking back, it would have been a lot better design spacing the window and nesting box frame apart with at least one wall stud between. Too late now.
HELP:
Now I need that help.
Hubs was awesome and helped hold the framed walls up to nail them together.Next is the roof. The roof was a situation. The roof was a challenge. The roof is way more roof than I expected to build
The roof was almost the end of this project.Pitch and slope and angles and numbers and the only subject I ever failed in school was GEOMETRY!
Ok that was mostly because I was lazy and boy crazy but still... This roof ended up insanely taller than I expected. I think I got a nosebleed putting on some shingles. Luckily my hubs friend did 90% of the roof for meNow it was time to “skin” the shed. (Put the plywood on the walls) Hubs to the rescue again! Although I would have preferred to put the plywood vertical for a better caulk seal, he insisted on horizontal. He was kindly helping so I went with it.
Back to this roof that will be the death of me. At this point plywood was running out. I wouldn’t be able to push a full piece of plywood on that evil pitched roof by myself if I tried so I started using left over plywood pieces. JUST DON’T
Hubs friend came to the rescue and another trip to Lowe’s for more plywood. Not only did he help hubs put the plywood up but he made some minor building adjustments on the death trap roof to stabilize the rafters. Once they were stabilized, the building didn’t shift or ‘twist again like you did last summer.’ Then up went the full sheets of plywood, roofing felt and SHINGLES!
The door. What material can I use to build this door? Ok- just look for a door at Lowe’s instead. Do you know how much a solid wood exterior door costs?
On an Lowe’s trip I grabbed an interior door to replace the one in our bedroom. Hubs suggested using that door for the coop. It was smaller than the opening allowed but exhaustion was setting in and the coop needed a door. A bit more framing and up went the interior door. (It will be replaced in the future but it’s painted now and holding up to the elements)
This fuzzy “I think I can do it” idea has turned into a solid building!
Next is the nesting box. I wanted it external so I didn’t have to walk in the coop to collect. Guess what! Chickens can’t read design plans and lay where they want to. But, these nesting boxes were framed out and they are going in! I may not be able to Geometry but I sure made that box fit like a glove
One long piano hinge and that door swings like a dream. Future addition will be a 3” board along the floor of the nest box flush with the opening so the nesting material doesn’t jump out when opened. It tends to get stuck in the hinge and makes it difficult to close. Minor adjustments!
The first chicken door opening was a sliding door. It worked for a bit until it snowed and froze shut
A few pieces of wood and screws and a new door with a better seal!
Later, the swinging door was replaced with an automatic coop door that will be in every future coop design! (There will be more?!
)Next to figure out what to do for the exterior walls. Siding sounded like a solid idea but more expensive than expected. The amount you have to buy would have leave too much excess to justify the purchase.
Searching coop ideas, one had beautiful cedar shingle siding that looked like a little cottage. Lowe’s had cedar shingles! (Yes, there are concerns with cedar and bird respiratory issues. The shingles are going outside, not inside. There have been comments on other sites so let’s just leave that right there.) There was plenty of roofing felt left over to use on the exterior walls for more insulation and weather protection.
With winter coming it didn’t allow time for the window install. That will have to wait but installing before all the shingles would have been optimal!
There is ventilation above the door which still needs some type of shudders. The eaves also provide ventilation at the ceiling level.
A touch of barn red paint and some metal signs and the outside looks somewhat finished until this summer for some more modifications!
Chickens need roosts! There is still a lot to do inside but roosts were installed and empty feed bags are free insulation! (The chickens weren’t too excited about the deer corn bags when they first saw Bambi hanging upside down staring at them that first night.
I hope you enjoyed my journey. My mistakes were included so maybe it will help someone not make them!! Always remember to check for any building code requirements in your area before your start a build! Be safe while building and take your time!
Attachments
-
 EE4A604D-0556-49CF-86F8-212BD3DE29BF.jpeg381.4 KB · Views: 24
 -
 8DB1AF67-B63F-47B5-A0A7-E2F495ED96AF.png2.7 MB · Views: 22
 -
 DDCB1EC7-FF60-4824-9992-A71F27EB34CF.jpeg589.9 KB · Views: 23
 -
 FEFB31F4-D241-4EF3-B689-E585C432399B.jpeg523 KB · Views: 21
 -
 8DA35C79-6C5B-4137-ABA9-BD96A6A955BF.png3.8 MB · Views: 22

