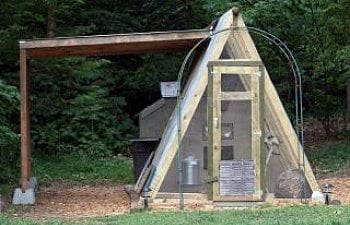
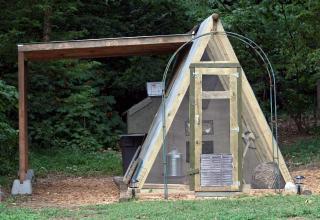
A-TOWN A-FRAME COOP: "THE PEEP SHOW"
We live in a historic area of Atlanta near the CDC. For a city, Atlanta is quite green and wooded. Our home is new, but on property that was a former dairy farm (1800's) and the site of Sherman's camp during the Civil War. I've unearthed artifacts in my flower beds. A train clacks nearby as it moves on the spur-line a few times a week. Wild turkeys nested on our deck rail for years until the coyotes took up residence in the woods along those tracks. They yodel at day break when the owls are finally quiet. A family of hawks cry out in the afternoons, their shadows slipping across the back yard as they patrol the bird feeders. Crows and Jays fuss and chase them from poplar to poplar. At dusk during the summer, cicadas begin their pulsing, rattling chorus and drown out the cricket song. At the back fence is an outhouse that belongs to the old homeplace beside the tracks left from the time this was dairy farm and not intown neighborhood. The only thing missing....some peeps!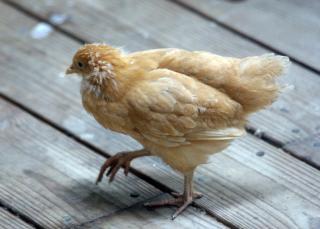
After two years of thinking and planning and looking at coops and researching birds, I asked my father to help me put up a coop. I decided on an A-frame because I liked the efficiency and the old-fashioned look of it, and I appreciated the free plan I found here (picture-linked):
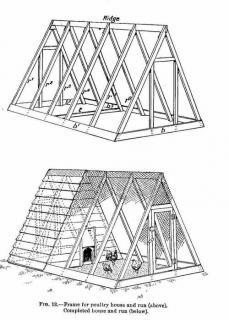
We used it as a suggestion and to determine general dimensions and construction, but we customized it based on features that seemed useful or necessary. We used 2x4s (rather than 1x4s) for the majority of the structure because I needed it to be sturdy and predator-proof, and didn't plan to move it.
The Saga Begins!
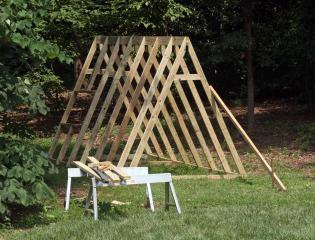
: We began by framing the base. We made it 8'x14' with metal corner braces for stability, and built it on the driveway to be sure it was square. We then moved the frame to the site in the backyard, leveled it and filled in gaps beneath the base with brick. Day 1
We spanned the 6x2 14' ridge beam across two ladders at 7 ft. (We increased the plan's vertical height to 7ft, so lengthened the rafters accordingly.)
Rafters were cut for 7 ft end height, then cut on diagonal to fit ridge, and notched out at bottom to sit atop the base frame. (Cut one set, then use as a pattern for the rest.)
We then nailed up the two sets of end rafters first at base and top of ridge, then braced them with scrap. We added the remaining rafters on center at every 24 inches so that each "bay" was 2 ft wide.
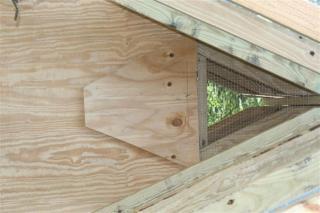
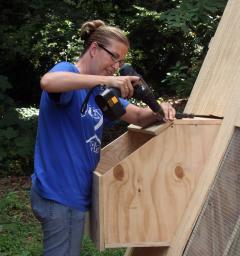
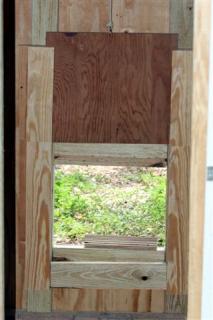
We framed in the floor of the house portion of coop by adding a 2x4 board spanning the base of rafters at the second rear bay, making the finished house dimensions 4'x8'. We cut a 18"x24" window in the side of the house section, then framed-in the space with 2x4s for an outside nest box. (A shed roof will be attached off that side to keep the box dry, provide some covered storage, and a watershed for a future rain-barrel.) Header boards were added at the top angle of each end where the screen door for run and wooden door for house will be installed at 5' high, making the door width about 18.5". Also a similar header over the pop-hole side in the run was added to account for a ventilation flap once siding is up.
We spanned the 6x2 14' ridge beam across two ladders at 7 ft. (We increased the plan's vertical height to 7ft, so lengthened the rafters accordingly.)
Rafters were cut for 7 ft end height, then cut on diagonal to fit ridge, and notched out at bottom to sit atop the base frame. (Cut one set, then use as a pattern for the rest.)
We then nailed up the two sets of end rafters first at base and top of ridge, then braced them with scrap. We added the remaining rafters on center at every 24 inches so that each "bay" was 2 ft wide.
We framed in the floor of the house portion of coop by adding a 2x4 board spanning the base of rafters at the second rear bay, making the finished house dimensions 4'x8'. We cut a 18"x24" window in the side of the house section, then framed-in the space with 2x4s for an outside nest box. (A shed roof will be attached off that side to keep the box dry, provide some covered storage, and a watershed for a future rain-barrel.) Header boards were added at the top angle of each end where the screen door for run and wooden door for house will be installed at 5' high, making the door width about 18.5". Also a similar header over the pop-hole side in the run was added to account for a ventilation flap once siding is up.
View of the framed structure from run side that faces our house.
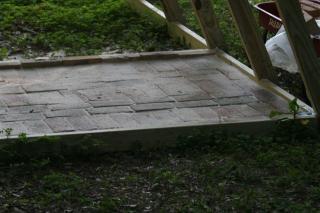
: I spent several hours laying a brick paver floor in the house. Used leveled sand as a bed, brushed sand into the cracks of finished floor, then pushed excess into run area. (Now a favorite dusting area!)Day 2

We framed in the doors (angles are a little tricky, but it works to hold board to be sawed against the cross board, trace angle, then saw.) There is a door on each end: a wooden one for the house and a screened one for the runDays 3-5: . We also framed the pop-hole area and added studs to attach the siding to.
We trenched around the base 12" deep and wide, then attached the hardware cloth.We used most of a 100ft roll of 48" wide wire with 1/2" weave. (Perfect dimensions for our 2ft bays.) To install, we rolled out enough wire to cover both sides of the run plus another 48" to toe-out and bury. (Each panel covers two bays.) We then folded the panel end-to-end and creased it midway, hung it over the ridge and used a 2x4 block to pound it flat against the beam. We attached it to the ridge and along each rafter with heavy duty poultry nails. Then we began the siding.
We used T111 for ease of installation, plus the dimensions are perfect for this coop with very little waste. The trick on the cut-outs (door, nest box, pop hole) is to hold the board up and trace the cut pattern. (Make sure it is perfectly centered.) We loved that the cut-aways from the top of the board when flipped, perfectly cover the angles at the bottom. (Geometry at work in your life.) Added studs to the walls at seams for strength. You can see that we also cut the top angles off over the door and pop hole walls at center of our header-boards, and covered with harware cloth for ventilation. We saved them to attach as hinged flaps that close in winter.

We framed in the doors (angles are a little tricky, but it works to hold board to be sawed against the cross board, trace angle, then saw.) There is a door on each end: a wooden one for the house and a screened one for the runDays 3-5: . We also framed the pop-hole area and added studs to attach the siding to.
We trenched around the base 12" deep and wide, then attached the hardware cloth.We used most of a 100ft roll of 48" wide wire with 1/2" weave. (Perfect dimensions for our 2ft bays.) To install, we rolled out enough wire to cover both sides of the run plus another 48" to toe-out and bury. (Each panel covers two bays.) We then folded the panel end-to-end and creased it midway, hung it over the ridge and used a 2x4 block to pound it flat against the beam. We attached it to the ridge and along each rafter with heavy duty poultry nails. Then we began the siding.
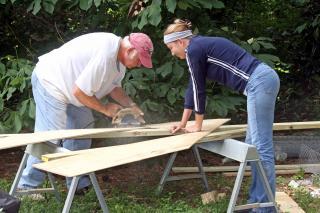
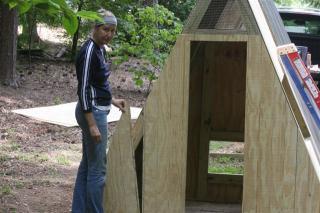
We used T111 for ease of installation, plus the dimensions are perfect for this coop with very little waste. The trick on the cut-outs (door, nest box, pop hole) is to hold the board up and trace the cut pattern. (Make sure it is perfectly centered.) We loved that the cut-aways from the top of the board when flipped, perfectly cover the angles at the bottom. (Geometry at work in your life.) Added studs to the walls at seams for strength. You can see that we also cut the top angles off over the door and pop hole walls at center of our header-boards, and covered with harware cloth for ventilation. We saved them to attach as hinged flaps that close in winter.
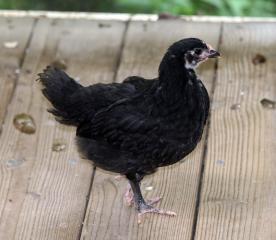
In the meantime, someone offered me several 4 week old pullets in the breeds I wanted. Of course I picked them up and put them on the back screened porch...which quickly became a big messy birdcage. They are awfully cute to watch while drinking coffee! But I'm motivated to work faster.
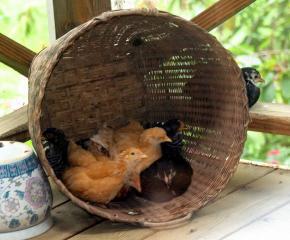
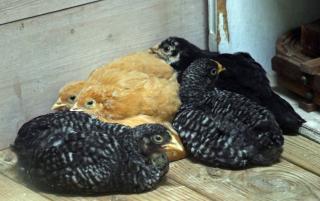
Ava, Rita, Lana, Hedy, Bettie, Sally(RIP-hawk), & Mae.
 ays 6-8 We construct and install the doors. We gave them a 2" overlap on the 18' opening, then trimmed around them with 1x2 so that there are no gaps. I am paranoid about predation, so put 3 latches on each door.
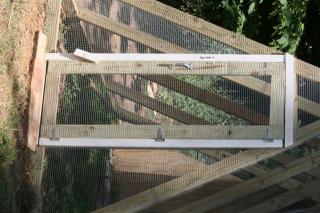

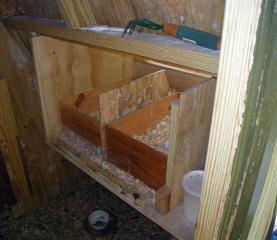
Dear dad and I have a disagreement about nest box construction. He leaves in frustration, so I decide to forge ahead on my own. I basically built a sturdy box out of 3/4" cabinet quality ply and slid it into the window we'd left open on the side, and attached each panel to the studs with wood screws. The top of the box is flush with the header inside, but due to the angled sides, it sticks out a little inside the coop at the bottom and quite a bit outside. It's ok because it leaves all the floor space available for the chickens. I caulked the seams, weatherstriped, and flashed the top where it meets the wall using roofing screws with rubber gaskets. (It will be covered by a shed later, so should stay dry.)
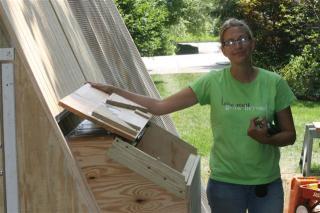
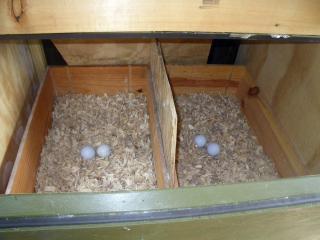
I found that two wooden wine crates sitting side by side inside the box work perfectly as separate nests, and can be removed for easy cleaning. Plus they look very nice.
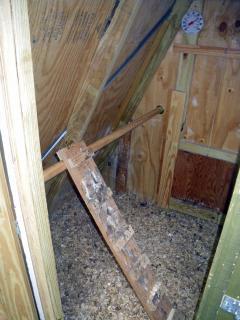
Days 9-10:Home stretch! We constructed the pop door to slide up on a track inside the house.We used a 1/2" piece of good quality plywood to fit the 12x14" opening, construct the track from 1x4s set atop 1x2s. We attach an eye-bolt to the center top of the door, another eye bolt directly above it in a cross board, then drill a hole in the siding at 90 degrees from the 2nd bolt. A length of synthetic marine lacing is tied to the door bolt, threaded through the eye above it and out of the drilled hole (finished with a brass grommet.) A cleat attached on the wall outside just below the grommet allows us to tie-off the raised door to keep it open.
There is overlap at the bottom to keep predators from prying or pushing it open.Just make sure you make the track at least 1.5x taller than your door to keep it stable and in the groove when you open it.
We finished the siding gaps at the ridge by installing a plastic ridge vent to cover it. Dear son and his buddy painted the outside using exterior left from our house. I installed roosts in the run and the house, hung the water and food outside, put litter inside and the chickens left the back porch for good!
We waited a week or so, then tackled the shed roof addition. It consisted of adding a 1x2 ledger board below the ridge vent on one side. We made it 8 ft long to cover the nest box and part of the outside run on the side with the food and water. We attached metal rafter hangers to the ledger board every 20" and stood two landscape timbers on end in prefab concrete bases about 7 feet away from the ledger board. We attached a 3-sided frame (built in the driveway) to the outside hangers and two posts, then filled in the remaining rafters. We covered it with corrugated aluminum panels attached with rubber gasket roofing screws. After some heavy rain, I can say it keeps the nest box dry and part of the run as well.

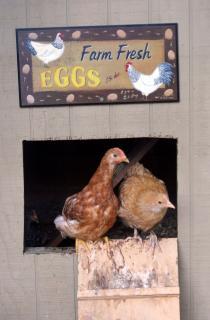
Peeps now showing!
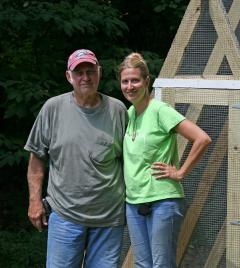
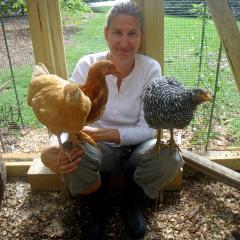
Thanks Dad! Now for some appreciation from the girls... a few fresh eggs?
Note: I didn't have a lot of recyclable materials other than the shed timbers, brick, paint, and a little bit of wood. Total cost for the coop was around $500. Hardware cloth was around $150 of the total, but worth it. Shed addition cost $70.
Things to add: A gutter on the front edge of the shed leading to a rain-barrel for water. A window would probably be nice, but it would have to be something like a small skylight because of the sloping sides. It would be good to have a cabinet under the nest box inside, but I ended up putting a small waterer and feeder there. A run on the back so the girls can forage a new area and allow the front run to recover a bit.
What I'd do differently: Attach the hardware cloth with wood screws and fender washers. More expensive, but I think it's a great looking system and would make repairs easier. Also allows for expansion and contraction of wood a little better because it has some leeway at the attachment.