Input on homemade incubator PLEEEASE

fantastic4

In the Brooder
7 Years
Apr 6, 2012
30
1
24
Here is my thoughts but I need input from some folks that have actually had success.
I have an LG, PC fan, and turner.

I am thinking...
disassemble LG
Take utility sink, build box to set it in and insulate the area b/w sink and box with "Great Stuff" insulating foam.
Use the bottom of the LG in the bottom of the sink
I haven't thought too much into the Lid but use the heating elem and thermostat off the LG top to regulate the "Sink" heat
I think this would be big and deep enough to use a bigger fan or multiple PC fans. Is bigger better or is multiple better?
Line walls with Sham Wow or whatever those super absorb cloths are for increased humidity during lock down
Put vent holes where h2o can be dripped down onto cloth walls

I just had a 100% failure after baby-ing that %^&* LG for 25 days. Temp erratic, humidity...shoot I was consumed in temp crazies to even attempt to regulate humidity accurately. I did increase at end but IDK to what, enough to produce condensation. I am just crushed and disillusioned and think I can to better than the LG.
 
To be perfectly honest, the failure point of the LG is the thermostat. One little bump, and it will cause the temps to fluctuate WILDLY and that is in the little If it was me I would ditch the LG Thermostat. Secondly.. don't worry about humidity soo much. It is easy to raise humidity at the end, but what you want to do is build stability in temps first, then stability in humidity. Also All of my home brew incubators I make circulated. Forget the still air approach and go with a fan.

Uses for the LG.. 1 presentation to folks on what type of incubator that they SHOULDN'T buy, 2. Target Practice, 3 Trot Line Marker.


My basic materials I use for incubators:

Insulated box.. Your sink approach sounds cool. Cheaper solution.. Pet stores get their fish in these HUGE Styrofoam boxes. Even cheaper.. broke dorm room fridge.

Thermostat -- Use a upper electric hot water heater thermostat. EXTREAMLY reliable. There is a cool mod out there some where that will allow you to shorten the temp variance. But in it's manufactured state it will swing between 101-99 which is where you need.

Here is the mod

Fan.. YES!!! must have.. I like old PC fans, old power supply fans.. just about anything that is used and boxed shaped.

Heat source.. Light blubs, the element out of the LG, thermal wire.

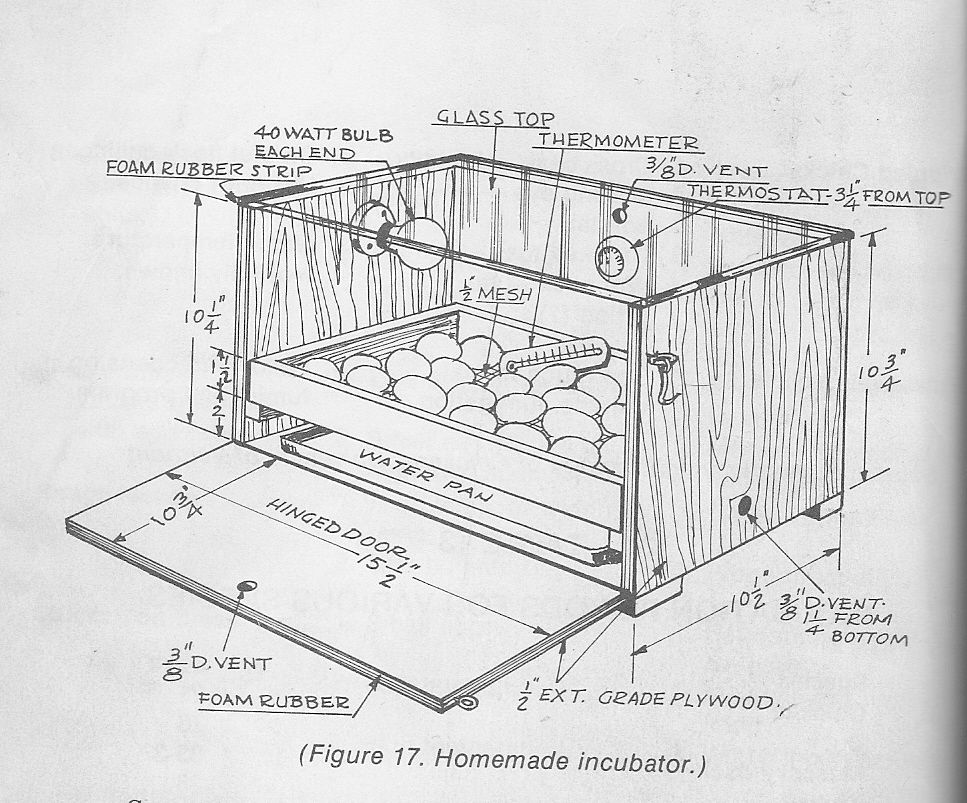
Here is an example of my first home brew incubator that I found a drawing of. I did add a fan.


Vent holes.. I drill 4 1/2 - 2" holes depending on space. Two on bottom side, two on top side. I cover them with a square of sheet metal with one hole drilled in one corner and a screw mounting it to the side of the box. I can open or shut as needed.


My latest home brew incubator uses 2 fans, 1 75 watt light blub, and has 78 developing eggs. This is my second hatch with it. I'm posting the video below.
 
Last edited:
thanks! for some ideas! Looks like you have a pretty neat set up :) Im just still chewing on ideas :)
 
I am saving my money for an incubator, so I don't have any words of wisdom... But I want to commend you for trying to build one!! That is scarier to me than building a chicken coop.
duc.gif
Good luck!!
 
did you happen to get that incubator idea rom storeys giude to raising poultry? i was just looking throught that book and saw that lol

To be perfectly honest, the failure point of the LG is the thermostat. One little bump, and it will cause the temps to fluctuate WILDLY and that is in the little If it was me I would ditch the LG Thermostat. Secondly.. don't worry about humidity soo much. It is easy to raise humidity at the end, but what you want to do is build stability in temps first, then stability in humidity. Also All of my home brew incubators I make circulated. Forget the still air approach and go with a fan.

Uses for the LG.. 1 presentation to folks on what type of incubator that they SHOULDN'T buy, 2. Target Practice, 3 Trot Line Marker.


My basic materials I use for incubators:

Insulated box.. Your sink approach sounds cool. Cheaper solution.. Pet stores get their fish in these HUGE Styrofoam boxes. Even cheaper.. broke dorm room fridge.

Thermostat -- Use a upper electric hot water heater thermostat. EXTREAMLY reliable. There is a cool mod out there some where that will allow you to shorten the temp variance. But in it's manufactured state it will swing between 101-99 which is where you need.

Here is the mod

Fan.. YES!!! must have.. I like old PC fans, old power supply fans.. just about anything that is used and boxed shaped.

Heat source.. Light blubs, the element out of the LG, thermal wire.

Here is an example of my first home brew incubator that I found a drawing of. I did add a fan.


Vent holes.. I drill 4 1/2 - 2" holes depending on space. Two on bottom side, two on top side. I cover them with a square of sheet metal with one hole drilled in one corner and a screw mounting it to the side of the box. I can open or shut as needed.


My latest home brew incubator uses 2 fans, 1 75 watt light blub, and has 78 developing eggs. This is my second hatch with it. I'm posting the video below.
 
Lol.. Yes.. When I first started raising chickens again my friend down the road hatch my first clutch. That was the incubator she had and the book. It was my first build, simple yet effective!

Joe
 
I would keep the sink and line the walls with 1" styro foam. Glue it, or cut it to fit.

Keep the bottom of the LG, and place it in the sink for the egg turner to rest on, and for the eggs to hatch on.

Find a piece of Plexi Glass that is 1/2 inch thick. Use it as the lid for the top of the sink.

Place 2 PC fans on the lid of the incubator side by side in the center of the lid.

Keep the heating element from the LG, and discard the thermostat, and the styro foam lid. (unless you want to keep the 2 windows for another project)

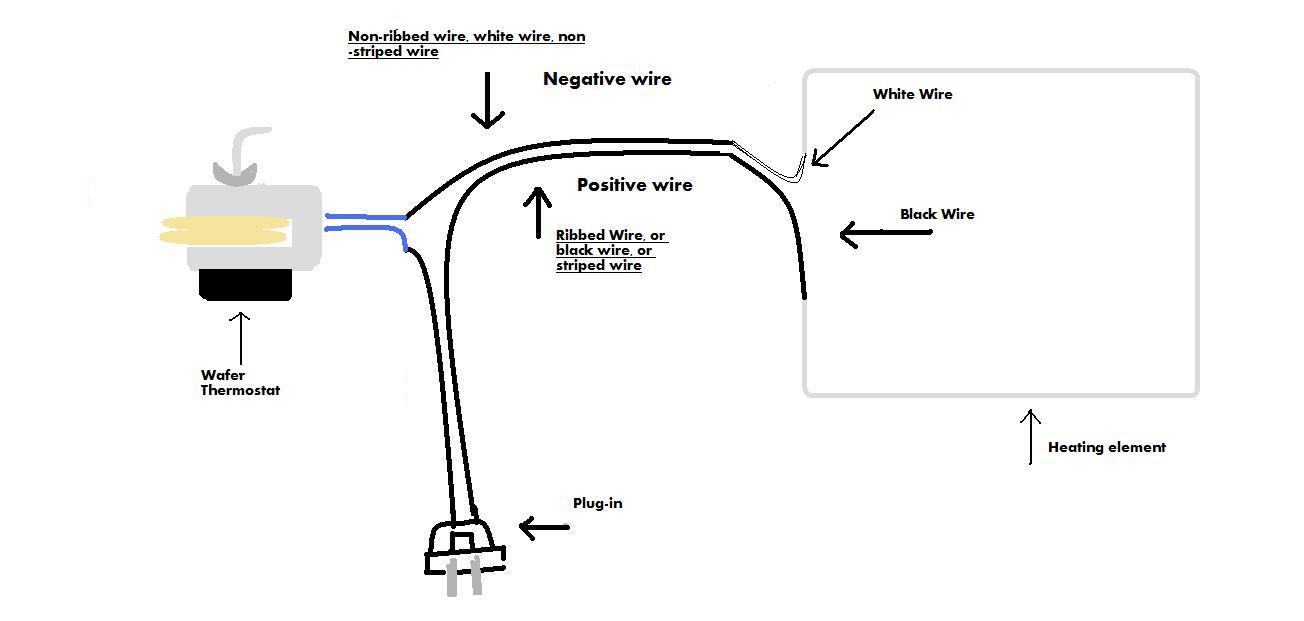
Invest in a wafer thermostat. They are about 30-35 Dollars with shipping included.

Wire it like this diagram I made for you.


And the thermostat should be placed about 2-3 inches from the heating element as shown in this picture.


Good luck! Hope this helps.
 
we just bought our place after renting here for 3 years. there was/is a huge place where previous tenants used to burn...everything. i dug and sorted this burned mess for months and took the scrap metal and turned it in and got $100 so i went and got the LG. We have 4 boys under 6 and one income so i try not to take $ out of our house for my little projects and that was 2 fold get my $ and clean up the mess. well needless to say I worked hard for that thing to "fail". I got a hygrometer/thermometer that is digital last night. Im thinking digital will be easier and more accurate. Anyone have thoughts on that?

To the lady above saving... I was terrified of building my own but once I got the LG and saw it is simple really I know I can make something better than that. So my mistake was going with the cheaper most readily ava. one.
 
A lot of the digital[FONT=Verdana, Arial, Helvetica, sans-serif] thermometers are plus or minus 1 degree C. To me that is a big variance and way to sloppy. A better question is: Is accuracy of plus or minus 1 degree C important for hatching? I'm new to chickens and will leave that to others. I did notice that the digital thermometers used to measure the temp in humans are usually a much more acceptable plus or minus 0.1 degree. [/FONT]
 
I know this may only work with a limited number of homemade incubators like mine, but I've managed to even out temp variations. Initially trying out my setup I had 2 degree plus or minus- a 4 degree spread. My incubator was a large foam container with a light bulb and water heater thermostat near it on one end, a small fan circulating the air around, and on the other end the egg tray.

I took some aluminum foil, folded it over double, and made an open ended "tent" over the light bulb/thermostat area. This allowed the the thermostat to cycle with out bring the egg area to the highs and lows that are in the "tent". With this set up I keep it down to about a 1 degree spread. The only drawback I see is that it takes longer to initially heat it up.

Maybe this might help a hand full of people who have built or who plan on building a setup similar to mine. I'd post pics but it's full of eggs right now.
 

New posts New threads Active threads

Back
Top Bottom