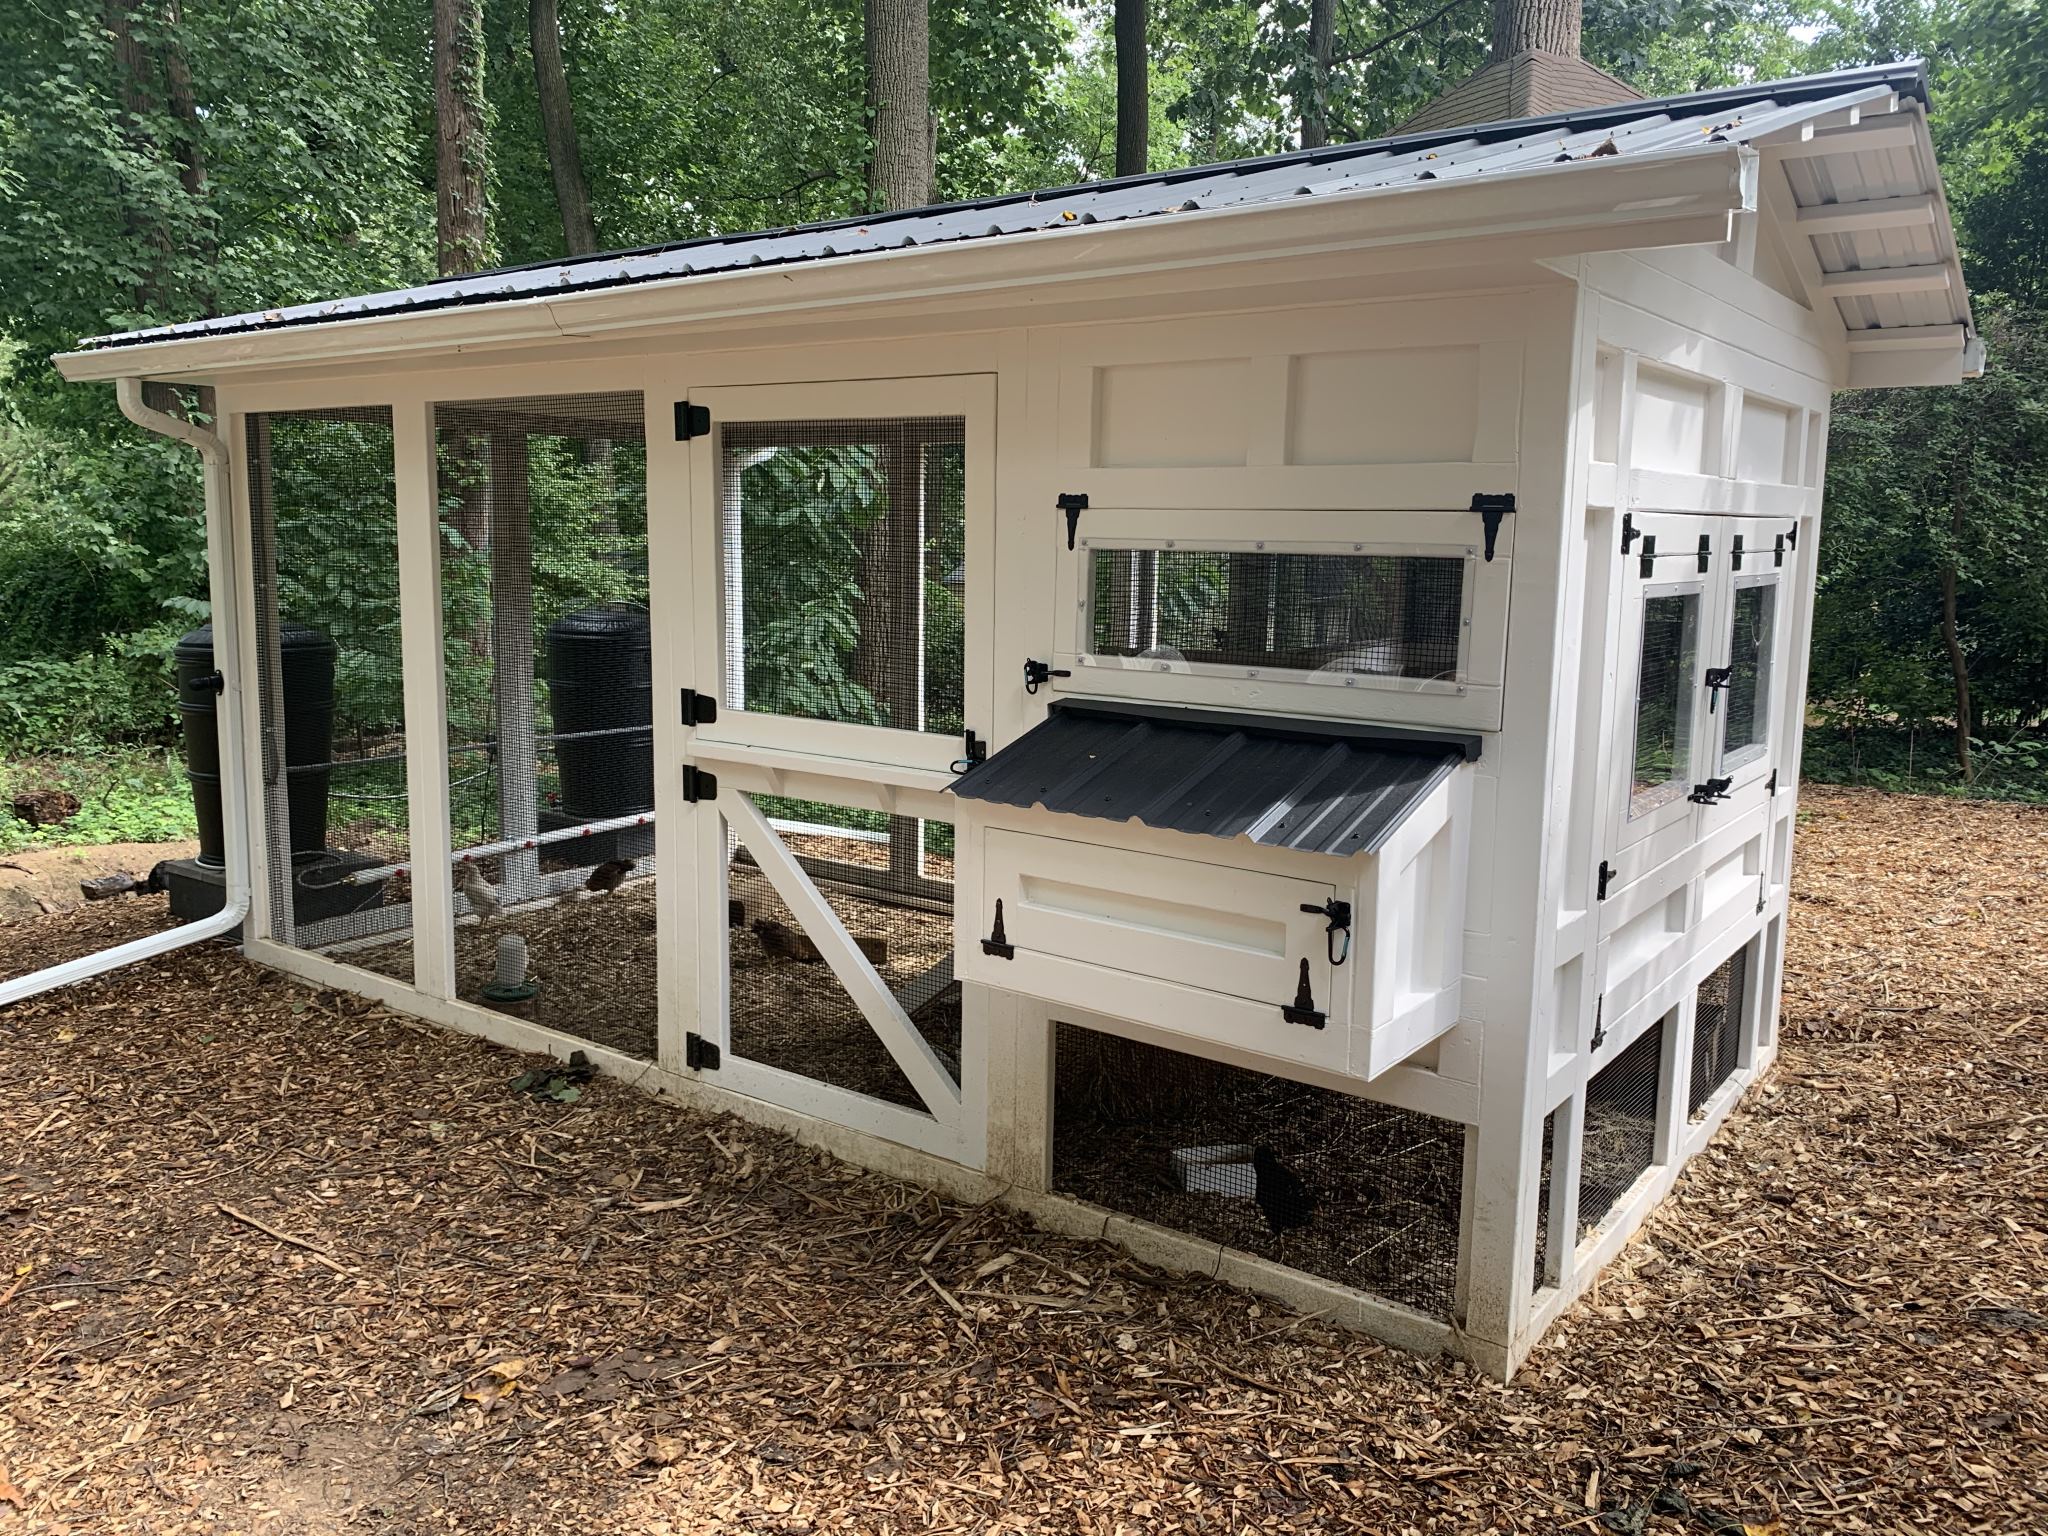
Here's mine! It's been a ton of work, but a fun project!
TL;DR, Wanted to buy a coop from carolinacoops.com, but they were backlogged. Decided to try building my own and that gave me the opportunity for tweaks to make this coop my own. I didn't end up saving any money (still cost about $5000 in materials + a lot of time), but I love it and think it turned out great!
The long story:
We had wanted to get backyard chickens for a long time. I'm sure like so many other people, the pandemic finally gave us the kick in the pants that we needed to do it! So, I started getting my plans and inspiration together and ran across the carolina coops videos on youtube. I got pretty sucked in and a lot of the information they provided made perfect sense to me, so I decided that is what I wanted to do. I went to their website, looked at the pricing and my eyes popped out of my head. Then as I started looking into their offerings and pricing it out on my own, it just made sense to buy one of their coops. They just do it "right". Somehow I was able to convince my wife that was the right way to move forward, so we reached out to carolinacoops.com and placed an order for their American Coop. Well, once the order was placed, they said that because of the demand and the difficulty getting materials, they wouldn't be able to start thinking about fulfilling the order for at least 6 months. That wasn't going to work for us. However, one thing they say often in their videos is that "if you don't buy a coop from us, at least learn to build one like us". There was no way I was going to wait that long and miss out on getting chicks this year, so build my own it was.
I haven't had much experience building anything on this scale before, but my sister is incredibly handy and my dad has built every home he's ever lived in, so even though they live across the country, they gave me the encouragement to tackle this project on my own.
I saw that Crowber on this site had done an amazing job building a carolina coops-esque coop and reached out to her for some advice. She was super helpful in providing some measurements and gave me some lessons learned from building her coop.
Using that as a starting point I started really doing a deep dive into every carolina coops video on youtube to help get a mental picture of the construction process. My intent was to do everything I could to build exactly what they had built. They do a good job on their website for listing out what materials they use and it was pretty easy for my to put together a parts list from Home Depot. I was able to buy just about everything from there (with a few notable exceptions).
As I begin the planning process though, I realized that the entry door was going to be annoying to walk through. I've over 6 feet tall and even though I could stand up inside the coop with no problems, I really wanted to have a standard door height (80 inches), so I wouldn't have to duck to walk in.
Well, that decision started a cascade and so I took that as an opportunity to look at everything. I decided that I wanted to minimize scrap as much as possible, so rather than 6 foot walls, why not make them 8 feet so I could use the full length of the wood.
We were planning on ordering 10 baby chicks, so at a rule of 10 square feet per chicken, I needed to have at least 100 square feet in the coop. I decided that my footprint for the coop would be 8' x 16' which would give me a footprint of 128 square feet so I had a little wiggle room. Also, with a rule of 1' of roosting bar width per chicken, two roosting bars at 8 feet wide would give me enough for 16 chickens if I wanted to add more (assuming that I let them predominantly free range). I found some custom carolina coop photos of an 8' wide coop, and adjusted my plans accordingly.
Once I had my plans finalized I started construction in my garage. My plan was that if I had bought a kit from carolinacoops.com, what would they deliver to me? Basically I built each wall individually and would try to do an assembly like they show in this video:
After placing an order at Home Depot for all my materials, I stored them on my porch and build the frame in my garage. Building my first "wall" was a big day.

I just followed that process for building each of the walls.

Once all the walls and trusses were built, it was assembly time!

Rather than having the structure be freestanding, I decided that I wanted to anchor it in the ground with some pressure treated 4x4 posts. We do occasionally get hurricane force winds here in Maryland, and I would rather be safe than sorry.
We attached the 4x4 posts to the walls of the run and underneath the floor of the henhouse for extra support. I originally was going to do 6 4x4 posts (one in each corner and two in the middle), but I decided to cut two of the posts in half to have 4 posts underneath the hen house floor because finding another couple 4x4 pressure treated posts was really difficult at this point due to everything being out of stock out here.
After the sticks were all assembled, we started painting.


After that it was time to assemble the roof. The galvalume roofing from Home Depot got cancelled on my, so I was lucky enough to find a manufacturer in PA (AB Martin) that provided a better sheet roof for nearly the same price and they had it in stock. While I was up there I also picked up all the gutter materials I needed.

I also wanted to make full use of the roof for rain collection. I think that was probably overkill, but I wanted to keep water away from the ground around the coop as much as possible, so I decided to add trim and gutters to both sides of the coop. We have a bunch of snakes around here too, so I wanted to not risk having any snake surprises, so we put some extra work into securing the openings around the roof and the nesting boxes while still trying to allow for proper ventilation with a proper ridge vent.
I also was planning on just building one egg hutch/nesting box, but it looked unbalanced, so I added on for both sides and I think it looks a lot better. There isn't an opening from the other nesting box into the hen house at the moment, and we're probably just going to use it for some storage or something unless we find that we need to open it up. We added some weed tarp under the predator apron to help with any weeds that might grow nearby and then threw wood chips all over the place.


I dug a trench from our main house out to the coop and got an electrician friend of mine to come out and help we wire up power to the coop. I'm using rain barrels as the primary water source for our chickens, and my plan is to add heating elements and pumps to the rain barrels in the winter so they don't freeze.
I've got them setup in series so the barrels stay at the same water level and when the pumps are on it flows from one barrel to the other to the water bar in series so water is always flowing, heated, and nothing freezes.... in theory")

My plan was to build a frame for the water barrels to sit on and attach power, hoses, etc. but lumber is STILL hard to come by and everyone was out of stock at my nearby stores, so I've got the rain barrels just sitting on these cinder blocks for now. I'll build a proper frame to attach everything once I have time and lumber stocks have sorted themselves out again.
This was a big project for me, and from planning, design, and construction, it took me almost 3 months to do in my spare time. We received our chicks about 6 weeks ago and we finally got them out of our house and living in their new home this week! It's been pretty satisfying seeing them play in the run during the day and go up to sleep on the roost bars at night. We're working on building up enough courage to let them free range. I'd like to put at least a few more predator deterrents in place and let them get a little bigger before just letting them out, but it feels really good that we're finally to this point! Our chickens seem to love it!


I'm pretty sure I didn't save any money in this process, definitely if you factor in all the time I spent. I calculated that I spent about $5000 in materials and I don't even want to think about how much my time would have cost. However, I'm very pleased with the outcome and think that it's even better than what I would have got if I had just been able to order one from Carolina Coops.
Well, congrats for reading this whole thing! Hit me up if you have any questions, but I hope that this gives some good info to anyone that is thinking about doing this on their own!
TL;DR, Wanted to buy a coop from carolinacoops.com, but they were backlogged. Decided to try building my own and that gave me the opportunity for tweaks to make this coop my own. I didn't end up saving any money (still cost about $5000 in materials + a lot of time), but I love it and think it turned out great!
The long story:
We had wanted to get backyard chickens for a long time. I'm sure like so many other people, the pandemic finally gave us the kick in the pants that we needed to do it! So, I started getting my plans and inspiration together and ran across the carolina coops videos on youtube. I got pretty sucked in and a lot of the information they provided made perfect sense to me, so I decided that is what I wanted to do. I went to their website, looked at the pricing and my eyes popped out of my head. Then as I started looking into their offerings and pricing it out on my own, it just made sense to buy one of their coops. They just do it "right". Somehow I was able to convince my wife that was the right way to move forward, so we reached out to carolinacoops.com and placed an order for their American Coop. Well, once the order was placed, they said that because of the demand and the difficulty getting materials, they wouldn't be able to start thinking about fulfilling the order for at least 6 months. That wasn't going to work for us. However, one thing they say often in their videos is that "if you don't buy a coop from us, at least learn to build one like us". There was no way I was going to wait that long and miss out on getting chicks this year, so build my own it was.
I haven't had much experience building anything on this scale before, but my sister is incredibly handy and my dad has built every home he's ever lived in, so even though they live across the country, they gave me the encouragement to tackle this project on my own.
I saw that Crowber on this site had done an amazing job building a carolina coops-esque coop and reached out to her for some advice. She was super helpful in providing some measurements and gave me some lessons learned from building her coop.
Using that as a starting point I started really doing a deep dive into every carolina coops video on youtube to help get a mental picture of the construction process. My intent was to do everything I could to build exactly what they had built. They do a good job on their website for listing out what materials they use and it was pretty easy for my to put together a parts list from Home Depot. I was able to buy just about everything from there (with a few notable exceptions).
As I begin the planning process though, I realized that the entry door was going to be annoying to walk through. I've over 6 feet tall and even though I could stand up inside the coop with no problems, I really wanted to have a standard door height (80 inches), so I wouldn't have to duck to walk in.
Well, that decision started a cascade and so I took that as an opportunity to look at everything. I decided that I wanted to minimize scrap as much as possible, so rather than 6 foot walls, why not make them 8 feet so I could use the full length of the wood.
We were planning on ordering 10 baby chicks, so at a rule of 10 square feet per chicken, I needed to have at least 100 square feet in the coop. I decided that my footprint for the coop would be 8' x 16' which would give me a footprint of 128 square feet so I had a little wiggle room. Also, with a rule of 1' of roosting bar width per chicken, two roosting bars at 8 feet wide would give me enough for 16 chickens if I wanted to add more (assuming that I let them predominantly free range). I found some custom carolina coop photos of an 8' wide coop, and adjusted my plans accordingly.
Once I had my plans finalized I started construction in my garage. My plan was that if I had bought a kit from carolinacoops.com, what would they deliver to me? Basically I built each wall individually and would try to do an assembly like they show in this video:
After placing an order at Home Depot for all my materials, I stored them on my porch and build the frame in my garage. Building my first "wall" was a big day.
I just followed that process for building each of the walls.
Once all the walls and trusses were built, it was assembly time!
Rather than having the structure be freestanding, I decided that I wanted to anchor it in the ground with some pressure treated 4x4 posts. We do occasionally get hurricane force winds here in Maryland, and I would rather be safe than sorry.
We attached the 4x4 posts to the walls of the run and underneath the floor of the henhouse for extra support. I originally was going to do 6 4x4 posts (one in each corner and two in the middle), but I decided to cut two of the posts in half to have 4 posts underneath the hen house floor because finding another couple 4x4 pressure treated posts was really difficult at this point due to everything being out of stock out here.
After the sticks were all assembled, we started painting.
After that it was time to assemble the roof. The galvalume roofing from Home Depot got cancelled on my, so I was lucky enough to find a manufacturer in PA (AB Martin) that provided a better sheet roof for nearly the same price and they had it in stock. While I was up there I also picked up all the gutter materials I needed.
I also wanted to make full use of the roof for rain collection. I think that was probably overkill, but I wanted to keep water away from the ground around the coop as much as possible, so I decided to add trim and gutters to both sides of the coop. We have a bunch of snakes around here too, so I wanted to not risk having any snake surprises, so we put some extra work into securing the openings around the roof and the nesting boxes while still trying to allow for proper ventilation with a proper ridge vent.
I also was planning on just building one egg hutch/nesting box, but it looked unbalanced, so I added on for both sides and I think it looks a lot better. There isn't an opening from the other nesting box into the hen house at the moment, and we're probably just going to use it for some storage or something unless we find that we need to open it up. We added some weed tarp under the predator apron to help with any weeds that might grow nearby and then threw wood chips all over the place.
I dug a trench from our main house out to the coop and got an electrician friend of mine to come out and help we wire up power to the coop. I'm using rain barrels as the primary water source for our chickens, and my plan is to add heating elements and pumps to the rain barrels in the winter so they don't freeze.
I've got them setup in series so the barrels stay at the same water level and when the pumps are on it flows from one barrel to the other to the water bar in series so water is always flowing, heated, and nothing freezes.... in theory
My plan was to build a frame for the water barrels to sit on and attach power, hoses, etc. but lumber is STILL hard to come by and everyone was out of stock at my nearby stores, so I've got the rain barrels just sitting on these cinder blocks for now. I'll build a proper frame to attach everything once I have time and lumber stocks have sorted themselves out again.
This was a big project for me, and from planning, design, and construction, it took me almost 3 months to do in my spare time. We received our chicks about 6 weeks ago and we finally got them out of our house and living in their new home this week! It's been pretty satisfying seeing them play in the run during the day and go up to sleep on the roost bars at night. We're working on building up enough courage to let them free range. I'd like to put at least a few more predator deterrents in place and let them get a little bigger before just letting them out, but it feels really good that we're finally to this point! Our chickens seem to love it!
I'm pretty sure I didn't save any money in this process, definitely if you factor in all the time I spent. I calculated that I spent about $5000 in materials and I don't even want to think about how much my time would have cost. However, I'm very pleased with the outcome and think that it's even better than what I would have got if I had just been able to order one from Carolina Coops.
Well, congrats for reading this whole thing! Hit me up if you have any questions, but I hope that this gives some good info to anyone that is thinking about doing this on their own!
