RedRaptor13
In the Brooder
I had promised a few folks I would post pics of the new winter coop we just finished, and I wanted to share.
My goal was to build a winter coop for around 20 chickens for $200 or less. We had collected a lot of dumpster dives over the years, and almost everything we had went into it.

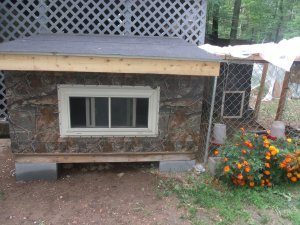
A view of the front. We had almost everything except some lumber, the walls and the hardware. We picked up this camo board from Home Depot. It was on sale for around $10/sheet. I believe we purchased 12 sheets in total for this project.

The view from the side. Apologies for the muddy construction site. We'll be working on seeding that soon. The cinder blocks were also purchased, but the base is actually an old bed frame boxspring from a bed we got rid of. Got rid of the mattress but used the box spring as the base. You can see it here. The window was a dumpster dive my brother got for me from off a construction site. The owner didn't want it because of the notch in the corner that you can see. We'll be framing the window and door next, but wanted you guys to see it as is.
Behind the winter coop you can see the doorway of our summer coop, which we purchased as a pre-fab. Also, the outside pen, retro-fitted from a dog run we had. There is a larger, open pen attached to the dog run. During rainy days, the birds like to sit in the inside pen.

More of the summer coop. Our Rhode Island White rooster is photobombing in the back. Marigolds drive away mosquitoes, so we planted a ton of these this past summer. Again, apologies for the muddiness. We've been having torrential downpours at night here in north-east PA.
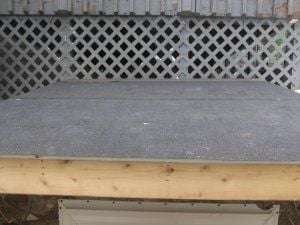
A close-up of the roof. All of it was a dumpster dive, from the wood beneath to the tar paper and finishing metal edges. As you can see the asphalt is a little worn-looking, but I don't think the chickens will mind. It's airtight. I know because it rained about 3 times on it already.
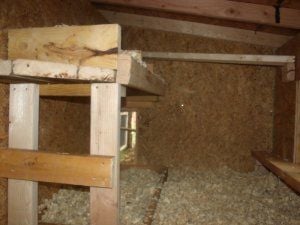
The interior, including the bench where the nesting boxes are located. The press board is new, but the timber is not. The bottom (big) nesting box was a wooden window frame we turned into a communal nesting box for those birds who won't or can't roost. The beam going across is a roosting beam, and there's a windowsill so the birds can watch nature from inside.

Another interior shot. Under the wood chips are vinyl flooring squares scavenged from yet another dumpster dive. Easier for clean-up and provides an extra layer of protection from the cold. Behind the walls are fiberglass insulation, also dumpster dived.
Total materials purchased came to $200. The rest probably averaged somewhere between $1500-2000, but it was all free because no one wanted it.
My goal was to build a winter coop for around 20 chickens for $200 or less. We had collected a lot of dumpster dives over the years, and almost everything we had went into it.
A view of the front. We had almost everything except some lumber, the walls and the hardware. We picked up this camo board from Home Depot. It was on sale for around $10/sheet. I believe we purchased 12 sheets in total for this project.
The view from the side. Apologies for the muddy construction site. We'll be working on seeding that soon. The cinder blocks were also purchased, but the base is actually an old bed frame boxspring from a bed we got rid of. Got rid of the mattress but used the box spring as the base. You can see it here. The window was a dumpster dive my brother got for me from off a construction site. The owner didn't want it because of the notch in the corner that you can see. We'll be framing the window and door next, but wanted you guys to see it as is.
Behind the winter coop you can see the doorway of our summer coop, which we purchased as a pre-fab. Also, the outside pen, retro-fitted from a dog run we had. There is a larger, open pen attached to the dog run. During rainy days, the birds like to sit in the inside pen.
More of the summer coop. Our Rhode Island White rooster is photobombing in the back. Marigolds drive away mosquitoes, so we planted a ton of these this past summer. Again, apologies for the muddiness. We've been having torrential downpours at night here in north-east PA.
A close-up of the roof. All of it was a dumpster dive, from the wood beneath to the tar paper and finishing metal edges. As you can see the asphalt is a little worn-looking, but I don't think the chickens will mind. It's airtight. I know because it rained about 3 times on it already.
The interior, including the bench where the nesting boxes are located. The press board is new, but the timber is not. The bottom (big) nesting box was a wooden window frame we turned into a communal nesting box for those birds who won't or can't roost. The beam going across is a roosting beam, and there's a windowsill so the birds can watch nature from inside.
Another interior shot. Under the wood chips are vinyl flooring squares scavenged from yet another dumpster dive. Easier for clean-up and provides an extra layer of protection from the cold. Behind the walls are fiberglass insulation, also dumpster dived.
Total materials purchased came to $200. The rest probably averaged somewhere between $1500-2000, but it was all free because no one wanted it.
Last edited:


