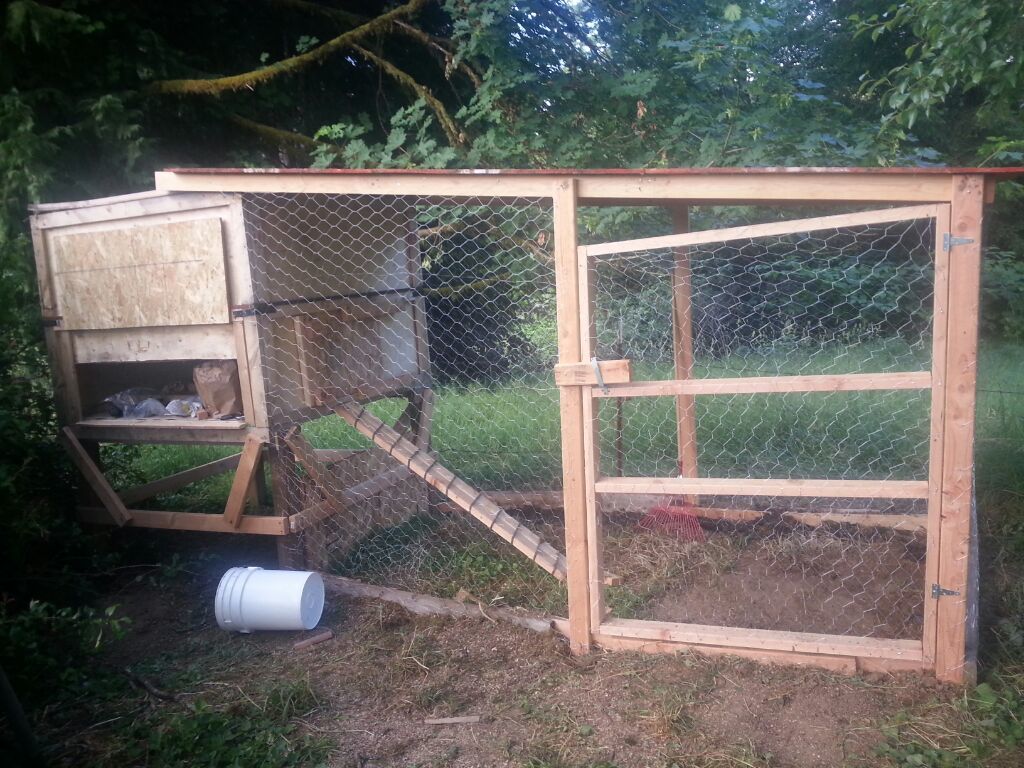
eggcellent job. I like that you wrapped the board to climb up to the coop with some wire....good for traction.... When you get a chance consider hardware cloth instead of chicken wire... its better protection against predators...
It is taking so long to build our hen house/run, we had to put 1/4" hardware cloth then 1/2" Hardware cloth and we screwed everything together...we now have to put the wire on the outside so nothing can dig under... we still have to build the nesting boxes, but we still have some time for that... our Australorps are 12 weeks old (that's the oldest ones) I never thought it would have taken this long!
Yep, my wife says everything takes me 3X what I think it will take (and she is usually right). And you are right, no rush on the nest boxes, you probably have at least another month and a half.
I wanted to post some pictures of our newly renovated coop, I hope this is the spot!
We took an old prowler camper trailer from the 70's and reworked the inside to make a lovely home for our hens. It ended up being a lot cheaper in the long run than building something from scratch. We painted the inside with the colours our 5 year old chose (which were surprisingly good). We even made a separate little area for our chicks.
What once was the bathroom is now the food storage area and so far the hens seem to be loving everything.
Now THAT is a mobile chicken tractor!! What sort of modifications (if any) did you have to make so the floor is protected from chicken "stuff"? Or are camping trailer floors "impenetrable" by design?
VERY nice, I think the birds are wanting to get out to forage, all bunched up at the door.
Gotta wonder why the 2 ramps to the roosts though. I'm not sure they need any ramp given the height of the "tray" under the roosts but 2 is just that much more "stuff" in the way when you are messing with the litter on the ground or scooping (I presume) the tray and once they get up on the tray, they can choose any spot on the roosts without having to go past/through an ensconced bird. Though, if they are like mine, they seem to think pushing and shoving must be an EVERY night event.
Yep, my wife says everything takes me 3X what I think it will take (and she is usually right). And you are right, no rush on the nest boxes, you probably have at least another month and a half.
Now THAT is a mobile chicken tractor!! What sort of modifications (if any) did you have to make so the floor is protected from chicken "stuff"? Or are camping trailer floors "impenetrable" by design?
VERY nice, I think the birds are wanting to get out to forage, all bunched up at the door.
Gotta wonder why the 2 ramps to the roosts though. I'm not sure they need any ramp given the height of the "tray" under the roosts but 2 is just that much more "stuff" in the way when you are messing with the litter on the ground or scooping (I presume) the tray and once they get up on the tray, they can choose any spot on the roosts without having to go past/through an ensconced bird. Though, if they are like mine, they seem to think pushing and shoving must be an EVERY night event.
The floor of the coop is vinyl. It's actually two layers of vinyl. The previous owner covered up the old 70's pattern with some plain grey stick on stuff. It's super water resistant though and really easy to clean. I just run a large squeegee over the whole thing and right out the door into the compost. If one has the space and doesn't mind the look of a big ol trailer in their backyard I highly suggest going this route. Super easy to make and super easy to keep clean. Great ventilation. Tons of space. Best thing that's happened to me ( and my hens).
Here you go....12 x 5 x 7 with the coop being 3 x 5. 1/2 in hardware cloth top all the way across (incl. coop area) and sides.
I love it - its 100 degrees out and the girls are doing fine. There is now a perch on the left that goes from the front left lower brace to the back lower brace.
The floor of the coop is a "used" commercial building sale sign and shavings. The run floor is washed sand (sand with small pebbles in it) which when misted helps to keep the girls cool. Hope to get the sign up soon "Bed and Breakfast, Theirs & Ours". We currently have 5 girls...bantam calico cochins, some laying some still "pullets". I hope to enclose the area around the run/coop this fall with deer fencing and perhaps bird net roof so that they can come out and play when we are home. We've also decided to create a patio area here....saw plenty of pictures of urban coops but never thought I'd like to have furniture near them...but heck chicken tv is free! Oh our yard is a 1/2 acre on a historic street which is why we are allowed chickens (the 1/2 acre). As everyone always wants to know cost...I kept track and we basically kept to my budget. We had the coop floor, all the tools (husband is a proj manager building multi million dollar homes/penthouses), heavy underlayment (under sand and over our hard clay soil) and some of the paint (blue is the color of house doors and had "barn" white paint for run). The total cost including sand was $750 give or take. $140 for the wire (3' x 100'), $160 roof panels, $65 sand (1.5 yards), $250 wood (we cut our own 2x2s), coop siding (3 4x8 sheets pre-primed), coop paint (white semi gloss for cleaning), concrete block, hardware, staples, screws, etc. We plan to add 1"x2" trim over the staples on the hardware cloth.
Got our inspiration on here and from Garden Coop which was the best coop design we saw for high heat and humid winters. We planned to do this type of roof already and had the design made; however had not thought to use hardware cloth over the coop. Made panels that screwed into the roof for the hardware cloth. This will make it easier to remove a panel should something need repair rather than cut away the wire. Did use their roof strut design as it was very attractive. Even in winter the better ventilation in cold weather will mean no moisture build up.
It has the typical pop door, egg door and the far right end has a large door for clean out. The walk in door latch (gate style) is on the inside with a "string" pull to open and two eye bolts that when the door is shut align so that a carabiner can be used to secure it. No one with out human hands is getting in and a small child could not open. The coop has 2 nest boxes (milk crates with a $1 tub inside) on the interior. Due to the heat we didn't want to do external ones and the milk crates keep good air flow. If I think of a way to safely keep them ventilated/cool, we'll add externals later. There are two perches that can be lifted out for removal or total scrubbing. The windows are at our adult hens eye height. Both perches are at the same height to keep "hen pecking" down on hot days.
I'll be adding an automatic waterier using a cooler and side nipples. Main reason for doing that will be to keep water cool in summer, no scrubbing of water container (although that doesn't seem to be an issue this summer) and easy fill without carrying the chicken waterier we currently have back and forth (its heavy and easy to break that drinking lip). Don't want to do it now due to the heat issues. I currently put 2 frozen soda bottles in the waterier each morning which as long as I get them in their early keeps the water cool. Their feed is in a plastic tub with a secure lid and 90 degree pvc elbows - set under the ladder (this keeps them from perching on it). The tub allows me to see how full it is and they don't scatter any food. There's one opening on each side so that there is no fighting(the brick is for a young girl). I feed grow out crumbles to everyone, so there is a rabbit "j-feeder" in the run with calcium supplement (behind the peacock).
Every time I see one of these style coops I love it..... Love the design and the airyness of it (is that a word?) With a clear corrugated roof its good that you have it in the shade.... I couldnt do that here the sun would eat the roof but it would become a bazillion degrees in there... I have no trees.
They sell "solar" style ones that are grey or solid ones. The newer better quality ones do much better in our sun. But yes the clear was so they would have plenty of sun in the winter. If we should loose a tree we will add a curtain of shade cloth just under the panels. That stuff is wonderful!
They sell "solar" style ones that are grey or solid ones. The newer better quality ones do much better in our sun. But yes the clear was so they would have plenty of sun in the winter. If we should loose a tree we will add a curtain of shade cloth just under the panels. That stuff is wonderful!
I'm thinking if I needed to add shade cloth I'd add cup hooks and use the grommets on cup hooks hanging from the roof. Tarps work! When we had the "ranch" our llama/goat "condos" were cattle panel shelters covered in tarps. The tarps lasted typically 3 years in the shade before they degraded although we did buy good ones. Our storms here are severe so tarps only work if they are "tight" against a structure roof and yes the sun destroys most anything plastic, etc.
On the fun side I think if I can find an iron shabby chic chandelier I'm hanging it in the run...you know something painted white, green or yellow gold and silly but not cutesy. There's a deep yellow gold 1/2 an old wood ladder up against the left side now with pots of flowers on it and the roost in the run is the same green as the chairs. If it doesn't cost anymore to be a little fun why not!