Hi Pete55, When you set your goose eggs in upright. What should your humidity level be in these cases of a free floating tremulous air sac? Is the positioning the only thing that you should do differently?
There's been a few members on the Geese Section recently that have experienced problems with air cells, particularly in shipped eggs. Problems appear to include; detached air cells, ruptured air cells and abnormally positioned air cells located on the side of the egg instead of the blunt end.
It appears that the purpose of the air cell is to provide a pocket of air for the almost mature chick to breath. Separated by a thin membrane it can be breached easily by the chick's beak and allows the chick to establish pulmonary respiration as the chorio-allantoic membrane begins to fail. So the location and size of the aircell is of critical importance to facilitate the hatching process. Of course there are exceptions, for instance breech where the chick HAS to externally pip in order to establish breathing. Sometimes nature finds a way but the mortality rate of malpositioned chicks is higher.
After shipping, the eggs may have been thrown about all over and subject to repeated jarring and jolts - no wonder air cells detach despite careful packaging! These eggs require individual and careful management if they are to sucessfully hatch. Firstly check they are not contaminated with egg contents from other broken eggs and if necessary wash using a proprietary egg disinfectant. Then candle the eggs and assess the level of damage. Candling may reveal hairline cracks and air cell damage. Sometime even free small bubbles of air are visible and fluid moves freely into the air cell space. These eggs should be coded with pencil and then stored upright in a cool room for 24 hours. This period allows the egg contents to settle and encourages any free air bubbles (which may be minute) to settle at the top of the egg where the air cell should be located.
These eggs should then be set into the incubator in a vertical position and not turned for 36-48 hours, after that turning by tilting side to side at a 45 degree angle helps to keep the air at the top. Otherwise leave well alone and dont remove for weighing. During the second week the chorio-allantoic membrane (generously supplied with blood vessels) grows out from the chick to line the complete inner surface, including the air cell. Think of it as inflating a balloon within an already inflated balloon. The air cell is now resealed and from 15 days can be treated normally though gentle handling is needed.
In some cases eggs are laid with the air cells in the wrong position and have to be managed slightly differently to compensate for this. Usually the most common mal-position of the air cell is on the side of the egg and often this defect is not noticed until first candling. This is why I prefer to candle all my eggs for closer inspection BEFORE commencing incubation. In the case of an air cell on the side of the egg I incubate with the egg positioned at a 45 degree angle. By doing this Im using gravity to keep the heavier egg contents to the bottom and hope the air cell expands a little towards the blunt end. The changes are small but may help when it comes to internal pipping. From Day 21 I incubate the egg in a position with the air cell uppermost though still raised at the blunt end at a 45 degree angle. The egg is auto-turned side to side but the mid position is always with the air cell upwards. By stopping full 180 degree turning early and setting in this position it maximises the chances for the chick to settle into a normal hatching position. In these cases when the time for drawdown of the air cell occurs the air cell appears to take up almost two thirds of that side of the egg. However the aircell is closer to the chicks beak in it's hatching position and it stands a fair chance of being able to internally pip normally.
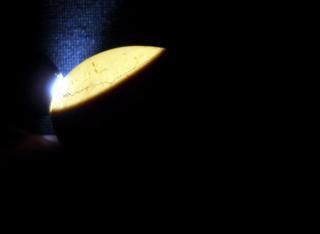
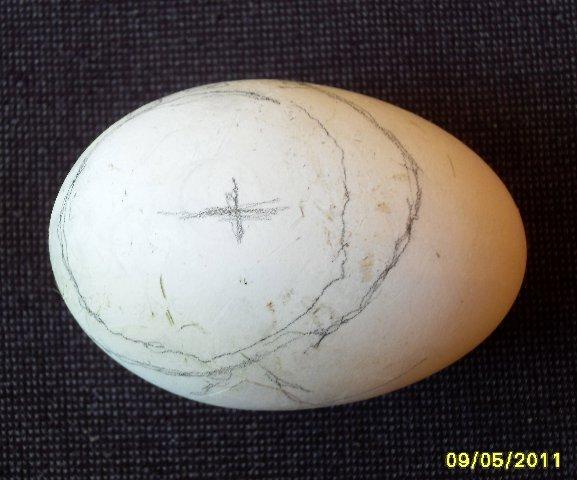
A Toulouse egg with an abnormal air cell located towards the side of the egg.
At Internal Pipping the air cell takes up almost two-thirds of the top surface of the egg. However the chick has managed to pierce the membrane with its beak and establish breathing. The cross is the original centrepoint of the air cell and the pencil outlines show its change in size during incubation.
Thankyou for this and especially the link to shipped eggs. QUESTION : Some sources say to keep temps 99.5-100 degrees while others say to keep temps 100-101. Is the difference fan air vs still air incubators? And there is an extreme range of humidity listed for the first 18 days "28-50./. " How can that be? I absolutely MUST get at least 1-2 hatches from these expensive/shipped eggs. Please help.
Hi there, Please help. I am on day 11 now with shipped chicken eggs the air cells were detached and rolling around. I kept them in an upright position and only turned the eggs on day 8. It seems like there is a saddlebag effect. Must i keep them in an upright position or must I move them? How important is it to tilt the eggs from side to side once a day? Or must I just leave them ?
This was asked before how how do I keep the eggs at a 45 degree angle? I just bought quail eggs and many have detached air cells. My Incubator has an odd turner that keeps the eggs on the ground, on their side. Also I dont have a quail egg carton to possibly balance them on because this is my first experience with quails.
Rats -- I bought the Brinsea last year, and this year wanted another. I was debating between the R-com and another Brinsea, and went with the Brinsea because I thought, hey, if something goes bad on one, I have interchangeable spare parts or emergency parts.
Kind of disliking a couple of things about the Brinsea, though -- the stupid tubing from the water tank always tangles and gets caught in things, the little rigid plastic straw becomes kind of soft and hard to work with as it creases and kinks. Finally, NOT a big fan of their stupid metal rails and foam inserts -- they take up too much room and are a pain. I just quit using them, stuff inert material like aluminum foil around the dead space, works fine.