Let me know how it goes. I am starting to raise La Fleche which are one of the traditional french breeds to caponize, which is why I have looked into the procedure. Altho I think it will be a while before I get up the gumption to try it.
Navigation
Install the app
How to install the app on iOS
Follow along with the video below to see how to install our site as a web app on your home screen.
Note: This feature may not be available in some browsers.
More options
You are using an out of date browser. It may not display this or other websites correctly.
You should upgrade or use an alternative browser.
You should upgrade or use an alternative browser.
Capon adventure
- Thread starter Boilerman66
- Start date
- Jun 27, 2011
- 10
- 0
- 22
There is a great thread on BYC about capons. Most of the tools purchased are designed to fit birds younger than 6 weeks. When they are younger the testies are both easily accessible from the one side, as they are staggered front to back rather than side to side.
It is stressful the first time you caponize. That stress will result in dead birds. My recommendation is to use a dead bird, or kill one prior to exploring it, and then take your time learning your best angle of approach etc. This will probably save a lot of birds' lives. You can buy males very cheap, but the goal is to keep your mortality down to 5-10% including healing time etc. My overall mortality is about 6%, but none of them die at my hands, so I am right in there with a normal rearing average.
Anyway, there is no stress when working on a dead bird.
Thanks,
Keabler
Great advice on practicing on dead birds. After all, nurses and surgeons practice on cadavers so they're familiar with the movements they have to make and become more efficient before dealing with the real thing. Also, with a 100% failure rate, I'd try to find a mentor who's done it sucessfully. That is probably hard to find though. Can't hurt to ask around though.
Glad to see your interest. Much of the literature and books available from 1890 – 1920 are indeed useful and informative, read them, save them to your document files. Just keep in mind that farmers were tied to the sun (noon), and fair weather for the best lighting available, that, and they had other daily chores that had to be done early (milk the cows, feed livestock, etc) and caponizing was fit in where it could. Today however the good sunlight has become portable to anywhere, and anytime, regardless of the weather. For myself, my observations have always been the earlier in the morning (dawn) the birds are quieter, more subdued, and I am also fresher!
I added a few pictures to my profile page of our caponizing set up.
The work table is an adjustable height (hospital) bed table, I work standing up.
The work surface is covered with an adult size diaper. When too soiled it is changed, or covered with a fresh paper towel.
Instead of using bricks, or weights, try using spring clamps to hold your restraining lines to the edge of the table, this is much easier to adjust, and to release when done.
The headlamp, and 3x reading glasses focus on the incision site without shadows. . For myself, I use a Rayovac head light (like a miners lamp) it is 100 lumens, narrow beam, (fairly bright) and can be directed, and focused to where you are looking. This way you are not looking into your own shadow. Available at Home Depot for $15. Get the brightest light you can.
The dark cloth is placed over the head to help keep the bird calm.
Q-tips, cotton balls, paper towels to clean blood from work area. Also for absorbing any blood from incision cavity.
The jar is for a 5% bleach, or alcohol solution for tool prep. I do wipe down all the tools after each bird. The minute or two that this takes can also be calming for the operator, plus a sip of coffee.
TOOLS:
Latex exam gloves. (more for your protection than the birds)
Restraining cords with 'S' hooks
Exacto knife with new blade (I discard the used blade at the end of each group)
Scalpel (disposable #11 blade) A vet may order them for you. Might also be available at tractor supply store.
Rib Spreader
Pick-Probe, or very sharp dental probe
Testes extractor
Tweezer
I believe the procedure is more stressful on the first time operator than for the bird. Just a few things to verify for yourself to make the event more successful:
Keep in mind that you are working on a live chicken, and you want it to stay alive. Though we have dispatched and processed many different kinds of poultry, or other livestock, in this case we want all survivors! Remember that when you make a mistake (you will) and the bird dies, continue with the operation and practice on the other side of the bird, continue learning. Afterwards, process, and eat your mistakes.
Just as your surgeon tells you no food intake for a day prior to surgery, well the same is true here. The timetable I use is ie, Sunday- select and isolate the birds with feed and water, remove feed at dusk. Mid-day on Monday remove water. Very early Tuesday is surgery, then back to water and feed. Leave birds in quiet area and observe. Free feed and water. Friday morning check for windpuff, alleviate where needed and check again on Sunday, then return birds to flock.
When I first tried, the birds turned into broilers for me. I cut in the wrong ribs, cut an artery, couldn't locate the second testes. YOU WILL LEARN FROM THESE TYPES OF ERRORS, You will also eat your mistakes. I was fortunate that a gentleman farmer was willing to share his experience, and time by allowing me to observe the process. He had also arranged to have a better set of tools than I was using. You can do this on your own without lessons, but the observations quickened the learning curve.
Practice using the knife or scalpel on a processed chicken thigh. Utilizing the point to stab and slice into a thigh, the skin is tougher than you think. Better to do this and learn your tools abilities before trying it on a live bird. Do this at your intended work station for practice. Become familiar, and comfortable with your tools.
For myself the size of the cockerel is more important than the age. Some breeds are smaller or grow slower. That being said I prefer an 18 – 24 ounce bird to start, smaller than that and the work space is too small, larger than that the testes are now the size of navy beans or bigger yet on older birds. The success rate is also lower, as the tissues are stronger, you are more apt to tear the artery and have the bird bleed out. I will not work on much bigger birds, two pounds is about my limit.
There is no time rush, take your time. You can do this procedure. I only wish more people would take an interest, and make the effort for a better use of unwanted cockerals.
Feel free to PM me.
I withdraw the water the night before, I want the intestines empty and out of the way.
Remember that if you make a mistake and the bird dies, continue with the operation and practice on the other side of the bird.
I also have a copy of the skeleton (link below) just to keep me on track for the ribs. I have a reverse pic also, and position it the same way as the chick to eliminate any confusion.
Send a pm on your progress, You will do fine.
j
http://www.google.com/imgres?imgurl=http://www.ca.uky.edu/poultryprofitability/Production_manual/Chapter3_Anatomy_and_Physiology/chicken_skeleton.png&imgrefurl=http://www.ca.uky.edu/poultryprofitability/Production_manual/Chapter3_Anatomy_and_Physiology/Chapter3_skeletal.html&h=603&w=455&sz=104&tbnid=PnaCslzVbEiNWM:&tbnh=90&tbnw=68&prev=/search%3Fq%3Dchicken%2Bskeletal%2Bsystem%26tbm%3Disch%26tbo%3Du&zoom=1&q=chicken+skeletal+system&docid=GNmgdsFPE1VrtM&hl=en&sa=X&ei=Z7JRT4L0GpGCsgKA44XwBQ&ved
I added a few pictures to my profile page of our caponizing set up.
The work table is an adjustable height (hospital) bed table, I work standing up.
The work surface is covered with an adult size diaper. When too soiled it is changed, or covered with a fresh paper towel.
Instead of using bricks, or weights, try using spring clamps to hold your restraining lines to the edge of the table, this is much easier to adjust, and to release when done.
The headlamp, and 3x reading glasses focus on the incision site without shadows. . For myself, I use a Rayovac head light (like a miners lamp) it is 100 lumens, narrow beam, (fairly bright) and can be directed, and focused to where you are looking. This way you are not looking into your own shadow. Available at Home Depot for $15. Get the brightest light you can.
The dark cloth is placed over the head to help keep the bird calm.
Q-tips, cotton balls, paper towels to clean blood from work area. Also for absorbing any blood from incision cavity.
The jar is for a 5% bleach, or alcohol solution for tool prep. I do wipe down all the tools after each bird. The minute or two that this takes can also be calming for the operator, plus a sip of coffee.
TOOLS:
Latex exam gloves. (more for your protection than the birds)
Restraining cords with 'S' hooks
Exacto knife with new blade (I discard the used blade at the end of each group)
Scalpel (disposable #11 blade) A vet may order them for you. Might also be available at tractor supply store.
Rib Spreader
Pick-Probe, or very sharp dental probe
Testes extractor
Tweezer
I believe the procedure is more stressful on the first time operator than for the bird. Just a few things to verify for yourself to make the event more successful:
- Plan the procedure.
- Layout your table with the tools in the order of use.
- Reset your table and tools after each bird. (instead of “Where is the extractor?”)
- Practice the plan and procedure on any dead bird in advance, learn chicken anatomy.
- Verify that you have plenty of light. The actual area you are working in is very small, and very confined (like the inside of a Ping Pong ball).
- Once a bird is complete, don’t dawdle, remove the spreader, and return the bird to water and feed.
- I’ve noticed a better recovery when using hard boiled eggs (chopped) and sugar water immediately after return, and like new chicks, dunk their beak in the water.
Keep in mind that you are working on a live chicken, and you want it to stay alive. Though we have dispatched and processed many different kinds of poultry, or other livestock, in this case we want all survivors! Remember that when you make a mistake (you will) and the bird dies, continue with the operation and practice on the other side of the bird, continue learning. Afterwards, process, and eat your mistakes.
Just as your surgeon tells you no food intake for a day prior to surgery, well the same is true here. The timetable I use is ie, Sunday- select and isolate the birds with feed and water, remove feed at dusk. Mid-day on Monday remove water. Very early Tuesday is surgery, then back to water and feed. Leave birds in quiet area and observe. Free feed and water. Friday morning check for windpuff, alleviate where needed and check again on Sunday, then return birds to flock.
When I first tried, the birds turned into broilers for me. I cut in the wrong ribs, cut an artery, couldn't locate the second testes. YOU WILL LEARN FROM THESE TYPES OF ERRORS, You will also eat your mistakes. I was fortunate that a gentleman farmer was willing to share his experience, and time by allowing me to observe the process. He had also arranged to have a better set of tools than I was using. You can do this on your own without lessons, but the observations quickened the learning curve.
Practice using the knife or scalpel on a processed chicken thigh. Utilizing the point to stab and slice into a thigh, the skin is tougher than you think. Better to do this and learn your tools abilities before trying it on a live bird. Do this at your intended work station for practice. Become familiar, and comfortable with your tools.
For myself the size of the cockerel is more important than the age. Some breeds are smaller or grow slower. That being said I prefer an 18 – 24 ounce bird to start, smaller than that and the work space is too small, larger than that the testes are now the size of navy beans or bigger yet on older birds. The success rate is also lower, as the tissues are stronger, you are more apt to tear the artery and have the bird bleed out. I will not work on much bigger birds, two pounds is about my limit.
There is no time rush, take your time. You can do this procedure. I only wish more people would take an interest, and make the effort for a better use of unwanted cockerals.
Feel free to PM me.
I withdraw the water the night before, I want the intestines empty and out of the way.
Remember that if you make a mistake and the bird dies, continue with the operation and practice on the other side of the bird.
I also have a copy of the skeleton (link below) just to keep me on track for the ribs. I have a reverse pic also, and position it the same way as the chick to eliminate any confusion.
Send a pm on your progress, You will do fine.
j
http://www.google.com/imgres?imgurl=http://www.ca.uky.edu/poultryprofitability/Production_manual/Chapter3_Anatomy_and_Physiology/chicken_skeleton.png&imgrefurl=http://www.ca.uky.edu/poultryprofitability/Production_manual/Chapter3_Anatomy_and_Physiology/Chapter3_skeletal.html&h=603&w=455&sz=104&tbnid=PnaCslzVbEiNWM:&tbnh=90&tbnw=68&prev=/search%3Fq%3Dchicken%2Bskeletal%2Bsystem%26tbm%3Disch%26tbo%3Du&zoom=1&q=chicken+skeletal+system&docid=GNmgdsFPE1VrtM&hl=en&sa=X&ei=Z7JRT4L0GpGCsgKA44XwBQ&ved
Just wondering if anyone has any photos of a grown out capon.
At 14 weeks:
Here is one capon, and one slip. Note the color of the comb and wattles. Tails are down.
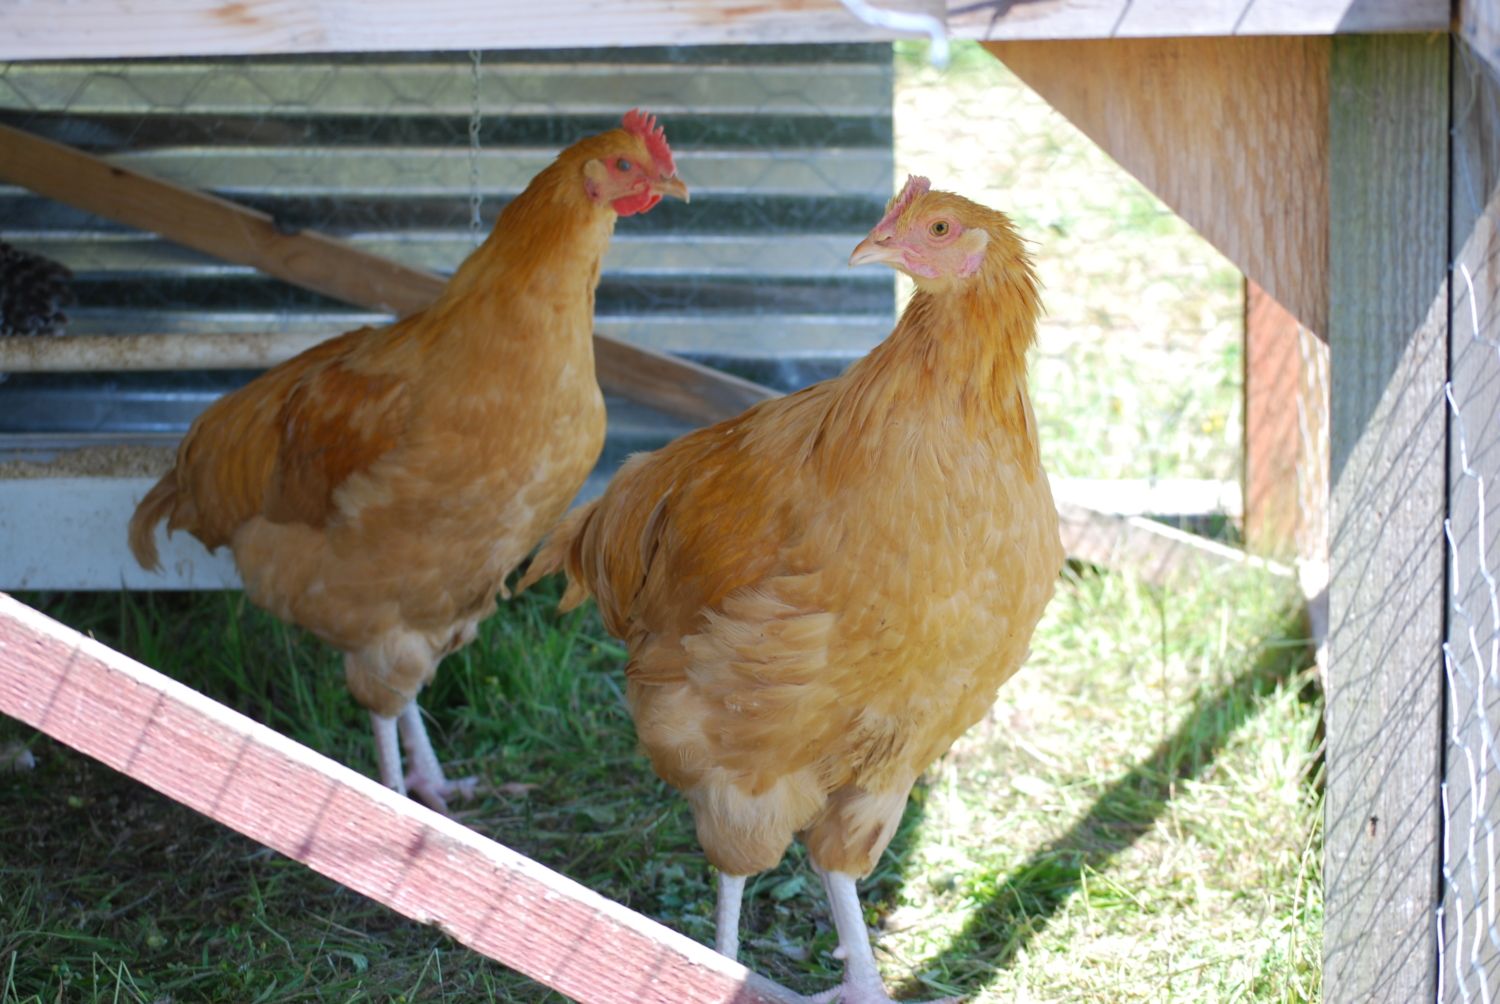
These birds were caponed on Mar 20, 2012. Two are slips, and will be in the freezer around the 20 week mark.
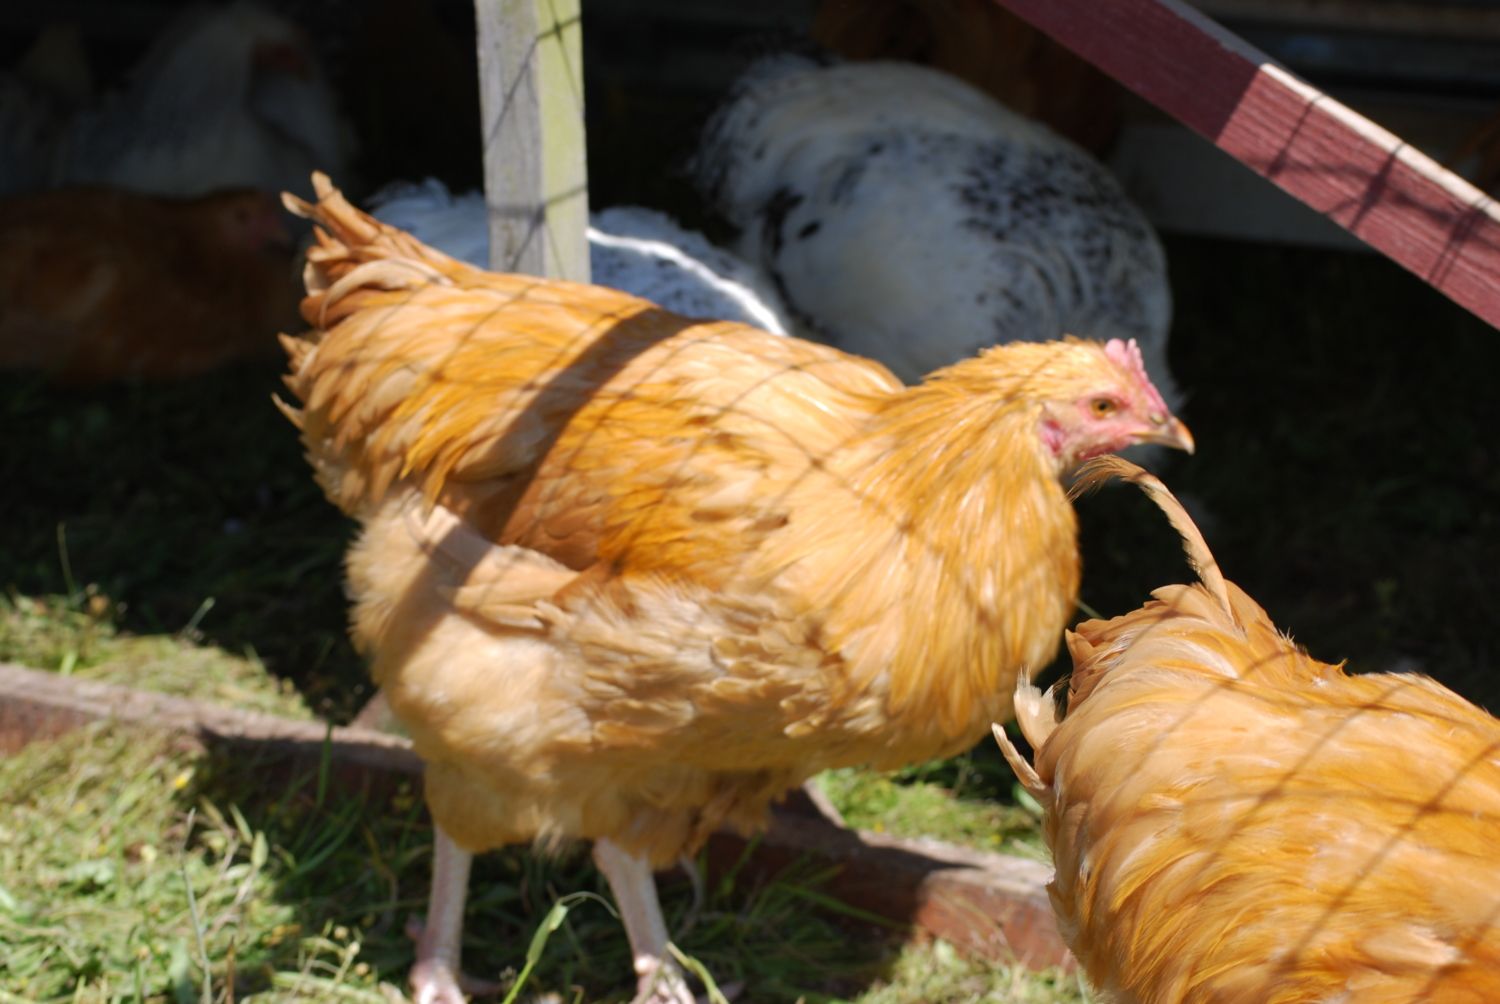
There are 17 in this tractor, it gets moved every other day. Breeds are Buff Orp's, and Delawares.
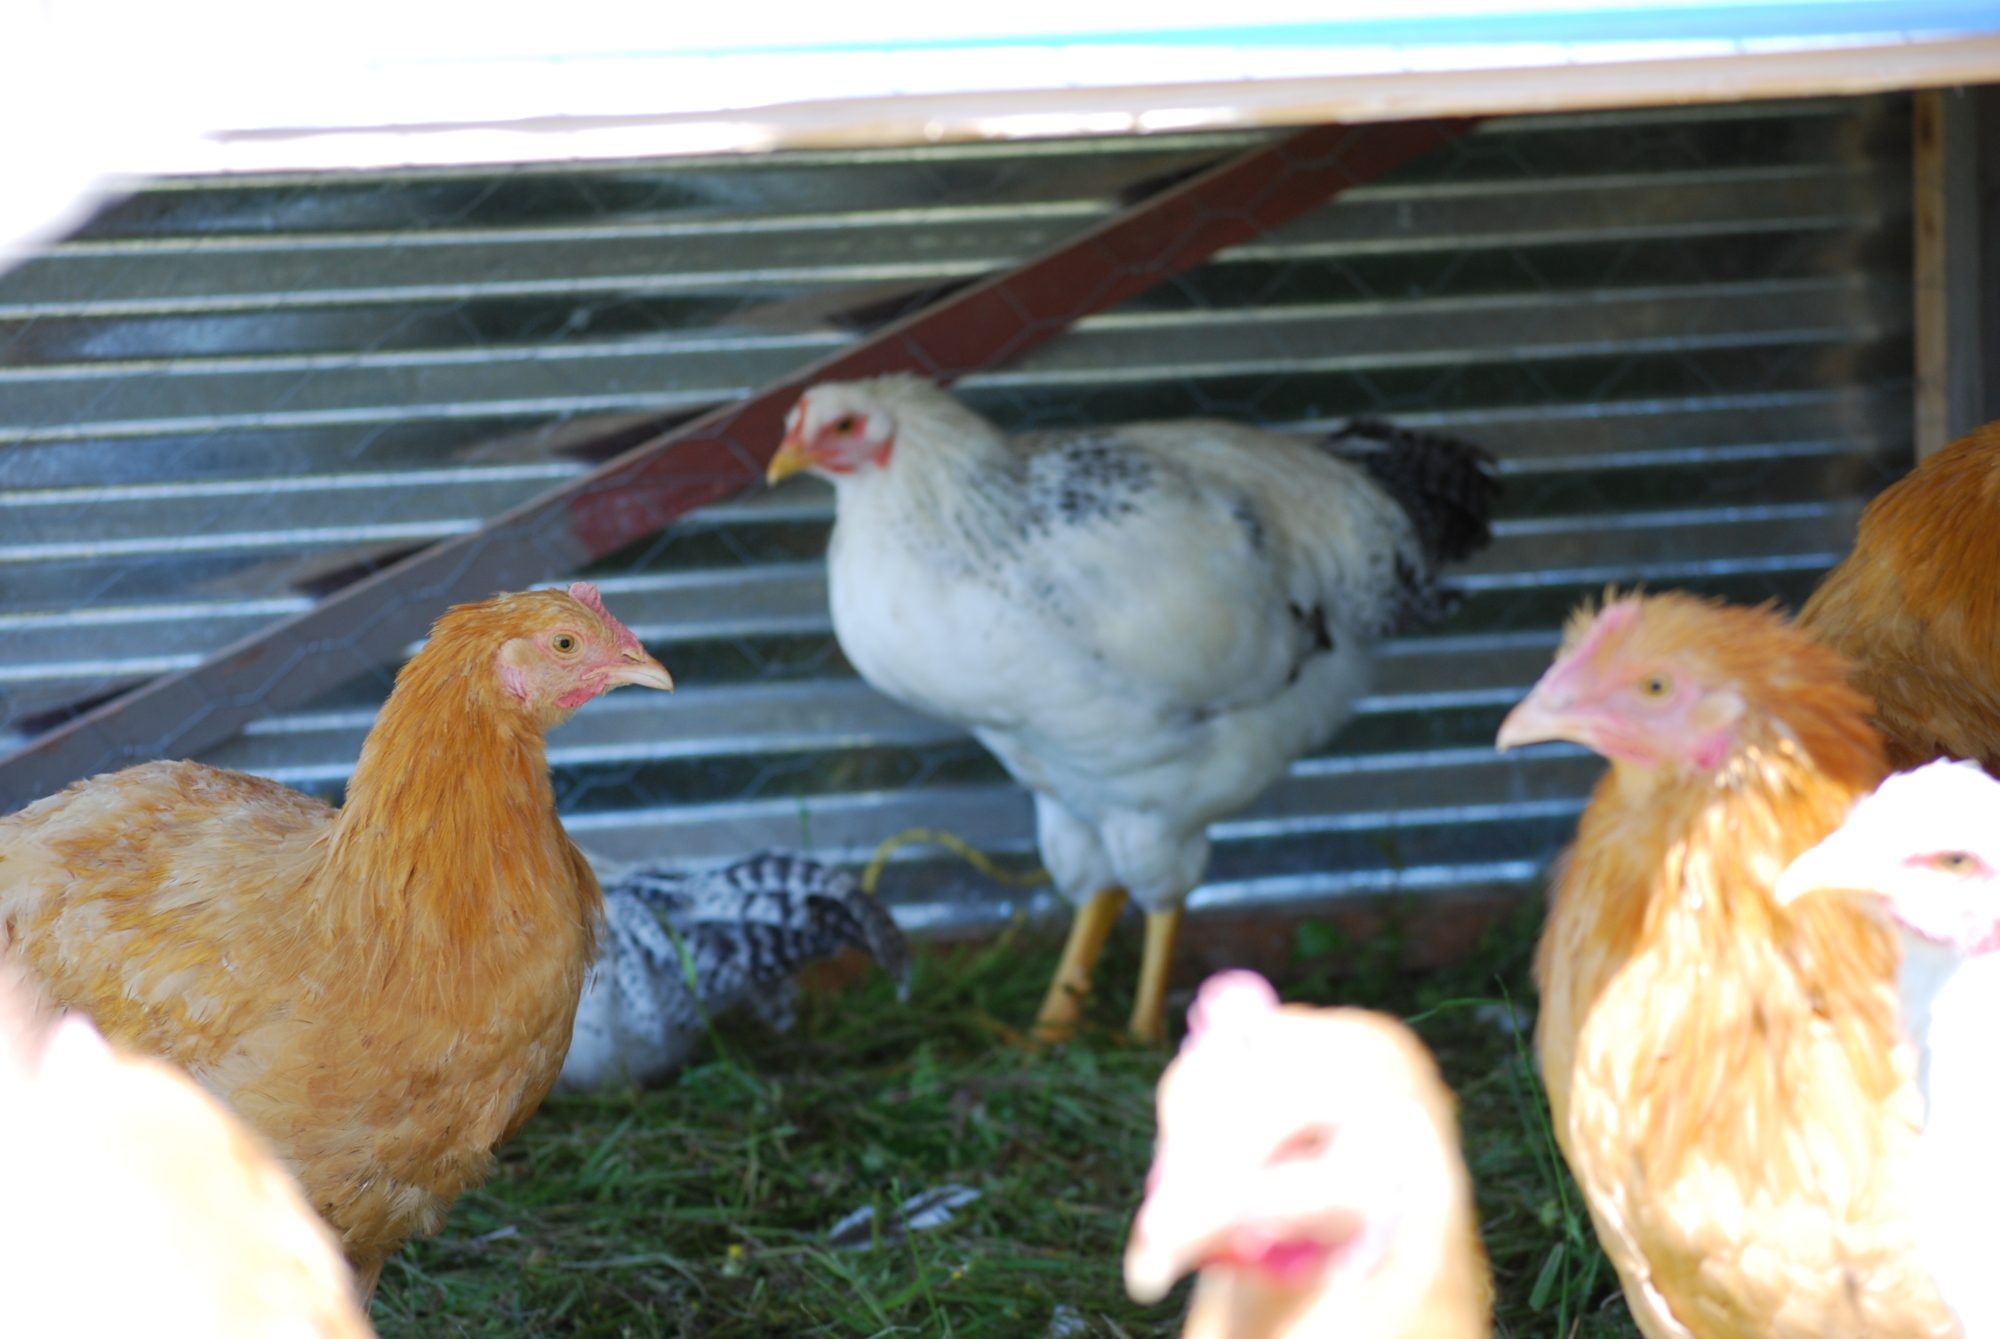
They will all be delicious!
J
Here is one capon, and one slip. Note the color of the comb and wattles. Tails are down.
These birds were caponed on Mar 20, 2012. Two are slips, and will be in the freezer around the 20 week mark.
There are 17 in this tractor, it gets moved every other day. Breeds are Buff Orp's, and Delawares.
They will all be delicious!
J
LocoPollo
Songster
I caponized the first time this year. At first it was VERY stressful, and of course the first few died. I finally decided to order 25 male chicks from the hatchery just to practice. Now i feel much more comfortable with the process and am so hppy i have something to do with all the extra cockerels i hatch!

Thank you for the summary, Naillikwj82!
The photos are great also.
The photos are great also.
Here is a good thread that starts with a pictoral.
https://www.backyardchickens.com/forum/viewtopic.php?id=562184
https://www.backyardchickens.com/forum/viewtopic.php?id=562184
Last edited:
- Thread starter
- #20
Thanks for the advice and words of encouragement, I appreciate it as I find negative people a real turn off especially when one is putting forth the effort to learn something. I like the idea of a cloth over the eyes as I believe the ones that did not make it off the table died of stress as one second they are fine and then got stiff as a board and that ended thier story. Also the sugar water and hard boiled eggs I like and will use these ideas the next time around.Glad to see your interest. Much of the literature and books available from 1890 – 1920 are indeed useful and informative, read them, save them to your document files. Just keep in mind that farmers were tied to the sun (noon), and fair weather for the best lighting available, that, and they had other daily chores that had to be done early (milk the cows, feed livestock, etc) and caponizing was fit in where it could. Today however the good sunlight has become portable to anywhere, and anytime, regardless of the weather. For myself, my observations have always been the earlier in the morning (dawn) the birds are quieter, more subdued, and I am also fresher!
I added a few pictures to my profile page of our caponizing set up.
The work table is an adjustable height (hospital) bed table, I work standing up.
The work surface is covered with an adult size diaper. When too soiled it is changed, or covered with a fresh paper towel.
Instead of using bricks, or weights, try using spring clamps to hold your restraining lines to the edge of the table, this is much easier to adjust, and to release when done.
The headlamp, and 3x reading glasses focus on the incision site without shadows. . For myself, I use a Rayovac head light (like a miners lamp) it is 100 lumens, narrow beam, (fairly bright) and can be directed, and focused to where you are looking. This way you are not looking into your own shadow. Available at Home Depot for $15. Get the brightest light you can.
The dark cloth is placed over the head to help keep the bird calm.
Q-tips, cotton balls, paper towels to clean blood from work area. Also for absorbing any blood from incision cavity.
The jar is for a 5% bleach, or alcohol solution for tool prep. I do wipe down all the tools after each bird. The minute or two that this takes can also be calming for the operator, plus a sip of coffee.
TOOLS:
Latex exam gloves. (more for your protection than the birds)
Restraining cords with 'S' hooks
Exacto knife with new blade (I discard the used blade at the end of each group)
Scalpel (disposable #11 blade) A vet may order them for you. Might also be available at tractor supply store.
Rib Spreader
Pick-Probe, or very sharp dental probe
Testes extractor
Tweezer
I believe the procedure is more stressful on the first time operator than for the bird. Just a few things to verify for yourself to make the event more successful:
- Plan the procedure.
- Layout your table with the tools in the order of use.
- Reset your table and tools after each bird. (instead of “Where is the extractor?”)
- Practice the plan and procedure on any dead bird in advance, learn chicken anatomy.
- Verify that you have plenty of light. The actual area you are working in is very small, and very confined (like the inside of a Ping Pong ball).
- Once a bird is complete, don’t dawdle, remove the spreader, and return the bird to water and feed.
- I’ve noticed a better recovery when using hard boiled eggs (chopped) and sugar water immediately after return, and like new chicks, dunk their beak in the water.
Keep in mind that you are working on a live chicken, and you want it to stay alive. Though we have dispatched and processed many different kinds of poultry, or other livestock, in this case we want all survivors! Remember that when you make a mistake (you will) and the bird dies, continue with the operation and practice on the other side of the bird, continue learning. Afterwards, process, and eat your mistakes.
Just as your surgeon tells you no food intake for a day prior to surgery, well the same is true here. The timetable I use is ie, Sunday- select and isolate the birds with feed and water, remove feed at dusk. Mid-day on Monday remove water. Very early Tuesday is surgery, then back to water and feed. Leave birds in quiet area and observe. Free feed and water. Friday morning check for windpuff, alleviate where needed and check again on Sunday, then return birds to flock.
When I first tried, the birds turned into broilers for me. I cut in the wrong ribs, cut an artery, couldn't locate the second testes. YOU WILL LEARN FROM THESE TYPES OF ERRORS, You will also eat your mistakes. I was fortunate that a gentleman farmer was willing to share his experience, and time by allowing me to observe the process. He had also arranged to have a better set of tools than I was using. You can do this on your own without lessons, but the observations quickened the learning curve.
Practice using the knife or scalpel on a processed chicken thigh. Utilizing the point to stab and slice into a thigh, the skin is tougher than you think. Better to do this and learn your tools abilities before trying it on a live bird. Do this at your intended work station for practice. Become familiar, and comfortable with your tools.
For myself the size of the cockerel is more important than the age. Some breeds are smaller or grow slower. That being said I prefer an 18 – 24 ounce bird to start, smaller than that and the work space is too small, larger than that the testes are now the size of navy beans or bigger yet on older birds. The success rate is also lower, as the tissues are stronger, you are more apt to tear the artery and have the bird bleed out. I will not work on much bigger birds, two pounds is about my limit.
There is no time rush, take your time. You can do this procedure. I only wish more people would take an interest, and make the effort for a better use of unwanted cockerals.
Feel free to PM me.
I withdraw the water the night before, I want the intestines empty and out of the way.
Remember that if you make a mistake and the bird dies, continue with the operation and practice on the other side of the bird.
I also have a copy of the skeleton (link below) just to keep me on track for the ribs. I have a reverse pic also, and position it the same way as the chick to eliminate any confusion.
Send a pm on your progress, You will do fine.
j
http://www.google.com/imgres?imgurl=http://www.ca.uky.edu/poultryprofitability/Production_manual/Chapter3_Anatomy_and_Physiology/chicken_skeleton.png&imgrefurl=http://www.ca.uky.edu/poultryprofitability/Production_manual/Chapter3_Anatomy_and_Physiology/Chapter3_skeletal.html&h=603&w=455&sz=104&tbnid=PnaCslzVbEiNWM:&tbnh=90&tbnw=68&prev=/search%3Fq%3Dchicken%2Bskeletal%2Bsystem%26tbm%3Disch%26tbo%3Du&zoom=1&q=chicken+skeletal+system&docid=GNmgdsFPE1VrtM&hl=en&sa=X&ei=Z7JRT4L0GpGCsgKA44XwBQ&ved
I will check you photos and see your set up and steal ideas.
Thank you!

New posts New threads Active threads
-
Latest posts
-
Building a coop! Questions as we go....
- Latest: Chicks_keetkeeper
-

-

-
-
Latest threads
-

-
-
 Attracted To Showgirls But What Color Is This?
- Started by LoveOfFeathers
- Replies: 0
-

-
-
-
Threads with more replies in the last 15 days
-

-
-
 Open Contest BYC's 4th of July Star Spangled Hatch-Along—Stars, Stripes, & Feathers, a Text-to-Image Contest
- Started by Debbie292d
- Replies: 89
-

-

-