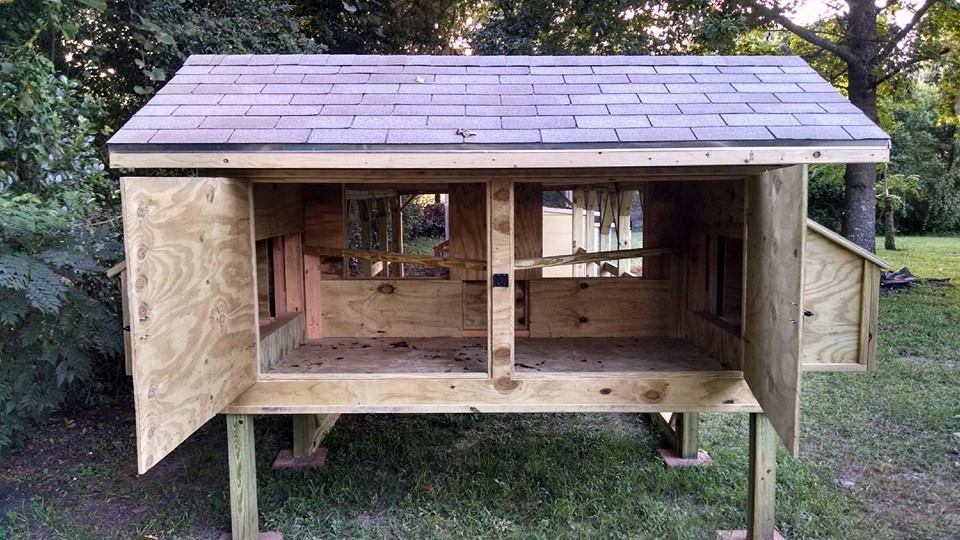
I have a "Daisy Coop", from purchased plans, with a 12 ft run and I am about to apply primer using a sprayer and then paint the coop the colors I have chosen. I plan on using linoleum on the treated plywood floor of the coop for ease of cleaning. The coop design had removable roosting boxes that I chose not to build and add to the coop floor. The 2 boxes do not cover the entire floor area and I would still need to clean around the outside edges and of course, the girls will be perching on the edges and pooping on the edges of the boxes anyway onto the floor. I added the diagonal 2 X 4s for roosting.
1. I need to know best way to install the linoleum in order to prevent any water or vapor moisture from accumulating between the plywood and the linoleum material. Should I frame the outside edges with furring strips or 1 X 2s? The entire coop will have at least 1 coat of primer, 2 coats on the underside of the main coop and under the roof of the run that do not show. I know in a house the flooring is normally glued down but I don't want to do this in case I need to remove it later. Should I drill some small holes in the plywood before laying down the flooring? If I primer the treated plywood with 2 coats, will moisture build up between the layers and cause rotting issues later? That is my main concern. This coop was very expensive to build and I want it to last a very very very long time.
2. Also, as the coop run has a shingled roof, the girls will have plenty of shade and cross breezes and more than half of it is under the drip line of a shade tree. I don't know if I want to leave the bottom of the actual coop area as part of their run, or maybe their dust bath area or enclose it somehow for storage. There is only a 2 ft clearance area and crawling under it to retrieve a sick/injured chicken or clean the dusting area, or....???....might be an issue for this old lady. LOL Any suggestions on how to best utilize this space?
3. I have 2 rolls of 4 ft. X 50 ft. hardware cloth and hoping this will be enough to finish out this coop. Do I run strips vertically or horizontally when installing the hardware cloth? I need to utilize as much of it as possible to also bury approx. 18" to 24" skirt around the bottom. The run roof is approximately 6 ft at it's highest point in front. The front of the coop will get flower boxes and deck flooring by the door and the egg collection areas that will extend out at least 18 ", if not more and hopefully deter digging predators but the backside and ends will need the full on predator proofing. We have opossums and raccoon in our area.
4. How long do I allow the primer/paint to dry and cure before housing the chicks/pullets in there. Don't want fumes giving them the vapors! (Home Depot associate didn't know since it was chickens and not kids. I asked...is there a difference??
 )
)
I will also be adding another coop to the other end in the very near future. Eventually, this set up will house a total of 14 chickens and 4 guineas. (And to think this started with 5 chicks, then 8, then 'gotta have a blue Silkie', 'gotta have some guineas and some chicks to raise together'....and then......) They should have plenty of room. I have 4 guinea chicks along with Blue AND Splash Silkies (how did that happen that we have 2 instead of 1?), Red Sex link, 2 Buff Orpingtons, another Barred Rock, all around the same age, currently in the brooder/makeshift run. They need to come out of there in another week as they have outgrown their current housing situation. I also have 8 pullets just beginning their egg laying in another coop. The guineas like high places to roost and the 2nd coop addition to the other end will not only lend them that option (it will be tall), but also give more room for the chickens to choose where they want to sleep at night. I have questions about who goes in first, the brooder chicks or the established pullets but that is another forum to explore.
BTW, I cannot take credit for building this coop. A very nice man, carpenter by trade, built it for me and he did an awesome job. It only took him 2 & 1/2 days. I chose not to install actual windows, located in FL, and they were so expensive anyway. The windows will have 't bars' added to look like windows along with hardware cloth and screening and will have removable vinyl covers for the colder months here in FL (Yes, we get cold weather) and they will keep drafts from entering the lower level of the coop. The coop is designed to also have 1 X 2 vertical strips added for outside trim but I wanted to primer/paint before adding them. I also chose to add the shingled roof run area (vs a wire covered roof) and have it sloped towards the back of the coop away from the front door. This coop will be hopefully absolutely and positively predator proof when I am finished with it.


1. I need to know best way to install the linoleum in order to prevent any water or vapor moisture from accumulating between the plywood and the linoleum material. Should I frame the outside edges with furring strips or 1 X 2s? The entire coop will have at least 1 coat of primer, 2 coats on the underside of the main coop and under the roof of the run that do not show. I know in a house the flooring is normally glued down but I don't want to do this in case I need to remove it later. Should I drill some small holes in the plywood before laying down the flooring? If I primer the treated plywood with 2 coats, will moisture build up between the layers and cause rotting issues later? That is my main concern. This coop was very expensive to build and I want it to last a very very very long time.
2. Also, as the coop run has a shingled roof, the girls will have plenty of shade and cross breezes and more than half of it is under the drip line of a shade tree. I don't know if I want to leave the bottom of the actual coop area as part of their run, or maybe their dust bath area or enclose it somehow for storage. There is only a 2 ft clearance area and crawling under it to retrieve a sick/injured chicken or clean the dusting area, or....???....might be an issue for this old lady. LOL Any suggestions on how to best utilize this space?
3. I have 2 rolls of 4 ft. X 50 ft. hardware cloth and hoping this will be enough to finish out this coop. Do I run strips vertically or horizontally when installing the hardware cloth? I need to utilize as much of it as possible to also bury approx. 18" to 24" skirt around the bottom. The run roof is approximately 6 ft at it's highest point in front. The front of the coop will get flower boxes and deck flooring by the door and the egg collection areas that will extend out at least 18 ", if not more and hopefully deter digging predators but the backside and ends will need the full on predator proofing. We have opossums and raccoon in our area.
4. How long do I allow the primer/paint to dry and cure before housing the chicks/pullets in there. Don't want fumes giving them the vapors! (Home Depot associate didn't know since it was chickens and not kids. I asked...is there a difference??
I will also be adding another coop to the other end in the very near future. Eventually, this set up will house a total of 14 chickens and 4 guineas. (And to think this started with 5 chicks, then 8, then 'gotta have a blue Silkie', 'gotta have some guineas and some chicks to raise together'....and then......) They should have plenty of room. I have 4 guinea chicks along with Blue AND Splash Silkies (how did that happen that we have 2 instead of 1?), Red Sex link, 2 Buff Orpingtons, another Barred Rock, all around the same age, currently in the brooder/makeshift run. They need to come out of there in another week as they have outgrown their current housing situation. I also have 8 pullets just beginning their egg laying in another coop. The guineas like high places to roost and the 2nd coop addition to the other end will not only lend them that option (it will be tall), but also give more room for the chickens to choose where they want to sleep at night. I have questions about who goes in first, the brooder chicks or the established pullets but that is another forum to explore.
BTW, I cannot take credit for building this coop. A very nice man, carpenter by trade, built it for me and he did an awesome job. It only took him 2 & 1/2 days. I chose not to install actual windows, located in FL, and they were so expensive anyway. The windows will have 't bars' added to look like windows along with hardware cloth and screening and will have removable vinyl covers for the colder months here in FL (Yes, we get cold weather) and they will keep drafts from entering the lower level of the coop. The coop is designed to also have 1 X 2 vertical strips added for outside trim but I wanted to primer/paint before adding them. I also chose to add the shingled roof run area (vs a wire covered roof) and have it sloped towards the back of the coop away from the front door. This coop will be hopefully absolutely and positively predator proof when I am finished with it.
Last edited:

