Coop rough draft

FoxRiverRat

Chirping
Feb 5, 2016
38
2
54
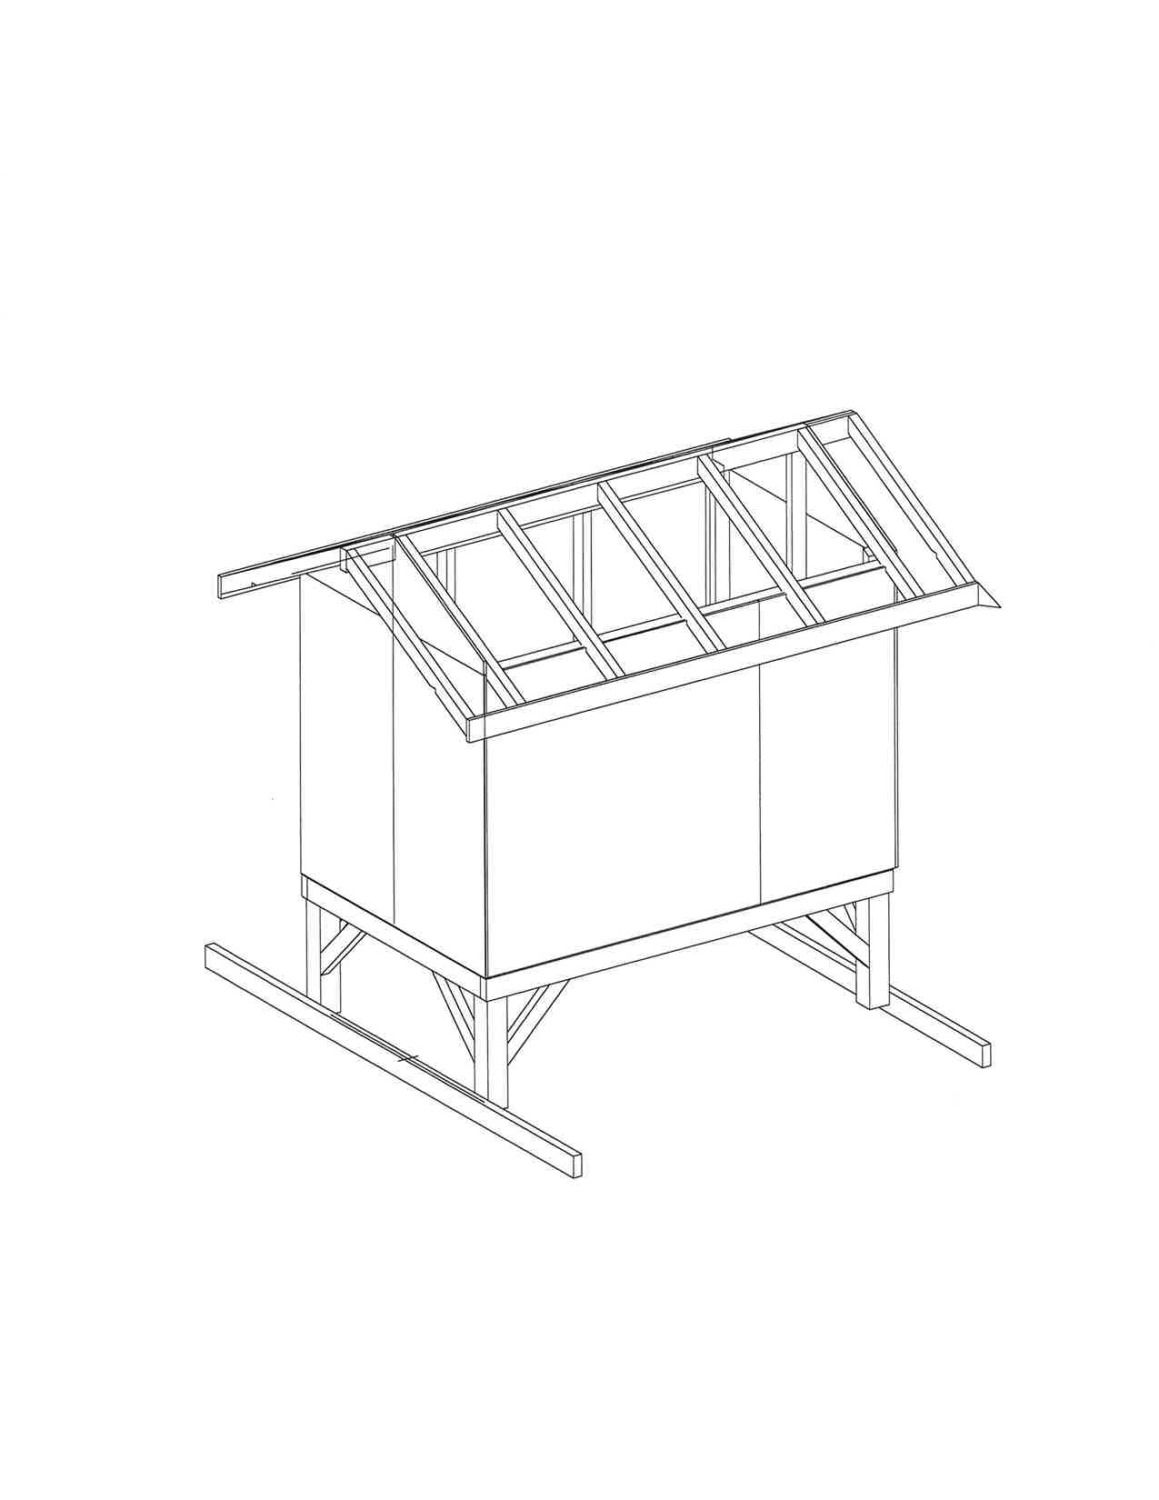
I'm working on a 4x6 coop for 6 hens, here's a rough drawing. were going to prefab it in sections at my work where i'll have access to all kinds of machinery/tools. This drawing doesn't show a lot of details, but there will be a nesting box added to one of the 4' sides, the 1'x1' chicken door on the opposite 4', a big clean out door on a 6' side and a window and some vents.

Before we start cutting wood, can you guys spot any inherent flaws in our design? Thanks!
 
It's good to get feedback before construction, and here's mine. It's too small. Build based on the 4' x8' dimensions of plywood, more efficient use of materials. Is it meant to be movable? If not, build it on the ground with a dig- proof foundation instead. Ventilation and predator proofing are MOST important. The triangular top ends of the building should be hardware cloth, and as many hardware cloth covered windows as possible. Walk-in coops are always better! Many of us use a garden type shed as a base, and modify it. In warmer climates, a three sided shed works great. My coop has evolved over time (getting bigger!) but starting bigger is a good idea. Mary
 
Here's a link to my coop which is similar to what you are planning. mine is also up off the ground but it's not movable.

https://www.backyardchickens.com/t/784144/the-rubber-room-is-open-for-business

I enclosed the space under the coop so it's part of the run and in the winter I put windows on the three sides to give them more shelter from the wind and being underneath they already get rain/sun/snow protection.

Mine is 4x8 and I already wish it was bigger, dam chicken math(especially this time of year when CL ads for chicks come out!!)


Most of the issues that I have with my current design are height related, as noted below. I'm vertically challenged but did not realize these would be issues until the coop was operational

Make the coop lower to ground. I placed it high enough that I could put a wheelbarrow under the edge beneath the big door and just sweep out the coop in to the wheelbarrow. This was not needed as I use poop boards and with poop boards the litter of the coop only gets changed every couple of years,I expected to change it more often but it stays dry and oder free so why change it.
Make the poop boards/roosts lower inside coop. I placed the nest boxes and pop door about 8" off the floor thinking of the deep litter method for my coop, but again with the poop boards I do/need deep litter. Because of the height of the nest box my roost and poop boards are a little high in the coop for me. One when cleaning the poop boards they are at eye level for me so it's a little tedious to clean. If I needed to get a hold of a bird everyone says to just grab them off the roost at night but with the high poop board I don't have much room to pull a bird through the gap between the poop board and the top of the big door.

So my suggestion is to think about the cleaning chores and if you'll use poop boards or not.

good luck
 
I do have to say that I do not agree with Folly's place about a walk in coop being better. I do not have a walk in coop nor did I want a walk in coop. With large doors my coop which is about waist high is easy to clean. I do not have to bend over. I like having the extra space under the coop for the girls to hang out in on a rainy day. They also use it for extra shade on a sunny hot day.

When I was building a new coop last spring I looked over what everyone else had built. I embraced the ideas that would work for my situation. Have to say I'm super pleased with the coop. It has worked out even better than I'd expected.

It's great that you are planning ahead and asking for advice.
 
Boy, I wish I had an app like that when I did mine!

A couple of suggestions. It doesn't show it, but I assume there are floor joists going across the bottom frame. You'll need that if you ever plan on standing in there, which you will during construction.

Also, I would highly suggest horizontal top plates on the sides. The siding material wont be strong enough on it's own to support the weight over time. Those three boards will want to start growing apart with the weight of the roof being supported on them. The top plate will help. Also, I would actually suggest a second level of top plate on top of those to really secure the four walls to each other.
 
Hi Mary,

I did actually want it to be movable. there is a code that I'm not supposed to build anything within 10 feet of my property line. yet, I see sheds and the like all over my neighborhood within 10 feet of property line. so, I'm putting the coop along the property line haha. But I do want to have the option to move it if the village/county etc tell me I need to.

will definitely be adding windows and ventiliation and hardware cloth to all openings, thanks! I couldn't see your coop though....


Gridguru, It's a 3D modeling software an engineer at my company uses...fringe benefits of working here! there is framing below the floor board, and you're exactly right, the engineer did say I would need to stand inside it to work on parts of it.

What did you mean by "top plates" though? I got a bit lost there....

So the framing of each wall typically includes a bottom plate (horizontal 2x4), studs (vertical 2x4s) and a top plate (horizontal 2x4), basically making a framed wall that can be set into place a it's own unit. I have a thread down just a few that shows the construction of my coup. One of the pics have all four walls together so you can see what I mean. They are not attached to each other in the pic, only set up together. Once all the walls are up and in place, another row of top plates will span three walls to secure them together.

Basically, if your end walls are 4ft long, and your side walls are 6ft long, you'll have a top plate that is 4ft-7in long (4ft plus the width of two 2x4s...which are 3.5" each). This will attach the corner of each side wall to the end walls and each other.

Sorry, this is hard to explain without pictures. Let me see what I can find.
 
My coop, built on an old concrete foundation. It's not stained yet in the pictures, taken shortly after this summer's addition. For winter I wrapped the bottom six feet in plastic to block the wind. Mary


Not everyone has three different shingle types, but it is only a chicken coop!
 

New posts New threads Active threads

Back
Top Bottom