KappyFlock
Songster
Because I've been told that I will get more feedback on our coop design in a thread rather than an article, I am starting this thread by copying & pasting my (unfinished) coop article here. Thank you in advance for your feedback!
I'll put my current questions right up front, but if you have any suggestions about other aspects of our coop design, please share that too. We would rather get this right the first time rather than make changes later!
Questions:
1. Do our overhangs look sufficient to keep the inside of the coop dry?
2. Do we need to cover the points of the roofing nails that are sticking through the roof into the coop?
3. Is it ok if the run doesn't have a roof on it? It will have a cover eventually (solar panels for a non-coop-related project), but meanwhile there will be nothing to keep the run from getting wet when it rains or snows. (The top and sides will, however, be completely covered with hardware cloth.)
Our coop is based on many others we have seen here on BYC, including the Wichita Cabin Coop, Boisemarker, Clamser Coop, The Palace, and more. Thank you to everyone who has posted coop articles. You have been very helpful!
We are planning on getting 6 pullets to start. Once they quit laying, they will still be living here and we will add more chicks to our flock. We're thinking about having a max of 10. (Although yes I have read about and therefore am aware of chicken math!)
Here are a few pictures of our coop so far. The coop is 6x5 and the entire structure is 6x16.
Front of the Coop

The top of the coop itself has a shingled roof. The extra structure above the coop roof extends across the entire coop and run, and that structure is there to support the solar panels my husband plans to install someday. (The solar panels are not for powering the coop, but he thought as long as he's building a structure in the yard he might as well use it to hold the solar panels.) The run will therefore be shaded by the solar panels.
On the right side the top hole is a window and the bottom hole is for the nesting boxes.
The front door is only framed, but you can see where a large window will be. After reading articles about ventilation, I urged my husband to create that large window. The back door of the coop, although shorter to provide roof slope, also has a window.
Speaking of ventilation, at the top of the coop there will be a few inches of permanent ventilation around the entire perimeter. Here is a photo.
Permanent Ventilation

It might be hard to see, but there is a space at the top of the wall and there is also a soffit. One of the walls (the one that will be subjected to wind and rain) has only a soffit, but the other three walls have both.
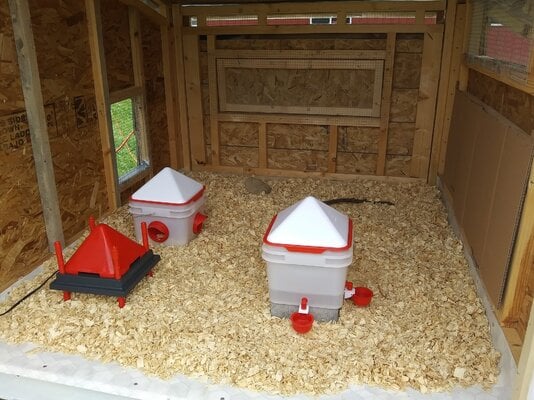
Inside the Coop

The above picture is the inside of the coop, with the hole for the nesting boxes on the lower left and the pop hole on the right. Much of the wood came from an old playset my husband dismantled, and that's why the floor has some paint on it. This floor will have a sheet of remnant vinyl over it. Both the front and back of the coop (the parts that are only framed so far) are on hinges, so we can open them for cleaning and whatnot.
That's all we have to share so far. Here's one more picture, from another angle.

I am looking forward to any comments you have. We think it's going well, but if there is anything we need to change, we'd like to know. Thank you!
I'll put my current questions right up front, but if you have any suggestions about other aspects of our coop design, please share that too. We would rather get this right the first time rather than make changes later!
Questions:
1. Do our overhangs look sufficient to keep the inside of the coop dry?
2. Do we need to cover the points of the roofing nails that are sticking through the roof into the coop?
3. Is it ok if the run doesn't have a roof on it? It will have a cover eventually (solar panels for a non-coop-related project), but meanwhile there will be nothing to keep the run from getting wet when it rains or snows. (The top and sides will, however, be completely covered with hardware cloth.)
Our coop is based on many others we have seen here on BYC, including the Wichita Cabin Coop, Boisemarker, Clamser Coop, The Palace, and more. Thank you to everyone who has posted coop articles. You have been very helpful!
We are planning on getting 6 pullets to start. Once they quit laying, they will still be living here and we will add more chicks to our flock. We're thinking about having a max of 10. (Although yes I have read about and therefore am aware of chicken math!)
Here are a few pictures of our coop so far. The coop is 6x5 and the entire structure is 6x16.
Front of the Coop
The top of the coop itself has a shingled roof. The extra structure above the coop roof extends across the entire coop and run, and that structure is there to support the solar panels my husband plans to install someday. (The solar panels are not for powering the coop, but he thought as long as he's building a structure in the yard he might as well use it to hold the solar panels.) The run will therefore be shaded by the solar panels.
On the right side the top hole is a window and the bottom hole is for the nesting boxes.
The front door is only framed, but you can see where a large window will be. After reading articles about ventilation, I urged my husband to create that large window. The back door of the coop, although shorter to provide roof slope, also has a window.
Speaking of ventilation, at the top of the coop there will be a few inches of permanent ventilation around the entire perimeter. Here is a photo.
Permanent Ventilation
It might be hard to see, but there is a space at the top of the wall and there is also a soffit. One of the walls (the one that will be subjected to wind and rain) has only a soffit, but the other three walls have both.
Inside the Coop
The above picture is the inside of the coop, with the hole for the nesting boxes on the lower left and the pop hole on the right. Much of the wood came from an old playset my husband dismantled, and that's why the floor has some paint on it. This floor will have a sheet of remnant vinyl over it. Both the front and back of the coop (the parts that are only framed so far) are on hinges, so we can open them for cleaning and whatnot.
That's all we have to share so far. Here's one more picture, from another angle.
I am looking forward to any comments you have. We think it's going well, but if there is anything we need to change, we'd like to know. Thank you!


")