This article is a work in progress because we are still building our coop. I'm hoping I'll be able to edit the article with updates as we progress, but I've never written an article here before so I don't know if it works that way. I guess I'll find out!
Our coop is based on many others we have seen here on BYC, including the Wichita Cabin Coop, Boisemarker, Clamser Coop, The Palace, and more. Thank you to everyone who has posted coop articles. You have been very helpful!
We are planning on getting 6 pullets to start. Once they quit laying, they will still be living here and we will add more chicks to our flock. We're thinking about having a max of 10. (Although yes I have read about and therefore am aware of chicken math!)
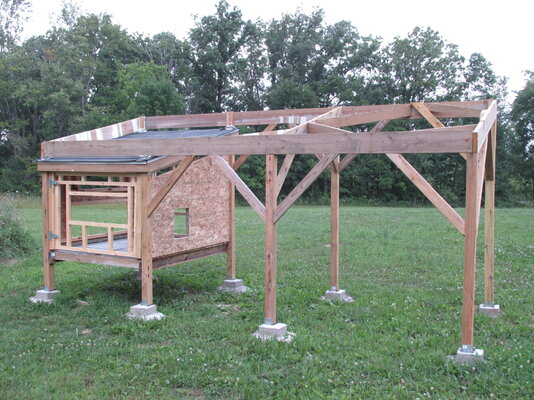
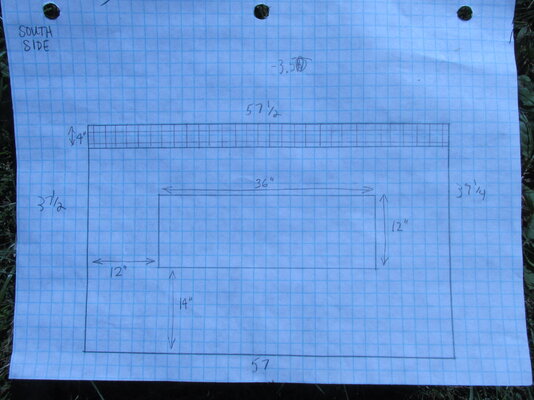
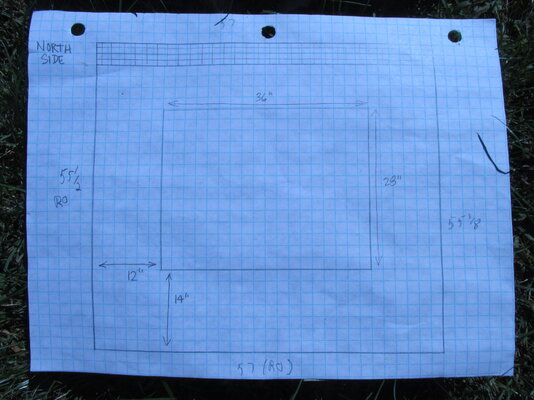
Here are a few pictures of our coop so far. The coop is 6x5 and the entire structure is 6x16.
Front of the Coop

The top of the coop itself has a shingled roof. The extra structure above the coop roof extends across the entire coop and run, and that structure is there to support the solar panels my husband plans to install someday. (The solar panels are not for powering the coop, but he thought as long as he's building a structure in the yard he might as well use it to hold the solar panels.) The run will therefore be shaded by the solar panels.
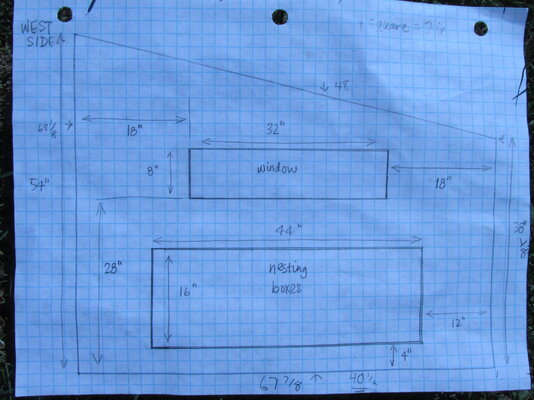
On the right side the top hole is a window and the bottom hole is for the nesting boxes.
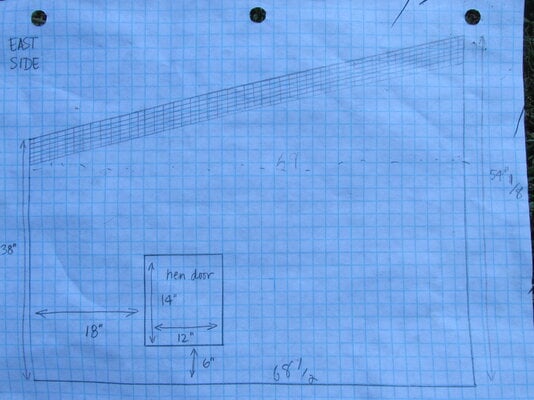
The front door is only framed, but you can see where a large window will be. After reading articles about ventilation, I urged my husband to create that large window. The back door of the coop, although shorter to provide roof slope, also has a window.
Speaking of ventilation, at the top of the coop there will be a few inches of permanent ventilation around the entire perimeter. Here is a photo.
Permanent Ventilation
It might be hard to see, but there is a space at the top of the wall and there is also a soffit. One of the walls (the one that will be subjected to wind and rain) has only a soffit, but the other three walls have both.
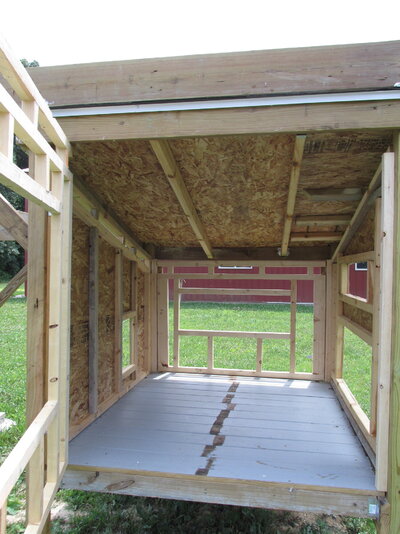
Inside the Coop
The above picture is the inside of the coop, with the hole for the nesting boxes on the lower left and the pop hole on the right. Much of the wood came from an old playset my husband dismantled, and that's why the floor has some paint on it. This floor will have a sheet of remnant vinyl over it. Both the front and back of the coop (the parts that are only framed so far) are on hinges, so we can open them for cleaning and whatnot.
That's all we have to share so far. Here's one more picture, from another angle.
We have made progress! Here is a more recent picture. The run is still not enclosed, but the coop is nearly finished. Actually, we got our chicks and they have been enjoying the coop for about three weeks now! We are enjoying them so much.
You can see the areas of permanent ventilation near the top. The pop hole (covered with hardware cloth for now) is on this side, and each of the other sides has a window.

Here is a view from the top.
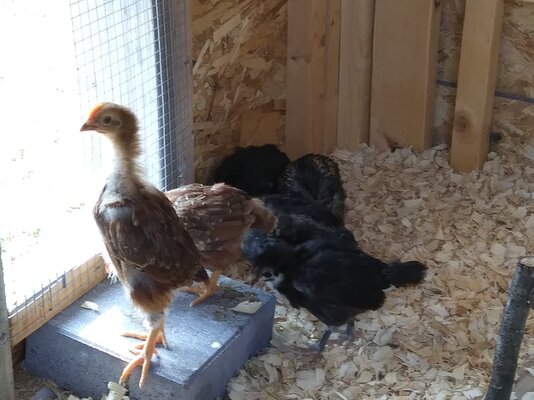
Here are the chicks inside the coop. Thank you to everyone on BYC who inspired and encouraged us to use the coop as our brooder! It is working out great! At first I was nervous and thought it was not convenient to keep going outside to check on them all the time. After their first night or so, I saw they had everything they needed and they were happy. Then I was able to relax and the coop really is just the best place for them. They are getting used to all the sounds and smells surrounding their new home. They can see out the pop door, so they are also getting used to whatever sights are visible from that vantage point.
There is a vinyl remnant under the pine shavings. For now, we have cardboard over the entrances to the nesting boxes (on the right).
They are so little in that picture! Now they are four weeks old and look huge compared to this! They also want OUT!
Here are some pictures of the run. We started by covering the ground with a layer of loose dirt from the yard. It's a low-ish spot with clay-ish soil, so the dirt will make the ground in the run a little higher than the surrounding area and hopefully drain. Then we picked up some free wood chips from the utility company and that's what you see in the pictures.
We have enclosed the perimeter of the run with hardware cloth. The top will be enclosed sometime too. Meanwhile, we aren't concerned about hawks because the spaces between the boards over the run are so narrow. Where the sides of the run meet the ground, we extended the hardware cloth across the ground for a good two feet, to keep out digging predators. Then we covered the hardware cloth lying on the ground with dirt. Here is a picture of one section before and after we added the dirt.
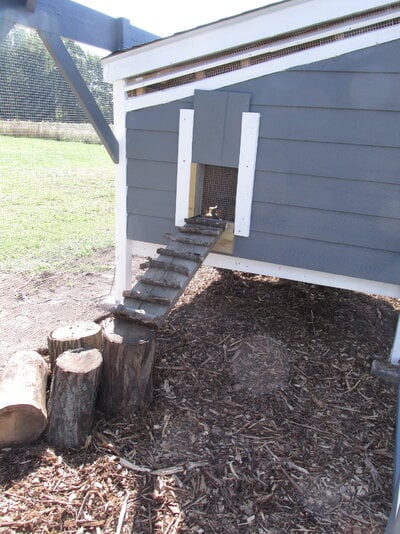
Here is a picture of the ramp. We used wood stumps of various heights at the base of the ramp.
Tomorrow we will remove the hardware cloth covering the pop hole so they can enter the run for the first time!
Our coop is based on many others we have seen here on BYC, including the Wichita Cabin Coop, Boisemarker, Clamser Coop, The Palace, and more. Thank you to everyone who has posted coop articles. You have been very helpful!
We are planning on getting 6 pullets to start. Once they quit laying, they will still be living here and we will add more chicks to our flock. We're thinking about having a max of 10. (Although yes I have read about and therefore am aware of chicken math!)
Here are a few pictures of our coop so far. The coop is 6x5 and the entire structure is 6x16.
Front of the Coop
The top of the coop itself has a shingled roof. The extra structure above the coop roof extends across the entire coop and run, and that structure is there to support the solar panels my husband plans to install someday. (The solar panels are not for powering the coop, but he thought as long as he's building a structure in the yard he might as well use it to hold the solar panels.) The run will therefore be shaded by the solar panels.
On the right side the top hole is a window and the bottom hole is for the nesting boxes.
The front door is only framed, but you can see where a large window will be. After reading articles about ventilation, I urged my husband to create that large window. The back door of the coop, although shorter to provide roof slope, also has a window.
Speaking of ventilation, at the top of the coop there will be a few inches of permanent ventilation around the entire perimeter. Here is a photo.
Permanent Ventilation
It might be hard to see, but there is a space at the top of the wall and there is also a soffit. One of the walls (the one that will be subjected to wind and rain) has only a soffit, but the other three walls have both.
Inside the Coop
The above picture is the inside of the coop, with the hole for the nesting boxes on the lower left and the pop hole on the right. Much of the wood came from an old playset my husband dismantled, and that's why the floor has some paint on it. This floor will have a sheet of remnant vinyl over it. Both the front and back of the coop (the parts that are only framed so far) are on hinges, so we can open them for cleaning and whatnot.
That's all we have to share so far. Here's one more picture, from another angle.
We have made progress! Here is a more recent picture. The run is still not enclosed, but the coop is nearly finished. Actually, we got our chicks and they have been enjoying the coop for about three weeks now! We are enjoying them so much.
You can see the areas of permanent ventilation near the top. The pop hole (covered with hardware cloth for now) is on this side, and each of the other sides has a window.
Here is a view from the top.
Here are the chicks inside the coop. Thank you to everyone on BYC who inspired and encouraged us to use the coop as our brooder! It is working out great! At first I was nervous and thought it was not convenient to keep going outside to check on them all the time. After their first night or so, I saw they had everything they needed and they were happy. Then I was able to relax and the coop really is just the best place for them. They are getting used to all the sounds and smells surrounding their new home. They can see out the pop door, so they are also getting used to whatever sights are visible from that vantage point.
There is a vinyl remnant under the pine shavings. For now, we have cardboard over the entrances to the nesting boxes (on the right).
They are so little in that picture! Now they are four weeks old and look huge compared to this! They also want OUT!
Here are some pictures of the run. We started by covering the ground with a layer of loose dirt from the yard. It's a low-ish spot with clay-ish soil, so the dirt will make the ground in the run a little higher than the surrounding area and hopefully drain. Then we picked up some free wood chips from the utility company and that's what you see in the pictures.
We have enclosed the perimeter of the run with hardware cloth. The top will be enclosed sometime too. Meanwhile, we aren't concerned about hawks because the spaces between the boards over the run are so narrow. Where the sides of the run meet the ground, we extended the hardware cloth across the ground for a good two feet, to keep out digging predators. Then we covered the hardware cloth lying on the ground with dirt. Here is a picture of one section before and after we added the dirt.
Here is a picture of the ramp. We used wood stumps of various heights at the base of the ramp.
Tomorrow we will remove the hardware cloth covering the pop hole so they can enter the run for the first time!