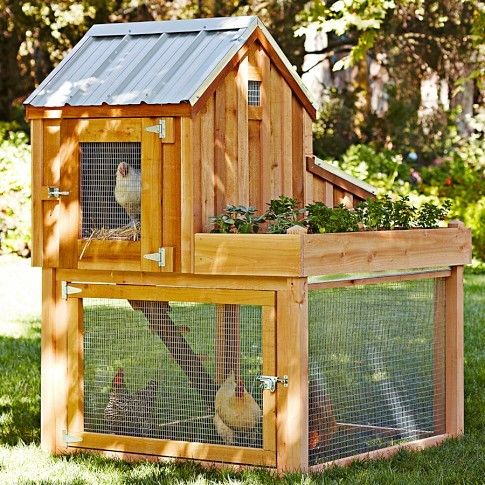
Looking for plans similar to....

i think i can explain it to you, where do i start?

ask yourselves these questions:
how many chickens?
whats my budget?
what materials do i already have?
how cold is your winter, will it need electric for lights?

and as far as lack of skills, do you have a saw and screw gun you can use? can you read a tape measure? i can walk you through this, just need to know where to start.

its not as intimidating as it sounds.
 
Last edited:
this will take a couple of days of back and forth, I will have to draw a couple pictures on paint for you. but if your confident, I can get you though it.

do you have any sawmills in your area? if so call and ask if they offer outs or culls (this is knotty lumber that they cannot use in cabinet construction or for trim/fooring ect.). I don't know what kinds of wood grow commonly in Idaho, but if they don't have outs I ask for poplar. do not get sawmill pine as its sap will run out. pretty much anything else is ok. also cedar is toxic to chickens so don't use it. see if the mill will sell you a partial bundle.

here in ohio building materials are high, it is cheaper (and stronger) to use the sawmill lumber than plywood.

your coop will not look exactly like what your picture, but close. a slanted roof is cheaper and easier to build, but I can walk you through the pitched roof if you would rather that. the price difference will be approx. $60 at Ohio's prices. and about 4-5 more hours to construct.

are you planning on metal roofing or shingles?
do you want wood siding running up and down like in the picture?
 
if you painted what you assembled so far, and looked at it straight on from the side, it should look something like the top picture.

cut 2 pieces of 2x4 45 inches long and 2 pieces 47 inches long. as we are looking at the coop, the 45 inch ones would be on the sides. the 47 inch ones would be on the front and back as marked. keep checking yourself for square as you go.
 
now for the nest box lid.
cut a piece of leftover siding 39 iinches wide, and 16 inches long (keeps lines running in same direction) cut a 39 inch long 2x2 and two pieces 13 1/2 inches attach as shown. leave a space at the back so the 2x2 does not hit the siding when lid is closed.

with at least 3 hinges use bolts and bold this through your siding and through the lid. use 2 latches to hold it shut.

from here you would use a 6 foot 1x12 with scrap pieces across for the ramp to enter. you could also use furring strips across for a more finished look. nail this to the floor of the coop and make sure no nail sticks up.

wrap your run in wire, securing it well. (I use pneumatic stapler, regular staples will work too, but harder to drive)
trim as desired, paint or stain. plant your flowers and add chickens.

this coop should hold 6 large chickens comfortably. 8 silkies would probably fit well.
 
at this point im going to stop, for input and questions. if your confused someone else may be too, so don't hesitate to ask.

if you don't have any questions or input, at least let me know your still following this.
 
Last edited:
I just wanted to say to loveourbirds, that was just fantastic of you to post all those instructions like that! You are obviously very gifted with the ability to build and teach! I am going to try to figure out how to save these plans, as I would like my husband to build this coop for me someday. It's adorable! Thank you so much for taking so much of your own time to share with others!
 
the overall measurement is 4x8 of the coop/run. since you are not going to add the flower bed, I would put a 2x4 in the middle of the run area to form a peak and cover it all with wire.

if you are using the 4x8 dimensions, you would put it 2 foot from the front as viewed here. if you decided to go with an 8x8 run, you would just run it against the side of the coop or house part, and extend the middle 2x8 or 4x4 up to match it. I would make it at least 1 foot higher than the low side.

im not familiar with winer in Alaska, but I think if you just covered the run area in plastic in the cold seasons you should be just fine. the angle will make it shed show better too. a perch high up in the peak of a plastic covered run will also help to warm birds.

edited to add: the original picture appears to be a 4x6 coop. I made it 4x8 for extra room for the original poster's silkies. this addition shouldn't cost more than $10, and in my experience the more room the better.
Thank you! Now to get construction under way!
 

New posts New threads Active threads

Back
Top Bottom