ddoss
In the Brooder
Hey, all you cool cats and chickens,
I wanted to post the progress of my coop build. It's been tons harder than I imagined it would be, but I wanted to give hope and inspiration to anyone thinking they can't do it. I have very little experience with woodworking and while I've been close to tears several times, my coop is finally taking shape. I'm calling this the "mini" coop-er build because I've made three runs with my mini loaded to the gills and both metal and 2x4's loaded out the window. Luckily, I've been able to borrow a truck to get bulk plywood, etc.
I'll start by saying this forum has been a great resource and I truly appreciate the help of those who have given me advice to date - especially @DobieLover. Here are a few of the youtube channels I subscribe to and have watched many, many late nights:
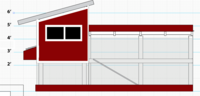
I looked at tons of coop ideas/plans and settled on the suburban coop by SSL Family Dad. It seemed doable to me and I decided to adjust it some to my needs. If you look at my photos I'm attaching a rough sketch I made up. It's basically the suburban coop, but wider and I've switched the direction of the roof pitches to accommodate my location better. I did have a grand plan to buy lumber where I could maximize the cuts, but once I got into the actual build I found myself with measurements less than perfect, so cutting one 2x4x8 in half for the 48" didn't work.


Before I could start I had to fix a fence that had a really bad lean to it. That required some new posts in concrete, but now it's solid and kinda straight")


The hardest part physically so far was digging holes for posts and pouring the concrete. I was out of commission about a week after spending two days with the post hole digger. After multiple trips to the chiropractor, I went back out and had lots of frustration trying to figure out how to put the anchor bolts in the correct placement. I ended up taking 1x4's and making a 6'x12' "template" I drilled holes in the template where I thought the anchor bolts should go. I used the 4x4 adjustable post base on the template. After I got concrete poured in the sonotubes I rushed to put the template over the top of all the tubes and used spray paint to mark the area I had drilled out. When I removed the template I had spray paint on the concrete where the anchor bolts should go. I got them installed and then took a week to rest.
When I came back to the finished anchor bolts I spent almost half a day messing with the adjustable bases trying to make them line up and be square. I was honestly killing myself not asking my wife for help, but I wasn't sure exactly what I was doing so I just wanted to go it alone. The moral of the story is my template didn't work out so great, and I should have paid more for the adjustable bases that had slots to move in two directions. I was able to get the 4 posts for the coop to be square and set them up and tacked them in place with 2x4's and stakes. From there I was able to start the base of the coop and it held together without supports.


Instead of building the base by putting 2x4's on the outside of the 4x4 posts, I did them inside and toenailed them in. This was not easy for me at all. None of the toenailing has worked great. I bust through one side often or end up driving a nail or screw smack dab in the middle and with no protrusions. I took the advice of another member and for any place that was structural and could have some shear to it, I used 4" nails. Everywhere else I've used 3.5" and 2.5" deck screws.


Next, I started building out the walls one at a time as I decided exactly what I wanted each side of the coop to accomplish. One thing bad about looking at multiple plans is that I often got confused about the part I was actually building. The nesting boxes I made have a 12"x12" inside, but the outside is way overbuilt and if I ever made another one I would definitely do it differently.
The rafters and cutting the birdsmouth was the most technically challenging aspect so far. I got a little scared working with the circular saw cutting off the 4x4 posts while on a ladder and after cutting all four realized I cut it shorter on one side than I had meant to. So the 2:12 pitch roof that I was trying to execute was now more like 2.5:12 pitch. I finally watched a video (one I posted above) showing how to use a speed square I learned my roof was 12 degrees. My 4x6 roof has 6 rafters, including the two for the overhang and it seriously took me five hours to get them figured out. Every time I got outside the task I set out to do takes me at least double what I had planned.


Finally, I took a vacation day from work this week and spent over 12 hours on the build, only sitting down once to eat a sandwich. I got the walls sheeted (still have parts around the nest box to finish) and a metal roof installed. My wife got some paint started on it and I stained the interior with a waterproof sealer.

My little chicks are set to hatch June 1, so I've still got several weeks to finish the coop before they are ready to go outside. The bad news is the weather shows rain every day in the forecast! I still have the doors/windows/trim for the coop and then the run to build. After that, I need to put the preditor apron on and finish up some dirt work. The place I picked I thought was fairly level, but after I fixed the fence lean I ended up removing some dirt and now my entire area is a muddy mess.
I'll post another update in a few weeks, hopefully, finished. For anyone struggling with their build like I have been, just keep with it. You can do it, too!
I wanted to post the progress of my coop build. It's been tons harder than I imagined it would be, but I wanted to give hope and inspiration to anyone thinking they can't do it. I have very little experience with woodworking and while I've been close to tears several times, my coop is finally taking shape. I'm calling this the "mini" coop-er build because I've made three runs with my mini loaded to the gills and both metal and 2x4's loaded out the window. Luckily, I've been able to borrow a truck to get bulk plywood, etc.
I'll start by saying this forum has been a great resource and I truly appreciate the help of those who have given me advice to date - especially @DobieLover. Here are a few of the youtube channels I subscribe to and have watched many, many late nights:
- SSL Family Dad Suburban Chicken Coop -
- Life on Beagle Road (fun to watch) -
- Lazy Lab Acres -
- Homestead Economics -
- Joe Simple (measure and cut rafters) -
- Carolina Coops -
- April Wilkerson -
- Becky's Homestead -
- Setting Posts -
- E Flemming -
I looked at tons of coop ideas/plans and settled on the suburban coop by SSL Family Dad. It seemed doable to me and I decided to adjust it some to my needs. If you look at my photos I'm attaching a rough sketch I made up. It's basically the suburban coop, but wider and I've switched the direction of the roof pitches to accommodate my location better. I did have a grand plan to buy lumber where I could maximize the cuts, but once I got into the actual build I found myself with measurements less than perfect, so cutting one 2x4x8 in half for the 48" didn't work.
Before I could start I had to fix a fence that had a really bad lean to it. That required some new posts in concrete, but now it's solid and kinda straight
The hardest part physically so far was digging holes for posts and pouring the concrete. I was out of commission about a week after spending two days with the post hole digger. After multiple trips to the chiropractor, I went back out and had lots of frustration trying to figure out how to put the anchor bolts in the correct placement. I ended up taking 1x4's and making a 6'x12' "template" I drilled holes in the template where I thought the anchor bolts should go. I used the 4x4 adjustable post base on the template. After I got concrete poured in the sonotubes I rushed to put the template over the top of all the tubes and used spray paint to mark the area I had drilled out. When I removed the template I had spray paint on the concrete where the anchor bolts should go. I got them installed and then took a week to rest.
When I came back to the finished anchor bolts I spent almost half a day messing with the adjustable bases trying to make them line up and be square. I was honestly killing myself not asking my wife for help, but I wasn't sure exactly what I was doing so I just wanted to go it alone. The moral of the story is my template didn't work out so great, and I should have paid more for the adjustable bases that had slots to move in two directions. I was able to get the 4 posts for the coop to be square and set them up and tacked them in place with 2x4's and stakes. From there I was able to start the base of the coop and it held together without supports.
Instead of building the base by putting 2x4's on the outside of the 4x4 posts, I did them inside and toenailed them in. This was not easy for me at all. None of the toenailing has worked great. I bust through one side often or end up driving a nail or screw smack dab in the middle and with no protrusions. I took the advice of another member and for any place that was structural and could have some shear to it, I used 4" nails. Everywhere else I've used 3.5" and 2.5" deck screws.
Next, I started building out the walls one at a time as I decided exactly what I wanted each side of the coop to accomplish. One thing bad about looking at multiple plans is that I often got confused about the part I was actually building. The nesting boxes I made have a 12"x12" inside, but the outside is way overbuilt and if I ever made another one I would definitely do it differently.
The rafters and cutting the birdsmouth was the most technically challenging aspect so far. I got a little scared working with the circular saw cutting off the 4x4 posts while on a ladder and after cutting all four realized I cut it shorter on one side than I had meant to. So the 2:12 pitch roof that I was trying to execute was now more like 2.5:12 pitch. I finally watched a video (one I posted above) showing how to use a speed square I learned my roof was 12 degrees. My 4x6 roof has 6 rafters, including the two for the overhang and it seriously took me five hours to get them figured out. Every time I got outside the task I set out to do takes me at least double what I had planned.
Finally, I took a vacation day from work this week and spent over 12 hours on the build, only sitting down once to eat a sandwich. I got the walls sheeted (still have parts around the nest box to finish) and a metal roof installed. My wife got some paint started on it and I stained the interior with a waterproof sealer.
My little chicks are set to hatch June 1, so I've still got several weeks to finish the coop before they are ready to go outside. The bad news is the weather shows rain every day in the forecast! I still have the doors/windows/trim for the coop and then the run to build. After that, I need to put the preditor apron on and finish up some dirt work. The place I picked I thought was fairly level, but after I fixed the fence lean I ended up removing some dirt and now my entire area is a muddy mess.
I'll post another update in a few weeks, hopefully, finished. For anyone struggling with their build like I have been, just keep with it. You can do it, too!


 Great looking build so far, remember to have plenty of ventilation in the coop!


