I live in Florida and bought chickens for my daughters, ages 7 & 10. We brooded the chicks in a 55 gallon fish tank in the house. While growing (quickly, I might add), I embarked on a design for our new flock. In observing our young chickens, I noticed several things: Chickens are messy and will foul their own water source and foul their own food source.
Since we live in Florida, heat is more of a concern than cold. There are days that will get into freezing temperatures, but rarely will the temps dip into the teens. In learning about chickens, I found that they are very cold hardy. Therefore, our design is focused more on ventilation rather than cold protection measures.
In planning of the design, I had many requirements:
1) Low Maintenance
2) Water source that is sanitary
3) Water source with 1 week supply, minimum
4) Feeding system with 1 week supply minimum
5) Roost space for 8-10 birds
6) Solid north face wall to protect against the few days that may have freezing temps
7) Method to control odors
8) Deep litter method is out due to the composting effect and we live in Florida - too much heat generation. Did I mention smells - YUCK!
9) Water Proof
11) Critter/predator proof
12) Egg access with low maintenance nest materials
13) Low cost - I do live in a budget
After thinking through these various requirements, I began to formulate our plan...
1) Watering Nipples. These have been a Godsend to us. If you have never seen them in action, please do a search on BYC. I found them because of someone on here. Best investment I have made in this design. We made our own watering system using a 5 gallon bucket as the resevoir then piped thru 3/4" PVC into the pen with 4 nipples on downspouts. None of the joints are glued and can be taken apart for cleaning. I added 5 pennies to the resevoir (copper reduced algae growth) and add a few drops of vinegar to the water with each new 5 gallon pail.
2) Feeding system. There was a lot of thought that went into this. I wanted something that the birds could not roost upon and therefore poop into; something that was adjustable to keep them from scratching feed out of the container to prevent waste; something that could hold minimum 25# of food at a time. We settled on a home made feeder out of a 5 gallon bucket with holes drilled and a planter bottom bolted to the bottom of the bucket (see pics below). The bucket is suspended on a pulley to adjust the height of the feeder. On the rope, there is a trash can lid threaded that is suspended at the top of the bucket. The trash can lid 100% prevents birds from perching on the feeder bucket.
3) Flooring material. I spent a lot of time researching the flooring materials. I have 3 requirements: Odor control, low maintenace poop control, no muddy runs aloud. I considered an enclosed coop with attached run. Enclosed coop did would be too hot and lack enough ventilation. It was decided on an open air pen with partial covering for rain protection. Flooring could be just dirt. Then I began thinking about the common afternoon deluge rain storms we have in Florida. Wetness breeds odors and bacteria. After researching (again a big thanks to BYC), we decided to make a flooring that is designed after a french drain: start with a layer of hardware cloth to prevent an underground predator digging attack, then a layer of 1/4" screened rock from a local quarry, topped with landscape cloth to allow moisture to drain through it, topped with a deep layer of sand. The landscape cloth keeps the sand from filling the voids in the rock. The voids in the rock allow the moisute to drain QUICKLY from the surface. The dry sand will pull moisture out of the poop therefore GREATLY reducing the ammonia smells associated with a typical coop. The sand floor provides an endless supply of grit. The sand floor, due to its moisture wicking capabilities makes poop clean up a SNAP. Think kitty litter scoop (this is exactly what I use, a small shovel designed to scoop poo out then shake to allow the sand to fall back through the screen in the shovel).
4) Roofing material: Metal roofing gets BLAZING hot in the summers when the sun bakes on the bare metal. We opted for U.V. protected polycarbonate roofing panels, similar to what is used on greenhouses. This allows for some see through to allow more light in winter for better egg production. The heat transfer is GREATLY reduced and the smoke color provides excellent shade for the flock in the middle of the day with the benefit of a reduction in temperature.
5) Egg collection: To keep costs down and maintenace to a minimum, I use plastic crates designed to hold a case of soda (you can see them in one of the pics below outside the pen). The crate is lined with an astro turf type door mate cut to size for bedding (an example can be found here: http://www.meyerhatchery.com/get_item_np_laying-nest-pad.htm). The astro turf is made of plastic and can be sprayed under pressure with a hose to clean it, shaken dry and re-used. Titleist Pro-V1's are used to encourage only the finest eggs! LOL
I built this in March 2010. I am providing this write up to help others that may be in the planning stage of 'what do I build?" I have no construction experience. Heck, I had to borrow the tools (including the screw gun) to build this. I am by NO MEANS an expert, just a novice who listened to others, took what I felt the best of the best ideas and implemented based upon my own opinions after researching. If you are in the planning stages, I encourage you to enjoy the process of keeping your flock. For me, a low maintence system makes it a FUN ownership and will allow me to stay involved not letting it feel like WORK.
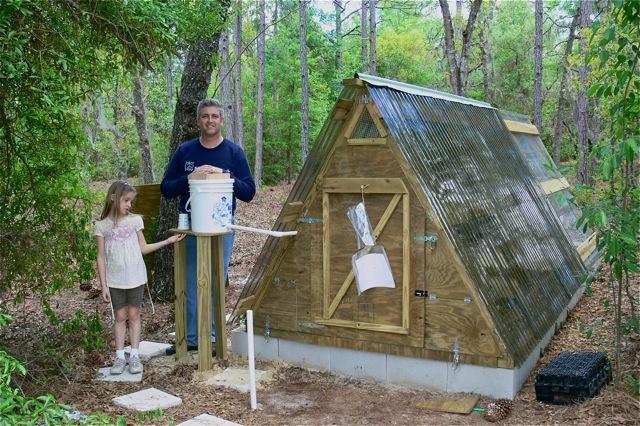
Water resevoir and north face of pen. Crate used for nest boxes laying off to the side (black things in pic)

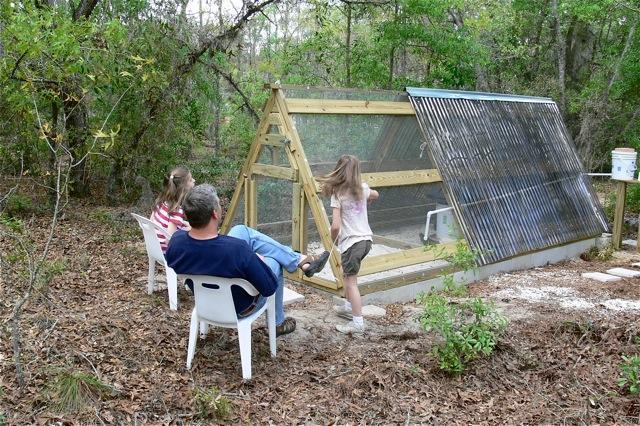
A view of the predominant open air design for MAXIMUM ventilation

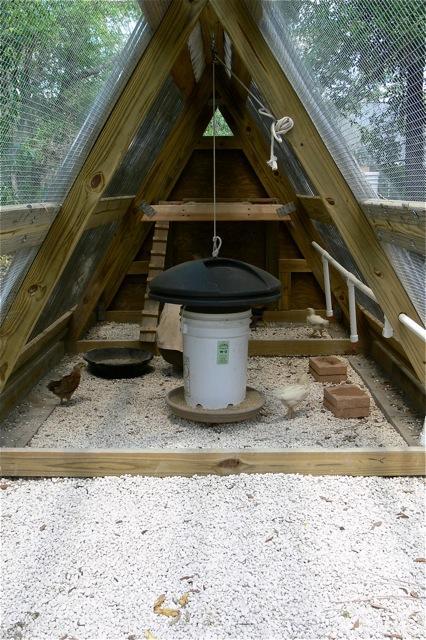
The rock flooring before landscape cloth and sand. Also shown is the pipe for the water nipples, the feeder and roost in the back ground

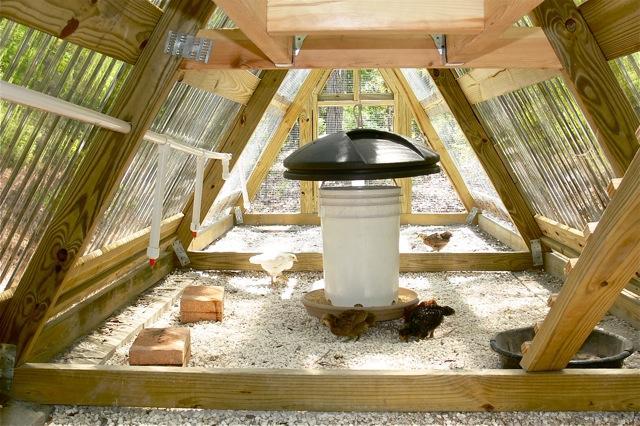
This is a view from the roost bars. Again, the trash can lid prevents birds from roosting on the feeing station.

Since we live in Florida, heat is more of a concern than cold. There are days that will get into freezing temperatures, but rarely will the temps dip into the teens. In learning about chickens, I found that they are very cold hardy. Therefore, our design is focused more on ventilation rather than cold protection measures.
In planning of the design, I had many requirements:
1) Low Maintenance
2) Water source that is sanitary
3) Water source with 1 week supply, minimum
4) Feeding system with 1 week supply minimum
5) Roost space for 8-10 birds
6) Solid north face wall to protect against the few days that may have freezing temps
7) Method to control odors
8) Deep litter method is out due to the composting effect and we live in Florida - too much heat generation. Did I mention smells - YUCK!
9) Water Proof
11) Critter/predator proof
12) Egg access with low maintenance nest materials
13) Low cost - I do live in a budget
After thinking through these various requirements, I began to formulate our plan...
1) Watering Nipples. These have been a Godsend to us. If you have never seen them in action, please do a search on BYC. I found them because of someone on here. Best investment I have made in this design. We made our own watering system using a 5 gallon bucket as the resevoir then piped thru 3/4" PVC into the pen with 4 nipples on downspouts. None of the joints are glued and can be taken apart for cleaning. I added 5 pennies to the resevoir (copper reduced algae growth) and add a few drops of vinegar to the water with each new 5 gallon pail.
2) Feeding system. There was a lot of thought that went into this. I wanted something that the birds could not roost upon and therefore poop into; something that was adjustable to keep them from scratching feed out of the container to prevent waste; something that could hold minimum 25# of food at a time. We settled on a home made feeder out of a 5 gallon bucket with holes drilled and a planter bottom bolted to the bottom of the bucket (see pics below). The bucket is suspended on a pulley to adjust the height of the feeder. On the rope, there is a trash can lid threaded that is suspended at the top of the bucket. The trash can lid 100% prevents birds from perching on the feeder bucket.
3) Flooring material. I spent a lot of time researching the flooring materials. I have 3 requirements: Odor control, low maintenace poop control, no muddy runs aloud. I considered an enclosed coop with attached run. Enclosed coop did would be too hot and lack enough ventilation. It was decided on an open air pen with partial covering for rain protection. Flooring could be just dirt. Then I began thinking about the common afternoon deluge rain storms we have in Florida. Wetness breeds odors and bacteria. After researching (again a big thanks to BYC), we decided to make a flooring that is designed after a french drain: start with a layer of hardware cloth to prevent an underground predator digging attack, then a layer of 1/4" screened rock from a local quarry, topped with landscape cloth to allow moisture to drain through it, topped with a deep layer of sand. The landscape cloth keeps the sand from filling the voids in the rock. The voids in the rock allow the moisute to drain QUICKLY from the surface. The dry sand will pull moisture out of the poop therefore GREATLY reducing the ammonia smells associated with a typical coop. The sand floor provides an endless supply of grit. The sand floor, due to its moisture wicking capabilities makes poop clean up a SNAP. Think kitty litter scoop (this is exactly what I use, a small shovel designed to scoop poo out then shake to allow the sand to fall back through the screen in the shovel).
4) Roofing material: Metal roofing gets BLAZING hot in the summers when the sun bakes on the bare metal. We opted for U.V. protected polycarbonate roofing panels, similar to what is used on greenhouses. This allows for some see through to allow more light in winter for better egg production. The heat transfer is GREATLY reduced and the smoke color provides excellent shade for the flock in the middle of the day with the benefit of a reduction in temperature.
5) Egg collection: To keep costs down and maintenace to a minimum, I use plastic crates designed to hold a case of soda (you can see them in one of the pics below outside the pen). The crate is lined with an astro turf type door mate cut to size for bedding (an example can be found here: http://www.meyerhatchery.com/get_item_np_laying-nest-pad.htm). The astro turf is made of plastic and can be sprayed under pressure with a hose to clean it, shaken dry and re-used. Titleist Pro-V1's are used to encourage only the finest eggs! LOL
I built this in March 2010. I am providing this write up to help others that may be in the planning stage of 'what do I build?" I have no construction experience. Heck, I had to borrow the tools (including the screw gun) to build this. I am by NO MEANS an expert, just a novice who listened to others, took what I felt the best of the best ideas and implemented based upon my own opinions after researching. If you are in the planning stages, I encourage you to enjoy the process of keeping your flock. For me, a low maintence system makes it a FUN ownership and will allow me to stay involved not letting it feel like WORK.
Water resevoir and north face of pen. Crate used for nest boxes laying off to the side (black things in pic)

A view of the predominant open air design for MAXIMUM ventilation

The rock flooring before landscape cloth and sand. Also shown is the pipe for the water nipples, the feeder and roost in the back ground

This is a view from the roost bars. Again, the trash can lid prevents birds from roosting on the feeing station.

Last edited:


